A Year of Home Baking

Diposting oleh good reading on Jumat, 28 Desember 2007

One year has already past since I first started this blog.

This was my intention when I first started this blog:
I hope I am able to get ideas and suggestions from fellow home bakers to improve my baking skills. At the same time I hope my creations and little experiments would also inspire others, who are like me, to start baking as a hobby.

Blogging is all about sharing. It is a wonderful platform for people who have got common interests to learn from one and other; to share and exchange ideas and experiences. So, I will like to thank everyone of you who have stopped by, and taken time to read and comment, and not forgetting all those who have linked me up. Thank you for sharing your experiences, and for walking alongside with me on my baking journey. I greatly appreciate your encouraging words, the exchange of ideas and information which has really helped me tremendously in improving my baking skills.

Indeed it was a whole year of home baking, from muffins to cookies and from cakes to bread. Thanks to all the wonderful food bloggers out there, I have tried and attempted many recipes that I wouldn't imagine I would ever be capable to come up with if not for their generous sharing of recipes and experiences. I am always so overwhelmed and inspired by their creativity and talents.

It also didn't occur to me that baking and photography actually come hand in hand in this blogging world. I have not taken a single photo of food before I started my baking journey. So it's a bonus that I am now slowly acquiring the skill of taking food photos. On top of that, my cooking skill has definitely improved by an inch!


I should have baked a cake to mark this special occasion, but instead I made something I have all along been wanting to do ever since I made my first loaf of bread. Yes, it's a focaccia bread. I have waited so long to try this as it took me several months before I got some coarse sea salt, and it was only yesterday that I bought my first pack of fresh rosemary! You may be surprised that fresh western herbs are not as readily available here...only certain supermarket outlets carry them.


Although I have gathered several focaccia recipes over the past months, I still did a search on the internet last night, just to see whether I can find any other suitable recipes. It was with luck that I chanced upon this blog. I was totally taken over by the recipe...besides fresh rosemary it also has got garlic added to the dough! I was very sure that the bread will turn out very flavourful. Hence, I incorporated the recipe I have on hand with this one :)


As with all my first attempts, I didn't know what to expect when I was making this bread. After having kneaded the dough for close to 10mins, it seemed to be quite smooth and less sticky. However, the next minute, the dough started to stick to the work surface again! and it got more sticky the more I knead on it! I was quite sure something must be wrong somewhere, so I stopped, oiled my hands, and slowly gather the dough to form a ball and left it to proof. The dough looked very silky and shinny...very much like a roti prata dough?!

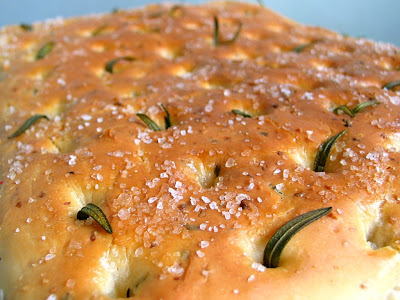
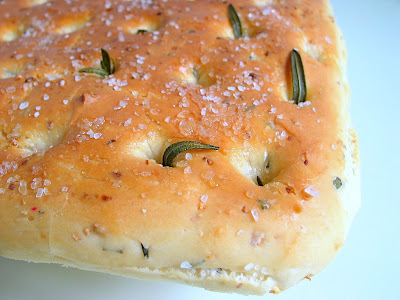
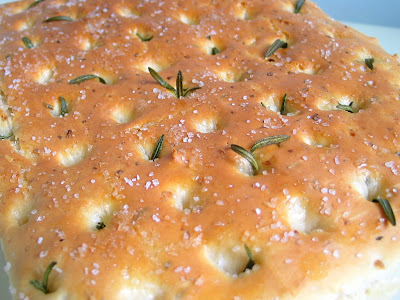
Fortunately, it doubled in size within an hour. It was not easy trying to press and smooth the sticky dough evenly onto the baking tray. I left it to rise for the second time, but after an hour, there was no clear sign of expansion, although it did looked a little puffy. As I was running out of time, I went ahead with the next step...which was the fun part...making small little holes with my fingers all over the surface, then fill the holes randomly with rosemary, and finally drizzle over the olive oil and a light sprinkling of coarse sea salt.

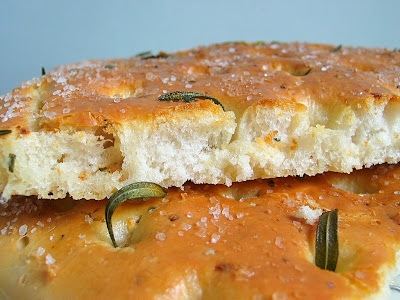
The scent from the rosemary and garlic while the bread was baking in the oven was incredible! When it was finally ready, I had a hard time trying to remove the bread from the tray, as it got all stuck onto the tray. It was a miracle that I didn't break the bread into pieces with my rough handling!

What can I say about the taste of this bread? I like how savoury it is, the taste is just fantastic! My better half has finally got the chance to eat this homemade focaccia bread...this is one of the couple of things that he has asked me to bake for him :)


Rosemary & Garlic Focaccia

Ingredients:

300g bread flour
1 teaspoon salt
1 teaspoon sugar
1 teaspoon instant or fast acting dried yeast
4 cloves of garlic, finely chopped
2 sprigs of fresh rosemary, leaves only, finely chopped
190~200ml water
1 tablespoon olive oil


for topping:
1 tablespoon olive oil, plus extra for drizzling
1 sprig of fresh rosemary
some coarse sea salt

Method:
  1. Mix flour, salt, sugar, yeast, chopped garlic, rosemary in a mixing bowl. Make a well in the centre and add in the oil, followed by the water. Do not add all the water, leave about 10~20ml and adjust accordingly. Mix to form a soft dough.
  2. On a lightly floured work surface, knead the dough for about 5 ~10mins, until it becomes smooth and silky. Flour both hands and make the dough into a round ball. Place dough in a lightly oiled bowl, cover with cling wrap and leave to rise for about 1hr until it double in bulk.
  3. Punch down the dough, and knead it lightly for about a minute. Press dough onto a baking tray (about 12 x 10 inches, greased). Fill in any gaps and push the dough into the corners, and patting out to make an even layer. Cover with a damp cloth and let rise until almost double in height, about 45mins to 1 hr.
  4. Flour or oil your fingers and press into the risen dough to make dimples, pushing you fingers deep into the dough. Press rosemary sprigs into the dimples and fill them with olive oil. Sprinkle with sea salt and bake in a preheated oven at 200 degC for 20 to 25mins or until golden brown.
  5. Remove bread from baking tray and drizzle with a little extra olive oil. Leave to cool on a wire rack.

More aboutA Year of Home Baking

Here Comes Santa Claus!

Diposting oleh good reading on Senin, 24 Desember 2007

Santa Claus finally came over to our house last night ;)

My two boys have been waiting for this day ever since the school holidays started. During the past weeks, they kept changing their minds about what to wish for from dear Santa. After much deliberations, both of them finally made their final decisions, and wrote their wishes to Santa, just last week!

In the past, they would constantly pester me with questions on how Santa can come into our house since we don't have a chimney! I always tell them my standard answer..."he will find some ways to get in, so don't worry!" It was only after reading a book about St Nicks, both of them agreed that the old man will shrink into the size of an ant, and crawl into our house by the key hole ;p Last nite, they were still talking about installing a few hidden video cameras, and setting up some infra red security systems at the various corners of the living room so as to catch Santa in action! Just before bedtime, they have wanted to prepare some cookies and a cup of hot coffee for Santa...but mummy was simply too tired to get it ready, and told them Santa would have his fair share of cookies and drinks from all his rounds.

We woke up early this morning. The first thing they did was to look around for presents left by Santa. They couldn't wait till boxing day to unwrap the presents, and I was being a little too kind to grant them their wishes (I had meant to try to stretch their patience a little longer!). Naturally, due to their 'short notice' they didn't get what they have wished for from Santa! My younger boy came to the conclusion that Santa must have made a mistake and placed the wrong gifts meant for other children, lolz! Anyway, they are still very happy with what he has offered ;)


I made this Santa Claus cake as dessert for our xmas eve dinner last nite. Don't ever think that I am creative enough to come up with this on my own!! I have copied the entire idea from this Japanese Meiji website here. It even came with a demo video to show you how to make and decorate the cake. I can't read a single Japanese word, but the video is really self explanatory.


I didn't follow the sponge cake recipe given in the website though. I used one which I copied from a Japanese to Chinese translated cookbook. This recipe is for an 18cm (7") cake, which is just the idea size for our family.


Making the sponge layer was relatively easy. I filled the middle with some non-dairy whipping cream and some strawberries slices. I also thought that frosting the exterior with cream was not too difficult this time. The only problem I faced was making the chocolate curls for the beard. In order to get very nice curls, first, the chocolate must be at the right temperature (room temperature)...soft enough for it to curl when you scrap it. Second, you got to use the right tool. I tried using a normal small spoon, it didn't curl up but broke into tiny bits instead...then I tried using a peeler...the curls was way too long! Then I realised the right tool should be a small ice cream scoop. Since I don't have one, I looked around my drawer to find something suitable. It was a plastic spoon (the 2.5ml end) which is use for dispensing medicine for my kids that did the trick!


The cake tasted very delicious...light and refreshing. The texture of the sponge layer was very soft and moist! I think it has got to do with brushing the sponger layer with sugar syrup. The cake was not dry at all even though I made it one day ahead. There is no doubt that this sponge cake recipe is going to be a keeper!


Ingredients:
(makes one 18cm sponge cake)

100g cake flour
3 eggs, room temperature
90g caster sugar
20g unsalted butter, melted
2 tablespoons fresh milk
1 teaspoon vanilla extract


Method:
  1. Sift cake flour, set aside. Line bottom and sides of an 18cm (7 inch) round pan with parchment paper, set aside. Pre-heat oven to 170degC. Position rack at the lower bottom of the oven.
  2. With an electric mixer, whisk eggs and sugar on HIGH speed for about 5 to 7 mins, until the batter double in volume and is ribbon-like (the batter should leave a ribbon-like texture when the beater is lifted up). Turn to LOW speed and whisk for another 1 to 2 mins. Whisking at low speed helps to stabilise the air bubbles in the batter.
  3. Add sifted cake flour into the batter. With a spatula, gently fold in the flour until well blended. Take care not to deflate the batter. (To ensure proper folding in of the flour, you can add the flour in three separate additions.)
  4. Add the melted butter, fold with spatula until well blended
  5. Add in fresh milk, vanilla extract and fold in gently with spatula.
  6. Pour the batter into the pan and bake for 30~35 mins, or until a skewer inserted in the centre comes out clean. Unmold and invert onto cooling rack, cool completely.
Recipe source: 点心达人, 轻松学 / 小川智美著
More aboutHere Comes Santa Claus!

Let it Snow!

Diposting oleh good reading on Minggu, 23 Desember 2007

Living almost right on the Equator means that we never get to see snow on Christmas. In fact I didn't get to experience snow until we went for our honeymoon. My first encounter with snow was at Mount Titlis, Switzerland. We were naturally very excited on the first sight of snow, and this funny idea came to my mind...I was quite sure the powdery texture of the snow could make very good ice kacang ;)

Even then, I didn't get to see snow fall until a few years later at Grand Canyon, and we made our first ever snowman at King's Canyon National Park on the Christmas eve in year 2000.


We weren't expecting snow at all when we prepared for this road trip. Hence, both of us didn't bring any gloves along. Fortunately, my elder boy, who was still a toddler then, was warmly dressed!


We didn't have any 'prior' knowledge of making a snowman, and so we made ours by gathering some snow around...very much like building sand castles at the beach!! It was much later that we learnt that we have to roll a small snowball all over the ground in order to form a giant snowball!


Even though we suffered great pain playing snow with our bare hands, we managed to come out with a snow sculpture that we proudly called 'snowman'!


Our second snowman was made at Mount Hamilton at San Jose on the first week of year 2004. My boy was holding this tiny snowman we made with the little 'leftover' snow by the roadside, just outside the Mount Hamilton Observatory. We were quite prepared for the trip...not only did we remember to bring our gloves, we also brought along a few baby carrots for the nose!

This is officially our 3rd 'snowman' ;)

We made snowman rice balls for lunch on this xmas eve. I borrowed the idea from this Japanese mother...the bento lunchboxes she made for her child are simply awesome!!!


I filled the rice balls with the kids favourite fillings...pork floss with mayonnaise. I cut out the eyes and mouth from small sheets of nori (seaweed). I used a knife to craft out the scarf on a slice of picnic ham (I was surprised that it was quite easily done), and a crab meat stick served as the hat. It is only while writing this post that I realised I have totally forgotten about the nose!!!


This one is for my younger boy as his snowman was slightly smaller in size. His snowman had got legs!!! The 'rosy cheeks' were made by dabbing some ketchup with a small spoon ;)

I thoroughly enjoyed the process of creating these bento sets. Most of all, we enjoyed the food...believe me or not, it tasted as good as it looked!
Here's wishing you a very Merry Christmas!!! May all of you enjoyed this festive seasons with your loved ones :D
More aboutLet it Snow!

RECIPE REVIEW: DECEMBER MISSION: GREENSPAN'S BLACK AND WHITE CHOCOLATE CAKE

Diposting oleh good reading

greenspan's black and white chocolate cake: let's say it had potential but came short in delivery. i had to decorate with tons of white and dark chocolate shavings to distract people from the ugly sides of the cake
the dark and white chocolate mousse components taste great on their own. the dark mousse is like chocolate pudding and the white chocolate mousse is truly a soft whipped cream. here you can see the cake layers have compressed the mousses and were sliding around so that the layers were no longer centered.

I am disappointed with this particular recipe from Greenspan's Baking: From My Home to Yours. Everything else I have made by Greenspan has been so spectacular and yummy. Her cookie recipes were foolproof and delicious.

Let's just say yesterday was one of my more challenging days as an amateur baker. With the white chocolate mousse component curdling on me 3 times, I thought that I was going to ditch the component and replace it with my favourite white chocolate mousseline buttercream recipe. However, I persevered and stuck with Greenspan's recipe just so I could give it an honest chance.

i was worried about the cake not turning out so I made the barefoot contessa's chocolate cupcakes with a buttercream frosting

In the end, I don't think my perseverence was rewarded well enough. The flavour was okay but the appearance of the cake was not that impressive. Because of the softness of the white chocolate cream, it was almost impossible to frost the cake properly. Greenspan's illustration of the cake clearly indicated gorgeous even layers of thin cake and dark and white chocolate mousse. In my rendition of the cake I followed the recipe to the letter and it certainly didn't have the "wow" factor that the cookbook's illustration had.

we couldn't find a "0" to follow the "4"

A problem I discovered upon serving the cake was that the weight of the layers compressed the mousses so that they squished out the side of the cake, making the layers of mousse thinner than desired. This I hadn't expected. I also had to keep the cake quite cold or it would melt. This meant that the cake layers were not as good texturally. The cake component was okay; nothing comparable in flavour or texture to the cakes I've made from the Cake Bible by Rose Levy Beranbaum. It was more dense than I would have liked, bordering on almost dry (but not quite).

here you can see the mousse layers. the white chocolate mousse layer in particular has been compressed by the weight and is too thin for my liking

The dark and white chocolate mousses tasted really good. However I felt the cake layers didn't complement them well. I would have liked a lighter crumb--kind of like more chiffon-like cake layers because of the need for refrigeration and the delicateness of the white chocolate cream.

When I served it to my friends, I had to apologize because I knew before we cut into it that it wasn't up to snuff. My usual cakes are moist and rely on Beranbaum's cake components. Her buttercreams are to die for and her cake recipes are foolproof and flavourful. She's my go to for cakes. My friends were polite and said it was good but N. was honest and said it wasn't as good as my previous cakes. She felt that the cake layers were almost too dry as well.

This is why from now on, I'll stick to my Beranbaum buttercreams. This way, when the cake layers come to room temperature (which is important for the best flavour and texture) the buttercream will still be looking good. I like the fact that I can rapidly create a flawless surface with buttercreams too.

The Verdict: I won't be making this cake again as it's not worth the amount of time and there's too much potential for failure. It's too finicky and the instructions for the white chocolate cream component were too general. I would have liked to know how long to whip the cream with the melted white chocolate. I would have liked to know what temperature exactly the white chocolate mixture should be before adding it in to the whipped cream. I shouldn't have had to research it online. As well, the results were so-so. It wasn't a total disaster but I had to work really long and hard to salvage this one.

The Lessons Learned:

Never add melted white chocolate to whipped cream to make a mousse without checking the exact temperature of the chocolate...no, no, touching it won't do--you need a thermometer!

Never add the dark chocolate cream component to a plain buttercream base in the hopes of recycling leftovers as it will curdle the whole batch of perfectly good buttercream. You can add leftover ganache to buttercream but you can't add a whipping cream-based mousse because of its higher water content.

Never try salvaging a curdled batch of chocolate mousse by melting it and refrigerating it because it's a waste of time and it'll curdle again anyway

Chocolate doesn't like whipping cream but it loves butter

Your friends will still love you even if you screw up a cake

More aboutRECIPE REVIEW: DECEMBER MISSION: GREENSPAN'S BLACK AND WHITE CHOCOLATE CAKE

CURDLED MOUSSE EMERGENCY!

Diposting oleh good reading on Sabtu, 22 Desember 2007

any ideas what to do with curdled white chocolate mousse?

I knew I shouldn't have mouthed off about how I didn't think there would be a problem with me making Dorie Greenspan's Black and White Chocolate Cake recipe.

Perhaps I was too cocky. I have never had a problem with mousse before. I've made it dozens of times over the years...but I've only ever made it the classical way with dark chocolate. I didn't think the White Chocolate Whipped Cream component would be a problem at all.

I completed the cake layers and the dark chocolate cream this morning and then proceeded to make the white chocolate whipped cream. It only has 2 ingredients for goodness' sake! How can you go wrong?

Well...it went wrong in so many ways. I was following the recipe to the letter and it said to add the room temperature melted white chocolate/cream mixture into the softly whipped cream mixture all at once and beat on high speed until it holds firm peaks. I did that. And whipped and whipped and it never did hold firm peaks. It looked runny. Then it looked really runny...and curdled. When I took the mixing bowl out, I had a huge coagulated fat globule bobbing in a pool of watery milk. I thought I had made white chocolate butter.

What to do-what to do?

I thought that perhaps I could save it by melting it all together and then letting it cool down to room temperature. I had some extra cold cream in the fridge and whipped that up and tried adding the remelted/cooled mixture to the newly whipped cream. It curdled again. It never went beyond a soft mushy stage.

My baking mojo was gone.

I had angered the pastry gods somehow.

I consulted texts and they didn't say anything much that would help me. I looked online and not much was said about how to rescue curdled mousse.

I knew I had to persevere and maintain the positive baking karma or I would be beat. So I called J. and consulted her. She said I should melt it and leave it in the fridge for a long time. I did. I melted it gently (it took mere seconds); took the bowl out after a long time in the fridge and stirred the mixture lightly with a spatula just to check it and lo and behold, it curdled! The butter fat had floated to the top and solidified in chunks despite my mixing it thoroughly before putting it in the fridge.

I'm left kind of scratching my head at this one.

I decided I would waste only one more batch of white chocolate before calling it quits. Right now it's sitting next to me in a bowl with a thermometer sticking out of it. It's 87.9degrees F, but I'm not doing nothin' until it reaches at least 85degrees F.

I can't not bring a birthday cake tomorrow. What to do? what to do? zoiks, I'm even writing double negatives now. This is a sorry state indeed.

Ooh. I have to go now as the white chocolate is nearing the temperature I need.

Keeping my fingers crossed. Stay tuned. I'll be back.

*********************

Okay, I'm back.

I was so scared of wasting all that beautiful white chocolate. As the whipping cream came to the soft peak stage, I took the bowl of white chocolate mixture which happened to be at 83.2degreesF exactly at the moment I approached the KitchenAid. I made a little Christmas Wish and dumped it into the mixing bowl. I closed my eyes as I cranked the KitchenAid to full power, just as Greenspan indicated in the recipe. I held my breath as the white chocolate mixture integrated into the softly whipped cream; the whisk leaving little spirals in its wake.

I turned the KitchenAid off. What if it curdles? The mixture was still quite soft. It wasn't holding firm peaks at all. I was so afraid of another curdle. I cranked it up high again. That's what the recipe says, "high"! and got worried when the mixture started to thicken a little bit; the whisk leaving a slight trail now. The last 3 times it was mere seconds after this stage that the mixture broke.

I couldn't stand it.

After another 3 starts and stops, I just called it quits and convinced myself that it was firm enough. I had read somewhere online in someone else's recipe that it'll firm up in the refrigerator (and not to worry about the runny appearance!) I'm still concerned that the white chocolate whipped cream component will not be stiff enough for spreading on the cake layers. I have to wait at least 2 hours for the white chocolate mixture to cool before assembling the cake now.


the white chocolate whipped cream never seemed to hold firm peaks...but remained quite soft

This cake better be worth it because I'm pretty peeved by all this effort right now when I can be kicking back in my armchair with a rerun of The Sound of Music playing on the t.v. in the background while I do such lazy Christmasy things like thumbing through my new copy of Sherry Yard's Desserts by the Yard (thanks for the bday present, J & M!)

More aboutCURDLED MOUSSE EMERGENCY!

CHRISTMAS COOKIE BOXES: LAST ROUND!

Diposting oleh good reading

a stack of christmas cookie boxes ready for giving

WHEW! with all this baking going on, i forgot to make christmas cards this year (oops!) so instead i made a little card with a list of the contents inside

I don't want to see another butter cookie in a while. I'm putting all my raw dough logs in the freezer for when I go back to work next month. I figure that I can "dispose" of the offending calorie-traps after the New Year by placing the cookies strategically in the staff room during breaks.

I am quite pleased with this year's Christmas Boxes and though it was a bit of work and I copped out on the Anise/Vanilla Cookie, I more than made up for it with my newly concocted Bah Humbug Black Sesame Sable. By tossing the raw cookie in vanilla sugar before baking, I added a further crunchy element to it and I am very happy with this cookie. It's going to be a year-round cookie for me now.

More aboutCHRISTMAS COOKIE BOXES: LAST ROUND!

Colour My World

Diposting oleh good reading on Jumat, 21 Desember 2007

This is a slice of a birthday cake I made for my younger son.

As compared to his elder brother, somehow, it seems to take a longer time for this boy to grow! Due to his small built, plus, his behaviour, he seems to be a baby forever! Since his birthday falls at the end of the year, he has waited almost a year for this day. He keeps telling me how he envy his friends whose birthdays are in the earlier part of the year...they don't have to wait very long for their birthdays to arrive ;)


I would really like to make a 'traditional' birthday cake for him...you know, those that comes with lots of fresh cream, beautiful piping and kiddy cartoon characters. Since I am not good with any of these, I have opted to do a simple cake, and decorate them with some fool-proof candies! Hopefully, with more practice, I can make a real birthday cake for them next year!


Instead of the usual sponge layer cake, I made the cake base by adapting a Low-Fat Chocolate Marble Cake recipe from Alice Medrich's Chocolate and the Art of Low-Fat Desserts. Feeling very adventurous, I added in some nutella and turned this into a Nutella Butter Cake.

Tip 1: The instructions from the recipe calls for using an electric mixer, but I used a wooden spoon and spatula instead. I learned that as long as you cut the butter into small cubes and leave it at room temperature until it is very soft, it is really easy to mix it with a wooden spoon. The batter was very simple to prepare...not very much different from making a muffin or a quickbread. Except for a slight crack on the top, the cake was baked beautifully.

Tip 2: I liked the way the sides was evenly browned...something that I have learned from the numerous baking session...ie, to just line the bottom of the cake pan with parchment paper, as for the sides, grease and flour it instead of lining it with parchment paper. This way, the sides will get to brown very nicely without the insulation from the parchment paper. When ready to unmold the cake, simply slide a thin-bladed knife all around the side to release the cake.


While the cake was cooling on the rack, I made the usual chocolate ganache I am familiar with, melt 100g of chocolate with 1 small tin of nestle's pouring cream. Since I didn't layer the cake, I only used up half of the chocolate frosting.

The birthday boy willingly helped me sprinkled on the mini M&Ms, 'hundreds and thousands' and Hershey's kissables.

I coated the sides with crusted oreo biscuits as I know every well that I won't be able to achieve a nice even frosting. The end results reminded me of a Oreo cheesecake I have seen in some cafe :)

When the cake was all ready, I realised that whatever that went into or on the cake were all my boy's favourite goodies!


I was lucky that the cake turned out rather soft and light...not very different from a sponge cake...in fact it tasted much better. I believe the cake would taste very moist if I had not kept in the fridge, uncovered. I will certainly make this cake again, without all the candies and frosting of course!


Nutella Butter Cake

Ingredients:

225g cake flour
1 teaspoon baking powder
1/2 teaspoon baking soda
1/2 salt
85g butter, soften at room temperature
3 tablespoons Nutella spread
150g sugar
2 eggs, lightly beaten
1 teaspoon vanilla essence
1 cup plain, non-fat yogurt


Method:

  1. Preheat oven at 180 degC. Line bottom of a 20cm (8") round pan with parchment paper. Grease and flour the sides of the pan, set aside.
  2. Sift together cake flour, baking powder, baking soda and salt. Set aside.
  3. Mix together yoghurt and vanilla essence.
  4. With an electric mixer, beat butter and nutella for 1 min. Gradually add in sugar and beat on high speed for about 3 mins. Scrape down the sides of the mixing bowl periodically.
  5. Dribble in the eggs slowly, about 1 tablespoon at a time, beat constantly for about 2 mins.
  6. On low speed, beat in 1/3 of the flour mixture. On medium-high speed, beat in 1/2 of the yogurt mixture. On low speed, beat in half of the remaining flour mixture. On high speed, beat in the remaining yogurt mixture. On low speed, beat in the rest of the flour mixture.
  7. Pour batter into into prepared pan, smooth the top evenly with a spatula.
  8. Bake for about 45 ~ 50mins or until a toothpick inserted into the centre comes out clean.
  9. Let cool in pan for 10 mins before unmold. Invert onto a cooling rack and let cool completely.

    Note: To mix by hand, cream butter with nutella and sugar with a wooden spoon until the mixture turns creamy and fluffy. Add in the eggs gradually, 1 tablespoon at a time, stir until the eggs are fully incorporated into the batter. With a spatula, fold in the flour mixture alternating with the yoghurt mixture in 3 separate additions.
More aboutColour My World

ALMOND COCOA NIB STICKS

Diposting oleh good reading

crispy, crunchy and not too sweet--these are a perfect gift for a chocolate connoisseur

AAAACK! only 4 more days until Christmas! There's so much baking and Christmas cooking to be done and so little time! I've whittled my original 8 pounds of butter down to 3. That's not bad. I decided to keep the rest of the butter for Christmas Day. You know, for the mashed potatoes, the stuffing, the turkey et al. You name it and it's got some butter in it.

This year, we're going organic, free range at Capers Market. I came about this delicious turkey because of my lazy-ass way of waiting until the last moment to purchase a fresh turkey. You see, I also don't like having a huge turkey crammed in my already crammed refrigerator. I also have to have it timed perfectly to allow for brining and drying in the refrigerator. I ran around town looking for a fresh turkey, but none was to be found a couple of days before Thanksgiving. Thankfully, I decided to check out Capers and found a few fresh specialty turkeys left. I took one home immediately (after paying about a third more than I usually pay for a regular non-specialty turkey) and brined it overnight. Then I rinsed and dried it and popped it back in the fridge to dry. That was the most flavourful bird our family has ever tasted. I was even tempted to eat that little turkey butt part that sticks out at the end because it was golden brown and crispy and looked like cracklings...but I didn't. The skin was indeed crackling good and the meat tender, juicy and full of turkey flavour. We deemed the turkey worth the money and we're going to buy it again for Christmas. I even called ahead and reserved one. The turkey I'll be getting is locally raised and free range.


cocoa nibs are roasted cocoa beans separated from their husks and broken into small bits

Those organic cocoa nibs I bought are getting good use this Christmas in my Cookie Boxes. I was salivating at Alice Medrich's Almond Sticks with Cocoa Nibs in her book Bitter Sweet. These cookies would be beautiful and graceful perched on a saucer next to your espresso or a cup of tea. I imagine you could even dip them in wine. They are definitely for adults since I added the frangelico and they are not particularly sweet. They are like thin biscotti almost but not as hard. Instead, these are light and crunchy. You need to slice the sticks as thinly as possible with a serrated knife. I use a bread knife...then use the knife to transfer the long wafer to the parchment-lined cookie sheet.

cocoa nibs are the essence of chocolate, but subtle and delicate in flavour

Again, I've twiddled with the recipe and have adapted it by adding a tablespoon of frangelico...which I think enhances the almond flavour.


ALMOND STICKS WITH COCOA NIBS

makes about thirty-two 6 inch sticks
3/4 cup ( 3 3/4 oz) whole blanched almonds
1 cup plus 2 T all-purpose flour
2/3 cup sugar
1/4 t salt
6 T unsalted butter, cut into chunks
2 T water
1 t pure vanilla extract
1/8 t pure almond extract
1 T frangelico
1/4 cup cocoa nibs
  • Combine the almonds, flour, sugar and salt in a food processor, and pulse until the almonds are reduced to a fine meal. Add the butter and pulse until the mixture looks like a mass of crumbs. Combine the water, vanilla, and almond extract, drizzle them into the processor bowl, and pulse just until the dough looks damp. Add the cocoa nibs and pulse only until evenly dispersed.
  • The dough will not form a smooth cohesive mass--it will be crumbly, but it will stick together when you press it. Turn it out on a large sheet of foil and fom it into a 6-by-9-inch rectangle a scant 1/2 inch thick. Fold the foil over the dough and press firmly with your hands to compress it, then wrap it airtight. Slide a cookie sheet under the package and refrigerate for at least 2 hours, or overnight.
  • Position the racks in the upper and lower thirds of the oven and preheat the oven to 350degrees F. Line two cookie sheets with parchment or wax paper.
  • Use a long sharp knife to trim one short edge of the dough rectangle to even it. Then cut a slice a scant 3/8 inch wide and use the knife to transfer the delicate slice to the cookie sheet. Repeat with the rest of the dough, transferring each slice as it is cut and placing them at least 1 inch apart. If some break, just push them back together, or bake them broken--they will look and taste great anyway.
  • Bake, rotating the cookie sheets from top to bottom and front to back half way through the baking time, 12 to 14 minutes, or until the cookies are golden at the edges. Set the pans on the racks to cool completely.
  • The cookies can be stored, airtight, for several days.
More aboutALMOND COCOA NIB STICKS

PISTACHIO COCOA NIB THINS

Diposting oleh good reading on Kamis, 20 Desember 2007

pistachio & cocoa nib thins

At last, my baking frenzy is winding down.

Here I am playing around with the Nibby Pecan Cookies ; replacing the pecans with pistachios as Tartelette did. I didn't bother chopping the pistachios as I figured I'd be slicing the cookies anyway. These will be part of the second batch of Christmas Cookie Boxes and will replace the pecan variation.sliced as thinly as possible, the cookies are crispy and delicate

I formed the dough logs into rectangles just to give it a different look. I think that a serrated knife is the best tool for slicing the logs into thin cookies. I believe the thinner you can cut them, the more delicate and crispy your cookie will be. Slicing also gives you the pretty cut mosaic look on the surface of the cookie.

I also decided to adapt the recipe further by adding frangelico to the cookie dough. The cookies smell and taste fantastic, but I don't think they're for the kiddies.

Pistachio Cocoa Nib Thins (adapted from Alice Medrich's Bitter Sweet)

1 cup (3.5 oz) organic pistachios, toasted

1/2 pound (2 sticks) organic unsalted butter, softened

3/4 cup organic cane sugar

1/4 t pink himalayan salt (slightly rounded)

1 1/2 t vanilla extract

1 tablespoon frangelico

1/3 cup organic cocoa nibs

2 cups unbleached organic all-purpose flour

  • Combine butter, sugar, salt, vanilla extract and frangelico in bowl of electric mixer and beat on high speed until smooth and creamy but not fluffy (1 minute). Beat in pistachios and cocoa nibs. Turn off mixer and add all the flour at once. Beat on low speed until flour is incorporated.
  • Form dough into 12-inch log about 2 inches thick. (I formed them into a rectangular log using a bench scraper). Wrap in parchment and refrigerate for at least 2 hours, preferably overnight. (can be frozen 3 months)
  • Position racks in upper and lower thirds of the oven and preheat the oven to 350 degrees F.
  • Use a sharp knife to cut the cold dough log into 1/4 inch thick slices. Place cookies at least 1 1/2 inches apart on parchment-lined cookie sheets.
  • Bake for 12 to 14 minutes, or until the cookies are light golden brown at the edges, rotating the cookie sheets from top to bottom and front to back halfway through the baking. Let cookies firm up on the pans for about 1 minute before transferring them to a rack to cool completely. Store cookies in airtight container for at least 24 hours for best flavour before serving.
  • can be stored in airtight container for at least 1 month
More aboutPISTACHIO COCOA NIB THINS

TIFFANY SNOWFLAKE COOKIES

Diposting oleh good reading on Rabu, 19 Desember 2007

tiffany snowflake cookies


a bowl of cute vanilla pod mini-snowflakes

this was cakebrain's first stab at decorating intricate snowflake cookies with royal icing

After my fortuitous excursion to Williams-Sonoma, where I picked up a set of Snowflake Cutters, I am now ready to make my Tiffany Snowflake Butter Cookies. I decided against making Snowflakes out of gingerbread for the following reason: I am not fond of it. It's an excellent medium for structural integrity in framing a house, as is the royal icing needed to spackle it together. However, I feel that those very qualities make it inedible and a waste of holiday calories.

the honking big snowflakes are my favourite, but they're a pain to decorate. as you can see in the background, my royal icing flooding skills leave a little to be desired.

As well, I have a negative conditioned response to gingerbread because years ago when I was still in university, I decided to make a gingerbread house. I had all the extra baked gingerbread scraps to eat. I brought them with me in my purse to munch on in the movie theatres (shhh...don't tell!), I gave some to friends and I nibbled gingerbread for snacks. By the end of the week I was so done with gingerbread for the rest of my life. Besides, I had a cute little gingerbread house that nobody wanted to eat because, well it was too cute. By the time I thought I should eat it, it didn't taste so great anyway. So when other people smell gingerbread, they think, "aaah...so homey and comforting"; while I think, "eew...not gingerbread again! gag"


you can see the real vanilla bean specks in the cookie
This yummy and flexible Vanilla Butter Cookie recipe hasn't failed me yet. I use it for sables (sorry, how the heck do you make the French accents in blogger? I have yet to figure it out and have been mangling/anglocizing all of the words--a sorry situation for an English teacher) and roll logs of it in sanding sugar...then I slice and bake. I keep the logs in the freezer just in case I need a couple of fresh-baked cookies. You know, when you want to (impress and) provide guests with the lovely baking smells from your oven as well as the cookie itself when they visit you. Only it was as easy as Pillsbury. How sneaky, eh?
when in doubt, pipe dots. as you can see, piping isn't my forte either

I also use the dough for cutouts but you just have to refrigerate the dough a lot to ensure crisp shapes. Refrigerate a little before rolling and refrigerate until firm after placing on the cookie sheet. Then bake until golden brown. Don't underbake or the cookies will taste insipidly blah.
pretty enough to decorate the tree--but that would be a waste of a perfectly good cookie
This time, I'm adapting the recipe so that I can make use of the stash of Vanilla Bean Pods I have leftover. As well as ramming the empty pods into a bottle of vodka to make vanilla extract, I've been saving pods for grinding. I grind up the pods with a little of the granulated sugar (hey, that's vanilla sugar!) The cookies are speckled with the tiny vanilla seeds and the slightly larger specks of ground vanilla pod. You can triple your vanilla pleasure by adding a little vanilla extract too.
Vanilla Pod Butter Cookies
1 cup (2 sticks) unsalted butter, softened
¾ cup granulated sugar
1 large egg plus 1 egg white, beaten
1 dried vanilla bean pod (for grinding with the sugar)
2 ½ cups sifted all-purpose flour
¾ teaspoon coarse salt
½ cup fine sanding sugar
  1. Split vanilla pod if it is fresh and scrape out the seeds for creaming with the butter. Place empty pod in food processor with granulated sugar to grind. Sift out the larger chunks of the bean. If you have a stash of dried vanilla pods, use that and supplement with 1 teaspoon vanilla extract.
  2. Put butter and vanilla seeds into mixer with paddle attachment, mixing until seeds are distributed thoroughly. Add the granulated sugar/vanilla pod mixture into the bowl and continue beating on medium speed until pale and fluffy, about 2 minutes. Mix in whole egg and vanilla extract, if using. Reduce speed to low. Add flour and salt and mix until combined.

For logs:

  • Halve dough; shape each half into a log. Place each log on a 12-by-16 inch sheet of parchment. Roll in parchment to 1 ½ inches in diameter, pressing a ruler along edge of parchment at each turn to narrow log. Transfer to paper towel tubes to hold shape, and freeze until firm, about 1 hour.
  • Preheat oven to 375ºF. Brush each log with egg white; roll in sanding sugar. Cut into ½-inch thick rounds. Space 1 inch apart on baking sheets lined with parchment. Bake until edges are golden, 18 to 20 minutes. Let cool on sheets on wire racks. Store in airtight containers at room temperature up to 3 days.
For intricate snowflake cutouts:
  • Halve dough; create discs and wrap one in plastic wrap.
  • Take the other disc and roll out the dough to the desired thickness (usually 3-5 mm) out between two pieces of parchment paper. I place the whole sheet of parchment/rolled-out cookie dough onto a plastic cutting board and pop it in the refrigerator to firm up (about 30 minutes).
  • Take other disc out and roll out as above. Pop that into the refrigerator to firm up too.
  • When the rolled dough is firm enough, take it out and use your snowflake cutters to make as many cuts as possible. Transfer to a parchment-lined cookie sheet. With the tiny cutters, you can now make more cuts into the cut cookies on the parchment. This way you won't have to transfer delicate snowflakes and avoid tons of frustration.
  • Do leave a proper amount of space between the cutouts (about 1 inch) to allow for a little spreading. Lift off the surrounding dough carefully. You may need a pointy knife, thin spatula or other such tool to assist you in this endeavour. I use the tip of a plastic kiddie chopstick to poke out the dough from tight crevices. If you leave marks, you can always flip the cookie upside down onto the parchment to bake.
  • Place snowflake cookie-laden cookie sheet back into the fridge to firm up again before baking.
  • Ball up the remaining dough and do it all over again.
  • Meanwhile, preheat the oven to 350 degrees F. Bake the cookies on the middle rack until golden, about 18-20 minutes--more or less depending on the size of your snowflakes. Just keep an eye on the first batch for an indicator.
  • Decorate with royal icing, if you wish

****Please check out a Sugar Cookie variation from my 2008 Xmas cookie boxes here.

More aboutTIFFANY SNOWFLAKE COOKIES

CAKEBRAIN'S CHRISTMAS COOKIE BOXES: ROUND 1

Diposting oleh good reading on Senin, 17 Desember 2007

here's what the first batch of christmas cookie boxes looks like inside

Ahhh...'tis the season to be weary.

clockwise from top left: world peace, vanilla butter, green tea christmas trees, bah humbug black sesame butter sables, cocoa nib & pecan, chocolate chunk oatmeal

I've completed and delivered my first batch of Christmas Cookie Boxes. I have 4 pounds of butter left in the refrigerator and I have been having second thoughts about some of those cookies. I noticed a particularly nice variation on Tartelette's blog using Medrich's Nibby Pecan Cookie recipe using pistachios and have decided to make the remaining boxes with pistachios instead. This is also a time-saver because I don't have any pecans in the pantry and I don't want to run out to the crowded market to fetch some! I have lots of pistachios left from my Pistachio Macarons adventure.
my favourite in decending order: green tea christmas trees, bah humbugs, vanilla butter, cocoa nib & pecan, chocolate chunk oatmeal, world peace

In Alice Medrich's bible of chocolate recipes and all things chocolate, Bitter Sweet, I noticed an interesting recipe that will use some of my cocoa nibs and whole almonds. It's for a wafer-thin biscotti-like cookie that isn't so sweet. It looks so yummy that I'll have to include it in my next boxes (I hope!) For the second round or cookies, I'm including the snowflake cutouts, the cocoa nib & pistachio cookies and the almond & cocoa nib wafers. I'm currently up to my armpits in royal icing (which I don't particularly like, but it's pretty on cookies). Icing consisitency is so important; otherwise the cookies will look pretty darned messy...and I have made quite a mess with some of these snowflakes! Bebe's been happy though because she gets to eat the rejects.

ah. fini

More aboutCAKEBRAIN'S CHRISTMAS COOKIE BOXES: ROUND 1