PICHET ONG'S BANANA CAKE RECIPE (review)

Diposting oleh good reading on Minggu, 30 September 2007


Well, I have completed my September mission of trying a new recipe from Pichet Ong's The Sweet Spot. The recipe called to bake the "cake" for 45 minutes. This seemed too short a time to me considering any "loaf" shape I've made is usually ready in over 60 minutes. Usually 70 minutes easily. I poked a cake tester in there and it was still goopy so I kept adding 10 minutes and checking. In the end I had the banana cake in there for 65 minutes. So he loses points for accuracy of baking time. As well, in his cookbook, the picture clearly shows a loaf shaped banana cake. Technically that's "banana bread" to me. A cake is usually a shallower pan and indeed takes less time to bake.
The flavour was good but I felt the texture was too gummy. I'll wait until the next day to see how it ages. The recipe also called for sour cream or yogurt in the batter. My own tried and true recipe doesn't call for the addition of this ingredient. I don't think it adds anything in terms of flavour. The crumb was very moist of course due to the dairy but I noticed that the slices fell apart very easily and didn't hold up as well as my banana bread. I suppose that's why he calls it a cake.
My verdict: it's good but not the best I've had. I'm not going to be using it again because I don't want to have to go out and buy sour cream or whole milk yogurt just to make this cake. And that's not even considering going to a specialty market to buy the baby bananas. However, it is a nice change of pace and my mom would like it because she enjoys "wet" cakes/desserts.
Review: 3.5/ 5 stars

More aboutPICHET ONG'S BANANA CAKE RECIPE (review)

Skulls are fun!

Diposting oleh good reading on Sabtu, 29 September 2007

Who would have thought Halo could be improved with some skulls? It really makes the campaign rock :)

I can't play without the grunt birthday blast. How else can I be sure I'm getting head shots?

Did you know bungie keeps a detailed record of all your games? If achievements weren't enough to keep me going...
More aboutSkulls are fun!

Good practices are beyond testing

Diposting oleh good reading on Jumat, 28 September 2007

Before using TDD, I was a big fan of separation of concerns, single responsibility and inversion of control. These things have proven over and over again to be priceless.

When I started using TDD I loved is how it enforced these principles. I couldn't maintain or write tests without them. Testing even forced the need for dependency injection and inversion of control containers.

The tests started to validate and enforce important behaviors. Behaviors some people don't appreciate. Sometimes these had been a hard sell.

TDD became an easy justification for best practices. How awesome!

Enter mocking libraries that don't require DI. You can mock everything from constructors to static methods. Mocking methods on the CUT is as easy as creating a new class for that responsibility.

With this, its easier to make a large class and use static utils and real constructors. Now you can test without adding those pesky things that add to the confusion of object oriented code... you know stuff like interfaces, polymorphism, encapsulation...

If we don't need DI or interfaces for testing, then why do we need them? If testing can happen without it, then that behavior isn't driven, right? Why can't I make a big class if its testable?

But these design principles have been around for a long time and for good reason. DI, single responsibility and separation of concerns were not born from testing.
More aboutGood practices are beyond testing

If only this really existed

Diposting oleh good reading


If they would feature this service at software conferences, that would be most excellent too!
More aboutIf only this really existed

All That Baking!

Diposting oleh good reading on Rabu, 26 September 2007

I have been baking nothing but cakes for the past few days...after my attempt on chiffon cake, I tried another French-style yogurt cake.


This is my third yogurt cake so far, and I followed this Grapefruit Yogurt Cake from Foodbeam. This recipe is quite similar to the Lemon Yogurt Cake I made two weeks ago.


It's supposed to be a very straight forward and easy cake...children in France learn how to make this cake when they are 4! And yet, once again, this yogurt cake didn't turn out that well. Although this time round I used an oven thermometer to make sure that my oven temperature was correct, the texture of the cake was quite dense, almost the same texture as the lemon yogurt cake ***sigh***

Anyway, I'm gonna try it another time as I am keen to get it right. It's such a simple cake that can be whipped up in no time, and it's great to bring along for dinner parties.


I made this Chocolate Torte for a friend who has lately been clocking 14 hrs each working day. I was glad that the cake came out from the oven with a slightly sunken top and a crackly, crusty surface. This meant that the cake was baked to near perfection!

I dusted it with some icing sugar and brought it over to my friend's office in the late morning. She shared it with her colleagues and I was told the cake was moist and chocolaty. Three quarter of it was gone by noon time and she didn't manage to get a second piece before it was all snapped up.


This is the third cake which I made yesterday. It's a Green Tea (Matcha) Pound Cake. Upon a prompt by a fellow blog visitor, Yvonne, I bought a new bottle of matcha powder which is suitable for baking. The product is made in Japan and I have been waiting to try it. I have also gotten a can of azuki red bean paste from Daiso which has been sitting in the cupboard for quite some time. I followed this pound cake recipe from a Japanese cookbook which uses both green tea powder and azuki beans.

I didn't follow the exact steps called for in the recipe. For example, it's stated that after creaming the butter and sugar, one egg yolk should be added in gradually, beat till fully mixed, before adding the egg white, and repeat the same procedure for the other egg. I took the easy way, simply lightly beaten the two eggs before adding in slowly into the batter. It is also recommended that the cake should be taken out from the oven after 5 mins of baking to make a slit in the centre. What I did was, after spreading the batter evenly, I made a slit in the middle of the batter with my spatula before popping it into the oven. Somehow, the cake still managed to crack in the centre and a nice slit was formed during baking.


I guess the amount of green tea powder used is not really sufficient as the colour of the cake was not green enough, in fact, it was quite an unpleasing brownish green!! It could also due to the green tea powder as Yvonne had also pointed out that it will not yield a bright green finishing. The taste of the cake was all right, nothing very fantastic, just like a usual butter cake. The red bean paste was not overly sweet, and I could almost taste a hint of the green tea powder.

Ingredients:

120g cake flour
1 teaspoon baking powder
1 teaspoon green tea powder
100g sugar
100g butter, bring to room temperature
2 eggs, lightly beaten
200g red bean paste

Method:

  1. Preheat oven to 170 degC. Grease and line a 7 x 17 x 6.5cm loaf pan. Sieve together flour, baking powder and green tea powder, set aside.
  2. With an electric mixer, cream butter and sugar until the mixture turns pale and fluffy.
  3. Add in the eggs gradually, mix well after each addition.
  4. Sieve over the flour mixture in 3 separate additions. Each time, gently fold with a spatula until flour mixture is fully incorporated into the batter.
  5. Spread 1/3 of the batter evenly into loaf pan, spread a layer of red bean paste on the batter. Cover with 1/3 of the batter and spread another layer of red bean paste. Spread the remaining 1/3 of the batter. Smooth the batter evenly and make a slit in the centre (length-wise) with the tip of the spatula.
  6. Bake for 35 ~ 40 mins or until the cake turns golden brown and a skewer inserted into the centre comes out clean.

    Recipe Source: Delicious!! Baked Cakes, Ikuko Omori
More aboutAll That Baking!

Does Intuitive == Maintainable?

Diposting oleh good reading on Selasa, 25 September 2007

What makes code maintainable? What does it mean to be readable? Why does it matter?

My coding standards and styles change constantly.

I have yet to return to a project after a hiatus and understand it without some investigation -- no matter how intuitive it originally seemed.

If this is so, how can something be maintainable? If a project can be written in a few weeks and then not touched for several months, is there any chance you'd automatically understand or agree with the design?

There are very few solutions that cannot be figured out. Sometimes it takes minutes. Other times a bit longer. A lot of times it involves grimacing, cursing and questioning the sanity of the original developer(s).

But no matter how "awful" a solution may be, at one point it made sense to someone, so with some detective work it can be understood.

Something common of software that is easier to maintain is single responsibility and separation of concerns. These principles are not subjective. They don't change with time, mood or business domain.

If a project follows these principles understanding the entire system isn't necessary, just the part that needs to change. It may take some time to find it, but once found, the solution is simple.
More aboutDoes Intuitive == Maintainable?

I Can Eat a Rainbow...Bento!

Diposting oleh good reading


I decided to make something kiddish for lunch today. Even though it means spending a little more time and effort, I made this set of bento lunch for my boys. I managed to include all the 5 colours of fruits and vegetables in this rainbow set...there were green zucchini, yellow sweet corns, orange carrots, red tomatoes, and purple plums. I threw in some colourful low-sugar jelly beans and sour bears, and a bottle of vitagen made this a complete healthy meal.


The main "dish" was a rice burger...

and it turned out to be a 'tower' burger instead...

I piled up the burger with a meat patty (mixed with some finely chopped apples, and marinated with some salt & pepper), lettuce, tomatoes, and topped with some mushrooms & onions sauce (saute onions and mushroom slices with 2 tablespoon of Japanese terriyaki sauce and 2 tablespoon of water). The rice balls were lightly brushed with some light soya sauce before pan-fried over low heat. The carrots and sweet corns were par-boiled before mixing with the zucchini and some Japanese-style citrus salad dressings.

I was quite surprised that my younger boy was able to finish up all his greens...including the raw tomatoes...but the burgers were too tall for them to handle, so they actually ate it layer by layer ;)

Today is the Mid-autumn (or mooncake) festival...just to pass on the traditions to the younger ones, we will have mooncakes with tea tonight...and probably go for a short walk to see the full moon.

With this set of calligraphy done by my elder boy, I wish all who will be celebrating this occasion, 中秋节快乐!
More aboutI Can Eat a Rainbow...Bento!

Countdown to Halo 3...

Diposting oleh good reading on Minggu, 23 September 2007

Its almost here... the reviews are in and, well, outstanding.

Eternal Sonata is keeping me busy in the mean time (I highly recommend it for all you JRPG fans!)

So many games (Halo, Rock Band, Guitar Hero 3, Mass Effect, Beautiful Katamari...), so little time... I don't think I'll be blogging much this fall :P

And I still didn't beat Bioshock on hard...
More aboutCountdown to Halo 3...

A Milestone

Diposting oleh good reading on Kamis, 20 September 2007

I guess I have reached the first milestone of my baking journey...

Ever since I started baking "intensively" about a year ago, I have experimented with the various types of baking methods. The only method that I've stayed clear so far is anything that got to do with beating the egg whites. Somehow, I have developed this lingering phobia...just the thot of beating egg whites seems so intimidating to me. Thanks to vb for sharing her baking experience on chiffon cakes! Her enthusiasms and the beautiful cakes she came up with really got me interested! She makes it sounds so easy to whip up a chiffon cake, and with her little nudging, I finally break away from my comfort zone, and made my first chiffon cake this morning!

To mark "this occasion", I actually took the trouble to take a few photos during the cake making process. I stopped beating when the egg whites reached this stage...the signature look of the egg whites forming a nice hook when the paddle is lifted up. This photo was taken with some arm twisting...my left hand was actually holding up the mixer, while my right hand, holding the camera crossed over to snap a picture of it.


A nice whirlpool of foamy egg whites...


I was so excited when the batter started to expand and climbed up almost to the top of the pan...


but then, the cake sank significantly after it was cooled...is this normal?! By the way, this is a very small cake pan, it's only 16cm! I find the size just right for my small family.


I was very glad that I didn't "disfigure" the cake too much while trying to unmould it.


Don't get fooled by this photo...the cake looks quite tall and mighty, but in actual fact, it's only about 6cm in height.


There are a number of holes both on the surface and inside the cake...is it suppose to be like this?! After a glance at the cake, my little one stated flatly that I have made a donut cake today :'0


I kind of like the crinkly surface...especially on the sides...I followed a simple coffee chiffon cake recipe, but replaced the instant coffee with milo powder instead.


The cake texture is rather light and cottony...but taste wise, I could only taste and smell the eggs...I could hardly taste the milo at all.


Overall, it was a very good attempt...at least I've overcome my "fears", and from now on I could safely venture into making different types of chiffon cakes :)

Ingredients
(make one 16cm cake)

1 tablespoon milo powder
20ml hot water
2 egg yolks
20g caster sugar
20ml olive oil
40g self-raising flour

2 egg whites
1/4 teaspoon cream of tartar
50g caster sugar

Method:

  1. Stir milo powder with hot water until dissolved. Let cool. Sieve flour and set aside.
  2. Separate egg yolks/whites and bring to room temperature.
  3. Whisk egg yolks and sugar in a mixing bowl until sugar just dissolved. Add in milo mixture and oil. Whisk till combined. Sieve over the flour and fold gently with a spatula until flour is fully incorporated into the batter.
  4. In a clean, dry mixing bowl, whisk egg whites and cream of tartar with an electric mixer until mixture becomes frothy and foamy. Add in the sugar in 3 separate additions while beating at high speed till just before stiff peaks form* (after note: after several attempts at baking chiffon cakes, I learned that the whites should be beaten until just before stiff peaks form).
  5. Add the egg white foam into the egg yolk batter in 3 separate additions, each time folding gently with a spatula until just blended.
  6. Pour batter into a 16cm (6 inch) tube pan (do not grease the pan). Bake in pre-heated oven at 170 degC for 25 ~ 30mins or until the cake surface turns golden brown, and a skewer inserted into the centre comes out clean.
  7. Remove from the oven and invert the pan immediately. Let cool completely before unmould.
Recipe source: adapted from Chiffon Cake is Done by Kevin Chai
More aboutA Milestone

ALICE MEDRICH'S BITTERSWEET CHOCOLATE TART

Diposting oleh good reading on Rabu, 19 September 2007

I've been dying to try out Medrich's Bittersweet Chocolate Tart recipe...and having read it through, I noticed how unconventional it was. It calls for melted butter in the tart dough. While pressing the dough into the pans was easy, I was starting to wonder if I could make the dough stretch to cover all the surface areas. The crust would be super thin I realized.

The chocolate tart filling was also quick to make and only required setting in the oven. After pulling out the baked tart shells, you turn off the oven. You then pour the filling into the hot tart shells, and pop it all back into the oven to set for 10 minutes. Now how easy is that? The hardest part was waiting for it to cool down enough to eat it.


I didn't want to bother with decorating the tarts, so I sprinkled a little Fleur de Sel on top of half of them to see if it would taste okay. It did. But I prefer it without the salt.


Bebe inhaled it. The tart is somewhat like a shortbread cookie and is crispy, light and slightly sweet. The chocolate filling is custardy and truffle-like. I would say the crust to filling ratio is just right in the recipe since it is so rich and decadent. I used organic dark chocolate with 70percent cocoa content and I remember it being expensive. You can really taste the chocolate quality in this tart and should only use good quality chocolate. It's a keeper; especially the tart dough recipe.
as per Posh-Kimchi's request: here's the recipe...adapted by cakebrain

Bittersweet Chocolate Tarts

Crust:
8 T (1 stick) unsalted butter, melted
1/4 cup sugar
3/4 t pure vanilla extract
1/8 t salt
1 cup all-purpose flour
Filling:
1 cup half-and-half
2 T sugar
8 oz bittersweet or semisweet chocolate, finely chopped
1 large egg, lightly whisked
Special Equipment:
eight 4-inch (measured across the top) fluted tartlet pans (about 3/4 inch deep) with removable bottoms
*cakebrain's note: I think you can make do with 6 tart pans

  • Position a rack in the lower third of the oven and preheat oven to 350 F.
  • Crust: Combine melted butter, sugar, vanilla, and salt in a medium bowl. Mix in the flour just until blended. Divide the dough into 6 or 8 equal pieces (according to however many tart pans you're using). Press one piece very thinly and evenly across the bottom and up the sides of each pan. This takes patience--the amount of dough is just right (according to Medrich).
  • Place the pans on a cookie sheet. Bake for 15 to 20 minutes, until the crusts are a deep golden brown.
  • Meanwhile, make the filling: In a small saucepan, bring the half-and-half and sugar to a simmer. Remove the pan from the heat. Add the chopped chocolate and stir until completely melted and smooth.
  • Just before the crust is done, whisk the egg into the chocolate mixture.
  • When the crusts are ready, remove from the oven. Turn off the oven. Pour the hot chocolate filling mixture into the crusts. Return the tartlets to the turned-off oven for 5 to 10 minutes, or just until the filling begins to set around the edges but most of the center is still liquid when the pans are nudged. Set the sheet on a rack to let the filling continue to cool and set.
  • Remove the pan sides and serve the tartlets warm or let them cool completely. Just before serving.

notes:

To use chocolate marked 62% to 64% instead of standard bittersweet: use 7 oz chocolate

To use chocolate marked 66% to 72% instead of standard bittersweet: use 5.5 oz chocolate and increase the sugar to 5 T

More aboutALICE MEDRICH'S BITTERSWEET CHOCOLATE TART

Pumpkin Bread

Diposting oleh good reading on Selasa, 18 September 2007


I finally managed to work on this pumpkin bread after a long break from bread making. Since I missed the kneading so much, I made this loaf all by hand, although the bread can be easily done entirely by the bread machine (if you omit the pumpkin seeds and egg glaze). I was attracted to this recipe when I came across the illustration of this golden round loaf in the book, Bread, Baking by Hand or Bread Machine. My replica is way too far from the original photo, as the top was almost burnt! Even though I had placed the oven rack to a lower position, the bread rose high and mighty and almost hit the heating elements that are located at the top of my small oven. Luckily, I managed to spot the slightly burnt smell, and quickly "tent" the top of the loaf with a sheet of aluminium foil.

After downloading the photos, I thought I saw "two eyes" and a "wide smile" staring back at me. Can you spot it? If not, what about this smaller one:


I find this so hilarious!! That's one of the joys of baking, isn't it?! You never know what you get until the entire thing is done!


I was expecting something dense, moist and sweet, but surprisingly, the bread was soft, light and even fluffy...and it was not sweet, it tasted almost like a plain loaf of soft white bread. There's no trace of the pumpkin at all, if not for the deep yellow hue, you wouldn't know it's made with mashed pumpkin! Nevertheless, I like the texture of the bread and the slightly crisp crust and the pumpkin seeds were very fragrant. The bread tasted good lightly toasted and buttered. I must say it's a great healthy choice of bread for breakfast :)


Ingredients

500g pumpkin, after peeled, seeded and cut into pieces
you are left with about 300g(alternatively, use 300g canned pumpkin puree)
60ml cooking liquid reserved from cooking the pumpkin or use water if using canned pumpkin puree
2 teaspoons of runny honey
500g bread flour
2 teaspoons salt
2 teaspoons instant yeast
egg glaze (beat together 1 egg yolk with 1 tablespoon of milk)
2 tablespoons pumpkin seeds, to decorate

Method:

  1. Bring a large pan of salted water to the boil. Add the pumpkin flesh and simmer until soft and cooked through, about 20 mins. Drain the pumpkin and reserve the cooking liquid.
  2. Mash the pumpkin thoroughly, and sieve, or puree in a food processor or blender, about 2 mins. (I didn't sieve or puree the pumpkin as it was already very soft and fine.) Leave the pumpkin puree and the reserved cooking liquid to cool.
  3. Add honey to 60ml of the cooking liquid and stir to dissolve.
  4. Mix flour and salt in a large mixing bowl. Add in the instant yeast and mix well. Make a well in the centre and add in the honey liquid, followed by the pumpkin puree.
  5. Mix in the flour to form a firm, coarse, sticky dough. If the mixture is too dry, gradually add one or two tablespoons of the pumpkin liquid (or water). (I added extra two tablespoons of liquid).
  6. Turn the dough out on a lightly floured work surface. Knead until very smooth, silky and elastic, about 10 mins. (I didn't stop until almost close to 20mins of kneading!)
  7. Place dough in large clean bowl and cover with a tea towel or cling wrap. Leave to rise until double in size, about 1 to 1.5hrs. Knock back the dough to release the air, then leave it to rest for 10mins, covered.
  8. Shape dough into a round loaf. Place on an oiled baking sheet and cover with a tea towel. (I used a round 20cm baking pan instead). Prove until double in size, about 1 hour.
  9. Brush the dough with egg glaze and sprinkle with pumpkin seeds.
  10. Bake in pre-heated oven at 220 deg C (I set mine to 200 deg C) and bake for 40mins until golden-coloured and hollow-sounding when tapped underneath. Leave to cool completely before slicing.

    Source: adapted from Bread, Baking by Hand or Bread Machine by Eric Treuille & Ursula Ferrigno
More aboutPumpkin Bread

Another Yogurt Cake

Diposting oleh good reading on Sabtu, 15 September 2007

This is yet another yogurt cake I have made within a week. Yes, I know, this Strawberry Yogurt Cake doesn't look really appetizing with all the cracks and holes on the cake surface. I have poured in too much batter into the pan before adding in the strawberries, and I must have added too much strawberries too, as a result, the remaining batter was not enough to cover the strawberries. So most of the strawberries were peeking out of the batter but I still went ahead to bake the cake. Hence, I ended up with a very much pimpled-face cake ;'(


The recipe is as straight forward as the lemon yogurt cake I made last week. With only a few stiring and mixing, the batter is formed and ready for baking. This cake was done with the help of not just one, or two, but three eager assistants! My niece came over to play with the boys after school. She showed great interest in what I was going to bake and offered her help. Naturally, the other two kids also made their way into the kitchen. The three of them crowded around the kitchen table, each taking turns to stir, add, and crack the eggs. So, with three extra pairs of hands, a rather easy recipe became a little "complicated". Everyone wanted to have a hand in every single step, and would made noise whenever the others took a little longer to stir the mixture, or sieved in too much flour and so on, and so on. I am not complaining though, I really enjoyed their company, it's fun to be able to share your hobby especially with your loved ones, even if it means having to do the extra work of cleaning up the mess they have created.


Despite the not too nice appearance, the cake was quite tasty. It was moist, fluffy and tasted almost like freshly baked muffins. After taking a few small bites, my niece came back to ask for a whole slice of cake. She even requested to pack some home. My younger boy gobbled down a slice in no time. My elder boy was the only who didn't show much interest as he didn't like the sourish strawberries. This cake is made with some ground almonds, which I believe is not that commonly used in other similar yogurt cakes. I wasn't able to taste the ground almonds when I first tested the cake. It was only when I had a whole slice of it for breakfast the next day, then I could taste the nutty bits in the crumbs. I was a little hesitant whether to post the recipe as I am really not sure about its original source. However, since it is indeed a simple and yet great in taste cake, I thought I should share it here. I thank the originator for sharing this recipe, and I hope I can get the source soon.

Ingredients:

125ml (1/2 cup) yogurt
100g (1/2 cup) granulated sugar
60g (1/2 cup) brown sugar
3 eggs
95g (1/2 cup) ground almond
140g (1 cup) plain flour
2 teaspoons baking powder
125ml (1/2 cup) oil (I used olive oil)
some strawberries, diced

Method

  1. Pre-heat oven to 180 degC. Grease and line a 20cm round pan with baking paper.
  2. Mix yogurt, sugar, eggs in a large bowl.
  3. Add ground almonds and sieve over flour and baking powder. Mix till combined.
  4. Add oil and mix well.
  5. Fill 2/3 of the batter in the prepared pan, arrange diced strawberries on the batter and pour the rest of the remaining batter over the strawberries.
  6. Bake at 180 degC for 40-50mins or until a skewer inserted into the centre comes out clean.
  7. Let cool in the pan for 20mins before unmoulding.
More aboutAnother Yogurt Cake

I Can Eat A Rainbow

Diposting oleh good reading on Selasa, 11 September 2007

While we were doing our weekend grocery shopping at the supermarket, my elder boy stopped to read the sign boards that were on display at the fruits and vegetables section. There was some information on the different nutrients provided by the different coloured fruits and vegetables. Besides green, the other coloured fruits and vegetables are red, orange, yellow and purple. Each colour group of fruits and veg will give different nutrients. I make a mental note of it and told myself I should try to introduce more colours to our diets.


I had in my mind to make a pumpkin bread yesterday, but decided against it when it was pouring heavily early in the morning. Unless I want to use the full bread machine cycle to make the bread, I always think twice before making bread on a rainy day! It will take ages for the dough to proof. So, without knowing what to make for breakfast for the following day, I went off to the nearby wet market to get my fresh food supplies. I was glad that I managed to get a few varieties of fresh fruits from the neighbourhood fruit store...there were Korean pears, kiwi fruits, oranges and a punnet of strawberries in my shopping bags. After looking at the various coloured fruits, I decided that I should use them to bake something. What is more convenient other than a tart, which I can pile up with all the fruits I have. What more, it will be excellent if I can include all the 5 coloured fruits in the tart!


I followed a Strawberry Frangipane tart recipe that is from the same cookbook for the 
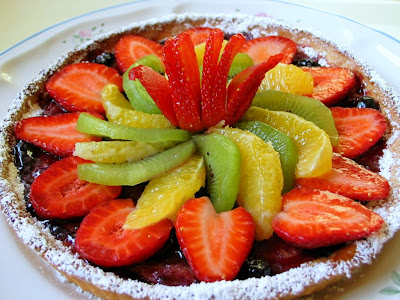
Peach Tart. The method is almost the same, just that the proportion of the ingredients is slightly different, and you don't bake the fruits together with the almond fillings. It took me almost a whole day to complete this tart! I made the tart shell in the morning, the almond filling just after lunch and I only managed to put the fruit toppings in the late afternoon! I've intended to make 3 rings of fruits, but I realised that the tart is too small (only 18cm), so I could only managed 2 rings, so I had to alternate the oranges and kiwi slices in the second ring. I tried to include all the fruit colours, and since I don't have any blueberries, I used blueberry jam instead of the strawberries spread called for in the original recipe. It was only after I completed my 'master piece', I then noticed that I have missed out yellow :,(


I made a strawberry fan after reading about it from a cookbook I just borrowed. The fan didn't really look like a fan, rather it looks more like a crane from a distant. It was only after I downloaded my photos that I noticed that it also looks like a rose or a tulip from this angle :)


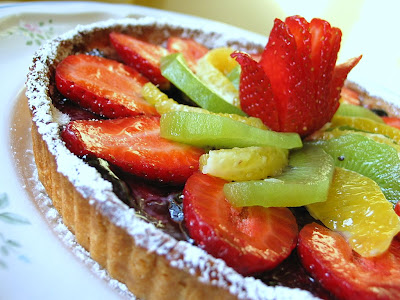
Here's how to go about making the strawberry fan:
Clean and pat dry a large strawberry. Do not hull. Place the strawberry with the pointed end up. Cut several vertical slices very close to the stalk end, take care not to cut through so that the slices are still attached. Press the stalk end gently to make the slices fan out.

Needless to say, my family members like this fruity tart a lot...I could only save one small slice for my little for his afternoon tea today.


I was pleasantly surprised when I found out that Peony of My Culinary Journal has passed me this award! I have not received any form of awards for ages, and it definitely made my day! Thanks Peony! and I'll like to pass this award to:

Elyn of E's Joie for her creativity and passion in baking!
Anne of Simply Anne's for her great talents and amazing creations!
Mandy of Fresh From The Oven, she sure can cook and bake, and she makes great desserts too!
Anh of Food Lover's Journey, another talented cook and baker, and she's still so young!
Patricia of Technicolor Kitchen, well, she's a all-rounder, what more can I say :)

Thanks so much, gals, for sharing all your wonderful stories and great photos!!


Ingredients:
(make one 18cm tart)

pastry:
80g flour
20g ground almond
30g caster sugar
40g unsalted butter, soften at room temperature
1 tablespoon (15g) lightly beaten egg

filling:
2 teaspoon flour
40g ground almond
3 tablespoon brown sugar
30g unsalted butter, soften at room temperature
30g egg, lightly beaten
1 teaspoon vanilla extract

some blueberry jam
fresh fruits of your choice, sliced and well drained
icing sugar for dusting

Method:
Pastry base:

  1. Lightly grease an 18cm tart pan, set aside.
  2. Toast ground almond at 100 degC for 10 mins. Stirring in between. Let cool.
  3. Sieve flour and ground almond.
  4. With a manual whisk, cream butter and sugar till light and fluffy.
  5. Add in the egg, very gradually, whisking the batter till well mixed each time the egg is added.
  6. Sieve over the flour/ground almond mixture in 2 to 3 additions into the batter. Fold the mixture gently with a spatula.
  7. Form and shape the pastry into a round ball. Roll out the pastry in between 2 sheets of cling wrap or baking paper (I used two sheets of cut-out plastic bags) to about 23cm in diameter.
  8. Remove one side of the cling wrap or baking paper. Place the pastry over the prepared tart pan. Mould the pastry into the tart pan, smoothing the edges and the rim carefully...if the pastry is too soft to handle, chill it in the fridge for 10~15 mins.
  9. Chill the pastry in the fridge for 20mins.
  10. Use a fork to poke holes on the pastry. Brush the top of the rim with egg wash. Bake in pre-heated oven at 180 deg C for 10 ~12mins until the edges are slightly browned. Let cool completely.

    filling:
  11. With a whisk, cream butter and brown sugar till the mixture turns fluffy. Add in the egg gradually, mix well each time the egg is added.
  12. Add in ground almond. Fold with a spatula till well incorporated. Sieve over the flour onto the mixture. Mix with a spatula. Add in vanilla extract and mix well.
  13. Spread the filling onto the cooled pastry base. Ensure that the edges are filled up. Bake in pre-heated oven at 170 deg C for 15 ~ 20 mins, until the surface turn golden brown. Let cool completely. Spread the top with blueberry jam and top with fresh fruit slices, dust the edges with some icing sugar.

    Recipe Source: adapted from Delicious!! Baked Cakes, Ikuko Omori
More aboutI Can Eat A Rainbow

Too many mocks?

Diposting oleh good reading

As I write tests, I use mocks to push off behavior that is difficult to test. This pattern helps me focus on the class under test and drives my design.

At what point can you push too far?

With TDD, its all about your tests, so anything that helps you write a test is the right thing to do. I am confident the tests drive a good design.

However, sometimes there are border cases. You may wonder if another class is excessive.

In this case ask a simple question: is this behavior the single responsibility of this class?

Usually the answer is no. The behavior I'm testing is combination of responsibilities and so, yeah, a mock is a good choice.
More aboutToo many mocks?

L'A PATISSERIE: A EURO-ASIAN BAKERY

Diposting oleh good reading on Minggu, 09 September 2007

Bebe's request: Black forest cake. Those are chunks of dark cherry jello!

I was walking by this Euro-Asian bakery on Granville Street and couldn't resist trying something.

Lychee mousse cake: the best out of the bunch, I think. Chocolate and vanilla sponge layers are nice too.

Green tea mousse cake. Green tea and chocolate cake. The chocolate sponge was not as tender and moist. I didn't like this one. But it didn't stop me from eating it all.

Coconut mousse cake with (sweet) black rice and mango mousse chunks. Looks like the pastry chef decided to throw all the leftovers into this one! Bebe didn't like it, but Stomach did. He thought the cake was on the dry side though.


Lots of fusion stuff here. They've got real boules, baguettes and european-inspired breads along with traditional chinese pastries.
L'A PATISSERIE
8278 Granville street Vancouver BC V6P 4Z4 TEL: 604-269-0002


La Patisserie on Urbanspoon
More aboutL'A PATISSERIE: A EURO-ASIAN BAKERY