Hokkaido Milky Loaf

Diposting oleh good reading on Sabtu, 28 April 2007


I have finally found the bread recipe that yields the "right" texture!!

I really like my bread to be cottony soft and fluffy. I found this recipe from this site sometime back, but didn't get to try it till now. I have seen another Hokkaido Milky Loaf recipe from a cookbook, but that is made with Hokkaido's Furano fresh milk, which of course is not available here. This recipe uses ordinary fresh milk.


I followed the recipe exactly but only halved the portion as we wouldn't be able to finish such a big loaf. The special thing about this recipe is that it uses whipping cream. I guess this makes the bread soft and increases the moisture. The bread was still moist when left overnight even though no additives such as bread improver is used! This bread can be made by using the straight dough method or the Water roux method. I find the Water roux method too troublesome, although it will yield a much softer texture.

It was a breeze making this loaf using the straight dough method. I simply added all the ingredients into my bread machine, set it to the "sweet bread" function and let it run on its own. Do note that if you are using a bread machine to do the kneading, you will have to scrape down the side of the pan from time to time. The dough appeared to be very sticky and wet in the beginning. When the loaf is done, do remove it from the pan carefully. When fresh out of the oven, the loaf was very delicate! It was so soft that I deformed it when I tried to remove the kneader at the bottom :'(


A closer look at the texture of the bread. This is the best bread I have made so far. The texture is truely cottony soft, and it tasted even better than the sweet bun bread that I have made earlier. The bread is delicious eaten plain and it is not necessary to warm or toast it even though it was left overnight. This is the kind of bread that I will make and give it away to friends and family members :))

More aboutHokkaido Milky Loaf

Mentoring

Diposting oleh good reading on Jumat, 27 April 2007

I wouldn't be where I am now if not for Peter Morrone. I began working with Peter after leaving a consulting firm where my days mostly consisted of c++ hacks, boring installers and c# bug fixes.

Peter and I set off on a mission. It seemed impossible. The deadline was an x on the calendar, less than 4 months from my start date, and even one day late was failure. The software was going to be used for broadcast graphics -- the systems would be running 24/7.

Even with a bare list of requirements, the application required the ability to be remotely controlled and have remote distribution of uncompressed high definition video assets. All these operations had to have fast response times.

On my first day, we started developing and the application grew fast, with technologies and patterns I had never used. By the due date, the application was shipped and delivered, the customer reported 2 bugs over a 3 month period.

Every morning we would get together and discuss what I was doing and what he was doing. We'd talk about designs. We'd talk about how things were going. He introduced me to design patterns and authors like Bob Martin, Scott Ambler and many others.

Peter was more than my manager, he was different than a friend.

I was the sole coder on the project, but if I was alone, the project would have failed.

Peter kept me on track, helped me find solutions, patterns and improved my designs. He trusted me.

He let me grow.

Thank you Peter.
More aboutMentoring

Durian Muffins

Diposting oleh good reading


I have been wanting to take part in the Muffin Monday (MM02) blog event but was too busy making bread over the past week. I finally managed to find some time to get the main ingredient for my muffins...DURIAN!

The durian season seems to be around already, but there is still no sign of them at the fruit stalls near my place. I was lucky to spot them when I went to the supermarket. This is the first time I bought durians in a ready-packed form. All along I have eaten durians that came with the thick, horny husk. To me, eating durians means you have to do some work before eating the flesh, that is, to pry open the huge fruit with a knife (sometimes a screwdriver can do a better job), and at the same time, guessing whether the flesh will be sweet, bittersweet or bitter. After eating the fruits from the first section, the next fun thing is to open up the various segments, and guessing whether there is any fruit in it. The ready-packed ones that I bought were Thai durians, the flesh were in bright yellow and tasted very sweet. Some people prefer the slightly bitter type, but as for me, I like both :)) For those of you who are have not heard of this fruit, you can read about it here.

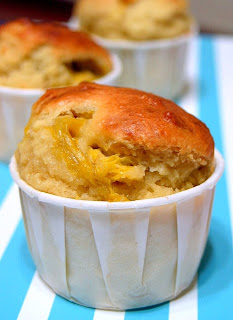
I used a banana muffin recipe and replaced the banana with durian pulp. I mixed half of the durian pulp into the batter and filled the middle of each muffin with a spoonful of the remaining durian pulp. In this way, you get to bite into the 
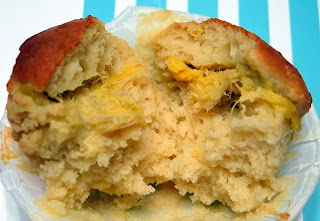
durian pulp when you reach the centre of the muffins :))

I was rather disappointed when the muffins failed to create the wonderful aroma from the durian while they were baking. There was only a very slight hint of durian fragrance coming from the oven. Apparently, the Thai durians are less fragrant as compared to those from Malaysia. When the muffins were finally cooled enough to handle, I couldn't wait but to try them with my boy. Yes, only one of them likes durian, the other one simply hates it. The taste of the muffins was very good, we liked the soft texture, and the fragrance of the durian was rather dominant. My boy, a durian-lover like me, was squealing with delights, and was actually kicking his legs and fists around after he took the first bite. The next thing he said was to request me to make durian breads, durian cakes, durian cookies and even durian brownies! This really got his brother very upset ;)

Well, I am not too sure about durian breads or cakes, but I will certainly try my hand on a durian choux pastry when the durian season is finally here!


Ingredients:
(Makes 9 muffins)

300g all-purpose flour
100g sugar
2 teaspoons baking powder
1/2 teaspoon baking soda
1/2 teaspoon salt
75g butter, melted
1 egg, lightly beaten
3/4 cup milk
300g durian pulp

Method:

  1. Preheat oven to 190 degC. Position rack in center of oven. Line muffin pan with paper liners.
  2. Melt butter over low heat in a saucepan. Set aside.
  3. Separate durian pulp from seeds, mash slightly with a fork and set aside.
  4. Add egg to the melted butter. Stir till combine. Add in milk and half of the durian pulp. Stir to combine.
  5. In another bowl, combine the flour, sugar, baking powder, baking soda and salt. Use a spatula or whisk to mix the dry ingredients completely (to prevent having lumps of baking powder/soda).
  6. Add the wet ingredients to the dry ingredients and stir only until the ingredients are just combined. The mixture will appear very lumpy. Do not over mix the batter otherwise the muffins will become tough.
  7. Spoon batter into the muffin cups, filling half full. Add 1 teaspoon of durian pulp to each, top with remaining batter. Fill up with the remaining batter to about two thirds full. Fill any unused muffin cups halfway with water to prevent warping of the pan or uneven browning of the muffins.
  8. Bake for 25 to 30 minutes or until a tester inserted in the center of a muffin comes out clean. Let the muffins cool for 10 mins in the muffin tin, then transfer to a wire rack to cool. Do not leave the muffins in the muffin tin otherwise the base will be soggy.
More aboutDurian Muffins

Vista drag and drop

Diposting oleh good reading on Kamis, 26 April 2007

Can someone please help me out?

Application A runs with medium security permissions on Vista.

Application B runs as a Browser Plugin in IE on the same machine.

IE runs with low security permissions on Vista.

Application A will not accept "drags" from application B because Vista prevents lower security applications from giving data (and potentially hurting) higher level applications. In theory this is a nice thing to do.

If you add some registry settings, A can accept "drags" from IE -- woo hoo.

Here is the problem: B sometimes starts its own "drags" and A won't accept them (even though A accepts drags that IE started)

Any ideas? (disabling protected mode does work, but is not really a solution)
More aboutVista drag and drop

Everyday Bread

Diposting oleh good reading on Rabu, 25 April 2007


I have been mad about baking bread for the past week. This is already my third loaf this week! The bread maker has really transformed bread making into something so simple that I can't help but keep trying out new recipes. Even my boys couldn't understand why I have been making bread, bread, and bread! My elder boy questioned why I have to make bread since we can get it easily everywhere. I had to come up with some lame excuse that store-bought bread contains additives which is no good for health...I find the excuse quite lame as I have been eating these kind of bread since young ;) Anyway, he seems to buy that idea and didn't question anymore.

As I am still in my quest to search for an everyday bread, I tried this Farmhouse White Loaf recipe from the book "The Bread Book" by Sara Lewis. This is a really simple recipe which anyone can make. However, I didn't follow the recipe exactly, thanks to the bread machine, I am now very adventurous when it comes to bread making! I replaced water with fresh milk, and replaced 30g of bread flour with cake flour. I read from floggers that cake flour will give a softer texture, while the use of milk will give a tender crumb.


I shaped the loaf by following the instructions given in the same cookbook. This is done by rolling the dough into a rope and then tuck in the ends underneath the dough before placing it in a loaf pan. My loaf pan appeared to be slightly bigger than the 1 lb loaf size, as such, the dough didn't really rise fully up to the brim after the second proofing.

Nevertheless, the loaf still puffed up well above the loaf pan when it was done. I didn't use any egg wash on the surface, as I prefer the loaf to have a matte look...anyway it is also not called for in the recipe. Next time I may sprinkle some flour on top before baking...to give it a more rustic, country-style look.


The crust made the finished loaf appear rather like a baguette, but it didn't taste anything like a french bread. The crust is rather thin, and the bread was easy to slice.


The texture was light and fluffy. I tasted one plain slice and it reminded me of the usual sandwich bread we have for breakfast. The bread did not taste "yeasty" or sourish.


I had them toasted and served warm with my favourite blueberry jam. Very Yummy! This recipe is going to be a keeper, well, at least for the time being, before I chance on another everyday bread ;p

Ingredients:

270g bread flour
30g cake flour
1 teaspoon instant yeast
1 teaspoon sugar
1/2 teaspoon salt
170ml milk
1 tablespoon (about 14g) butter

Method:
  1. Assemble the pan and kneader blade in the bread machine. Add in milk and butter, followed by sugar and salt. Spoon in the flour and make a slight indentation in the centre of the flour. Add the yeast in the indentation.
  2. Shut the lid and set to the "Dough" function. The machine will do the mixing, kneading and proofing within 1 hr 30mins (The setting and timing vary among different brands of bread machine).
  3. At the end of the programme, remove the dough from the pan. The dough should have doubled in size.
  4. Turn the dough out on to a lightly floured surface and and punch to deflate it.
  5. Roll the dough back and forth with your palms to form a rope. Fold the ends of the dough under so that it is even width and the exact length of the tin. Lightly grease the pan (not necessary if it is a non-grease pan) and lay the dough in it.
  6. Cover with cling wrap and let it proof for another 30 mins, or until double in bulk.
  7. Bake in a pre-heated oven at 180 degC for 25 ~ 30mins. The bread should be well risen, golden brown and sound hollow when tapped on the bottom. Cool on wire rack before slicing.
More aboutEveryday Bread

Nutella Milk Loaf

Diposting oleh good reading on Senin, 23 April 2007


I made another loaf again! I will be trying out different bread recipes for the next few weeks so that I can get one that's easy to make, with little shaping, with the use of minimal ingredients and most importantly comes with the "right" texture and taste.

This is supposed to be a plain, milk loaf...a recipe from the same Japanese cookbook as the butter loaf I made two days ago. What attracted me was the photo of the finished loaf...it's in the shape of a nice rugby ball. With very nice, clean slits on the surface. It's very obvious that I didn't do a good job in shaping the dough and cutting the slits. My loaf looked more like some strange-looking melon than a rugby! Anyway, I added in nutella spread as filling in the loaf as I wanted the bread to be able to be eaten on its own.


I used the bread machine to do the kneading and proofing. When the dough had risen, I added in the nutella and shaped it before baking it in my oven. Unlike the loaf baked by the bread machine, this loaf was not evenly browned. The top was darker, and the bottom was not fully browned. The bread machine did a much better job in getting an evenly browned loaf than the oven.

The bread is a little dense, and taste better when served warm. The nutella spread certainly enhanced the flavour of an otherwise plain bread.

Ingredients:

250g bread flour
1 teaspoon instant yeast
3 tablespoon sugar
1 teaspoon salt
170ml milk
30g butter (softened at room temperature)
Nutella spread as filling
15g butter (for decoration)
egg wash

Method:
  1. Assemble the pan and kneader blade in the bread machine. Add in milk and butter, followed by sugar and salt. Spoon in the flour and make a slight indentation in the centre of the flour. Add the yeast in the indentation.
  2. Shut the lid and set to the "Dough" function. The machine will do the mixing, kneading and proofing within 1 hr 30mins (The setting and timing vary among different brands of bread machine).
  3. At the end of the programme, remove the dough from the pan. The dough should have doubled in size.
  4. Turn the dough out on to a lightly floured surface and and punch to deflate it.
  5. Flatten the dough and roll out to form an oval shape (about 25cm by 18cm). Spread nutella evenly on the dough. Roll up tightly like a swiss roll. Close up all gaps and place dough on a baking sheet lined with parchment paper. Shape the dough to form an oval-shaped ball.
  6. Cover with cling wrap and let it proof for another 30 mins, or until double in bulk.
  7. Remove cling wrap, and make 5 long cuts (length-wise) on the dough. Slice 15g of butter into thin, long strips. Place strips of butter onto the slits of the dough. Brush with egg wash and bake in a pre-heated oven at 180 degC for 30mins. The bread should be well risen, golden brown and sound hollow when tapped on the bottom. Cool on wire rack before slicing.
More aboutNutella Milk Loaf

Butter Loaf

Diposting oleh good reading on Minggu, 22 April 2007

Borrowed a few cookbooks on breadmaking from the library and I'm now more familiar with the functions of my new bread machine. At least I know that you could actually open the lid while the machine is kneading the dough. I wanted to try the full function of the machine, ie mix, knead, proofing and bake. However, I am not too keen to make a plain white loaf and was happy to find this sweet bread or butter loaf recipe from a Japanese translated cookbook. The recipe is rather straight forward and I used the "Sweet" function to make the loaf. As sweeter breads tend to brown more quickly, this function make sures that the dough has sufficient time to rise and is baked at a lower temperature. I set the crust colour as "Light" on a safer side as I didn't want to have a dark crust.

I measured out the ingredients and place them in the pan following the sequence as stated in the manual...first to go into the pan are the wet ingredients such as water, milk, and eggs (lightly beaten), followed by butter, sugar, salt...and then the flour...with finger, make a small indentation on the centre of the flour and add the yeast to the indentation. The important thing is not to let the yeast come in contact with the wet ingredients...this is especially so if you are using the delay function.

After reading through the manual and cookbooks, I have a better understanding on how the various ingredients work together:

- sugar is the vital food for yeast to ferment...but too much sugar may slow down the fermentation, as such, sweeter bread needs a longer rising time.
- Salt is used in bread recipe to improve flavour and the crust colour. Too much salt can inhibit the fermentation...as such when adding in the ingredients, avoid letting the yeast come into contact with salt. if salt is omitted, you will get a larger bread.
- eggs can improve the texture of the bread and make it larger in size.
- butter and oil can make the bread softer and keep bread fresh for a longer time.


Dough proofing in the bread machine.


After 3 hours, the loaf was done, and it looked so pretty fresh out of the oven ;)


The down side of using a bread machine for baking is that the kneading blade actually got embedded in the loaf. I removed the blade from the loaf when it was still hot as I wasn't sure whether it would be difficult to remove if the bread was completely cooled. The blade made a small hole on the base of the otherwise almost perfect loaf.

The crumb is rather yellowish as two eggs are used in the recipe. It looks almost like a butter or pound cake. The texture is just right...light and fluffy with a thin, crisp crust. On it's own, the taste is a little plain, not sweet at all...it's almost like a plain white bread. I guess it will taste much better with some peanut butter or jam.

Ingredients:

250g bread flour
1 1/2 teaspoon instant yeast
3 tablespoon sugar
1 teaspoon salt
2 eggs (medium)
50g butter (soften at room temperature)
50ml milk

To make with a breadmaker:

  1. Assemble the pan and kneader blade. Add in milk, lightly beaten eggs and butter, followed by sugar and salt. Spoon in the flour and make a slight indentation in the centre of the flour. Add the yeast in the indentation.
  2. Shut the lid and set to the "Sweet" function, select loaf size as 1 lb, and set as Light crust.
  3. At the end of the programme, lift the pan out of the machine and turn out onto a cooling rack. Leave to cool before slicing.

Tip: Do check the kneading progress from time to time. If there are pockets of ingredients at the sides of the pan, open the lid (while the machine is still kneading away), scrape down with a spatula, make sure that the spatula doesn't get in the way of the kneader blade. Refrain from opening the lid when the dough is rising or baking.

To make by hand:
  1. Place flour, sugar, yeast, salt in a mixing bowl. Add in eggs and warmed milk (around 45deg C). Mix till a soft dough is formed. Knead in the butter.
  2. Knead dough on a lightly floured surface for 5 mins or until it is smooth and elastic. Shape the dough into a smooth round ball.
  3. Lightly grease a mixing bowl with salad oil and place the dough in it. Cover with cling wrap and leave it to rise for 1 hour or double in size.
  4. Remove cling wrap and punch the risen dough in the bowl to deflate it. Turn the dough out on to a lightly floured surface and shape it to form a rope. Cut into 3 equal portions and shape into round balls. Rest for 10 mins.
  5. Flatten each dough and roll out to form a rectangular shape. Roll up tightly like a swiss roll. Line the doughs side by side in a lightly greased 19cm x 9.5cm x 7.5cm loaf tin. Cover with cling wrap and let it proof for another 40 mins, or until double in bulk.
  6. Remove cling wrap, brush with egg wash and bake in a pre-heated oven at 180 degC for 30mins. The bread should be well risen, golden brown and sound hollow when tapped on the bottom. Cool on wire rack before slicing.
More aboutButter Loaf

Homemade Buns

Diposting oleh good reading on Kamis, 19 April 2007


Made this ham bun with my brand new bread machine. Thanks to fellow blogger pal, Elyn, for sharing her tips on how to use the machine! I didn't use the full function of the bread maker yet, for a start, I've only tried the kneading function. It is certainly much easier to have the machine taking over the tough work of kneading the bread dough. I used the same sweet bun recipe as I wanted to know how the texture of the buns will turn out with the kneading done by the machine.

I still gave the dough a few minutes of kneading by hand after I removed it from the maker...as it was still a little sticky after 20mins of kneading by the maker. I'll have to give it a full 30mins of kneading next time.


I learnt from a Chinese cookbook on the techniques to roll the ham into the dough and then cut into 4 or 5 sections and shape them as above. It looks pretty easy from the illustrations, but you will need the skills to cut the slices evenly so that you can get a neat bun...somehow the dough kept "shrinking' whenever I try to cut and shape it. So you can see the ham buns that I made have got big and small swirls as well as high and low hills, haha ;)


The sausage buns looked worst...I couldn't even space the sections evenly!


I added some pork floss toppings on this sausage bun.


Once again, the sweet bun recipe didn't disappoint me...the texture was soft and fluffy :))


My assorted homemade buns...guess I was too liberal with the egg wash (although I added some water with the egg), the buns looked so glossy...not very pleasing to the eye right?! I prefer a matt finish, and these remind me of those "fake" buns, hahaha!

I shall try the full function of the bread maker soon...I really like the idea that you only need to add in the ingredients and after 3 hours, you get to eat a fresh loaf of bread!
More aboutHomemade Buns

Smiles from the 100 Aker Wood

Diposting oleh good reading on Rabu, 18 April 2007

It was really very nice of my husband, who took the trouble to get these cookie cutters for me, during his recent business trip to Tokyo. Several months ago, when I found out that these cutters are available at Tokyu Hands, I told him casually that he could get them for me if he happens to be in Japan.

Despite his busy schedule, hours just before his return flight, he took a half-an-hour train ride to Shibuya just to see whether he could find these. It was a fruitful trip for him, as not only did he managed to find them, he also got to taste his favourite Hokkaido Ramen at Shibuya.

Naturally, I couldn't wait but to try out these cutters once I found some free time. I adapted a recipe from this blogger, as she used the same type of cutters. To my surprise, the cutters were rather difficult to use. It was only after several attempts before I could cut out the shapes neatly...the dough kept sticking to the mold...the piece which is used to "stamp" the outline of Pooh...everytime I released it, the dough broke into pieces :'(

After "practising" for a few times, I finally got the hang of it...the trick is not to press the mold too hard into the dough. I also find the dough very soft and sticky. Even though I have floured the cutters and my table top, tt was quite tricky to lift up the cut-out shape from my table top without spoiling it. This only became easier after I "sandwiched" and rolled the dough between 2 sheets of parchment paper. This prevented the dough from sticking onto the work surface and the rolling pin as well. After much hard work, the result was a tray of smiling Poohs and Piglets!


A closer look at Pooh...


and here's Piglet!


These cookies were buttery...and a little crunchy, could be the extra cornflour which I have added. It was a joy just looking at how my boys happily munching away the cookies over their afternoon teabreaks...and the cookies were all gone within 2 days!

I shall try the other Mickey and Minnie set the next time round :)

Ingredients:
(makes about 36 pieces)

100g butter, softened at room temperature
80g caster sugar
1 egg yolk
180g cake flour
20g corn flour

Method:

  1. Sift cake flour and corn flour together and set aside. Line baking tray with parchment paper, set aside.
  2. With an electric mixer, add in sugar to the butter in 2 ~3 additions and cream till the mixture turns pale and fluffy.
  3. Add in egg yolk and mix well.
  4. Add sifted flour mixture in 2 ~ 3 additions, stir with a spatula to form a soft dough.
  5. Place dough in a plastic bag and flatten with rolling pin.
  6. Refrigerate the dough for about half an hour.
  7. Remove dough from fridge. Roll out dough on slightly floured work surface and cut out with slightly floured cookie cutters. If the dough appears to be a little to hard and breaks into pieces while rolling, leave it at room temperature for a few minutes. The dough will soften up and can be rolled easily.
  8. Bake at pre-heated oven at 175 degC for 15 ~ 20mins.
  9. Let cool and store in air-tight container.
More aboutSmiles from the 100 Aker Wood

Xbox broken

Diposting oleh good reading on Senin, 16 April 2007

Again...

And I finally ordered Guitar Hero :(

Hopefully it will be back by the end of next week. Customer support was fast to respond and very helpful. Since this is our third repair, they assigned a supervisor to track its progress.

Its only been a day and I'm already experiencing withdrawal :(
More aboutXbox broken

Another Layer Cake

Diposting oleh good reading on Minggu, 15 April 2007


As I had some left over whipping cream, I decided to have another go on a layer cake. I made this Mixed Fruits Sponge Cake with the same recipe as that of the strawberry sponge cake which I did last week.

I am proud to say, this sponge cake was baked to almost close to perfection (in my own opinion, of course!) The top was not burnt as I baked it on a lower rack position this time. I also used less sugar, only 165g as compared to the 206g stated in the recipe. However, it still took another 10mins more for the cake to be done. The recipe stated that the baking time should be around 35mins. My oven always seems to take at least another 5 to 10 mins longer for most of my bakes :(

After the cake was ready, I let it cool in the pan for around 5mins. Then, I unmould it and let it cool Inverted. That is, the cake was placed on the cooling rack with the bottom side up. I couldn't recall where I have read it...but it was mentioned in some cookbooks that the cake should be let cool inverted so that a slightly domed top could be flattened, and the final cake will be very even and nice. True enough, the cake looked great when I flipped it over :))

I sliced the cakes into 3 layers and filled with whipped cream and canned mixed fruits. Everything went well until I was ready to cover the exterior with cream...I realised that I didn't have enough whipping cream to frost the entire cake! I was thinking whether I should go get some more whipping cream from the supermart...but my elder boy told me not to bother. He told me as long as the cake tastes good, why bother about the appearance. Well, after giving it some thots, I kind of agree with what he said, and left the cake as it is...with only a thin layer of frosting on the exterior. Luckily, the taste and texture of the cake didn't disappoint us...it was light, soft and not too sweet :p

More aboutAnother Layer Cake

The value of user testing

Diposting oleh good reading on Rabu, 11 April 2007

There is great value when you let your users try out your application as it evolves and allow their feedback to inspire you further.

Here's a great demonstration:
Halo 3 Documentary (I recommend downloading the HD version onto your 360 from the marketplace)

Did anyone else notice the dual monitors with multiple keyboards? Are they pairing over there?

I'm drooling over here :P
More aboutThe value of user testing

The developers responsibility

Diposting oleh good reading

What is our responsibility as developers?

1. Build the best solution
2. Maintain visibility
3. Uncompromising ethics
4. Continuous learning and sharing

We are an engineering discipline, but at an early stage, there is much to discover, too much reinvention, vast (differing) opinions of best practices, poor adoption of quality, little understanding of our art by outsiders and too much competition and stubbornness within the community.

While, I write passionately, I have an ethical dilemma of building the best solution, while experimenting with new technology and keeping my stakeholders aware of my risk taking. How do we justify using unknown technologies to solve problems that have known solutions? How do we share our experiences with our competitors in a way that is valuable to the community? Is it possible to fulfill all my responsibilities? I think so. We're making progress, but we have a long way to go.

Thanks for the inspiration!
More aboutThe developers responsibility

Oreo Yogurt Cake with Chocolate Crumble

Diposting oleh good reading on Senin, 09 April 2007


Made this cake for my husband's birthday. His birthday falls on the later part of the week, but as he will be travelling (again!), we celebrated the occasion earlier. Well, this is the first ever birthday cake I have baked for him. It was kind of difficult to decide what kind of cake to make. When I made him cheesecakes, he commented that it was too cheesy for him...and when he tried my sponge-layer cake, he suggested that a biscuit base would taste better!?

Eventually I came up with this "mix & match" cake. The base is made with a layer of Oreo biscuit crumbs, the middle is a yogurt filling and then topped with chocolate crumbles. The recipe for the yogurt filling was from taken from this blogger. It's a very interesting recipe as it uses Yakult, yogurt and whipping cream...no cheese or eggs involved. Instead of Yakult, I used Vitagen. My elder boy insists that they could only drink Vitagen as it has less sugar!


The texture of the yogurt filling is very soft, silky and smooth...my younger one thinks it's like eating tofu (soft bean curd). Overall the cake is a rather refreshing dessert...light and not too sweet. Most importantly, there were no complaints from the birthday "man".

Here's the recipe for the chocolate butter crumbles:

Ingredients:

50g butter
30g caster sugar
15g brown sugar
50g flour
20g cocoa powder

Method:
1. Sieve flour and cocoa powder. Mix all dry ingredients together in a mixing bowl.
2. Rub in butter to crumble stage. If the mixture gets a little too sticky, just add in a little more flour to form dry crumbs.
3. Bake in a baking tray lined with parchment paper in a pre-heated oven at 170 degC for 35 mins.
More aboutOreo Yogurt Cake with Chocolate Crumble

Chirpy Breakfast

Diposting oleh good reading on Sabtu, 07 April 2007

Yesterday morning, while having our breakfast, my elder boy requested for a "full" English breakfast for this morning. We don't usually have English breakfast as I find bacon, sausages and ham too high in sodium. Since the last time I did one for him was ages ago, I agreed and we bought the necessary items while out shopping for our groceries.

This morning, our kitchen smelt wonderful when the bacon was sizzling away in the frying pan...in no time, I had the sausages, sunny-side-ups and toasts ready.

I am a very fortunate mum as my kids are not fussy eaters from young. I didn't have to "dress-up" their food to entice them to eat their meals or greens. When I came across these adorable animal-shaped toasts from a Chinese cookbook, I told myself I should try making them for my boys someday. Since I was already "full force" in the kitchen, I spent a few more minutes to come up with these:


A chirpy looking chick...you just need to make a diagonal cut about 2~3 cm from the top right corner of a slice of bread all the way down to the bottom right corner. Then make 2 cuts on the cut-out piece of bread to make the beak and the wings and the eye. Simply arrange to form a chick and toast it. I used the left-over crusts from the car-shaped toast to form the legs.


This "sad" little doggy is made by cutting 2 small squares from each corner, and then make a cut on each side to make the ears. The left over squares (just the crust) are use to make the mouth and eyes.

For these 2 cars...just need to remove the crust of a slice of bread, then cut it into 2 rectangles. Next cut out a square & triangle from one corner, use the square for the window and one rectangular piece for the head-light. Repeat the same for the other car. Decorate with jam, peanut butter, etc. I cut two pieces of sausages for the wheels.

I admire the author of the cookbook for the genius way of doing the above. You will notice that there are not many left-over or unwanted pieces of bread...what ever little pieces are put to "good use". How clever!

We had a very hearty breakfast and you know what, we had to persuade my little one to eat the toasts as he found the doggy and chick to adorable to eat :)
More aboutChirpy Breakfast

Colour My Day!

Diposting oleh good reading on Kamis, 05 April 2007

My kids have been pestering me for brownies for weeks. Since Easter is round the corner, I baked a batch of Rainbow brownies for them yesterday.

I followed a simple brownies recipe from Hershey's website, frosted it with chocolate ganache (simply melt 125g of chocolate with 3 tablespoon of milk) and topped it with M&Ms and rainbow rice.

My younger boy did the decoration. He was very liberal with the candies..scattering as much as he could. I had to stop him when the brownies got really too busy. It was like a colourful, dazzling piece of artwork from a pre-schooler! I must say it certainly looked very cheerful with those fireworks of rainbow rice and M&Ms.


The brownies looked much better when they were cut into squares...less fuzzy and more appealing to me :))

We had these colourful squares for breakfast early this morning...a good source of energy much needed for our outing to the HSBC Tree-Top-Walk.

We ended our outing with a light brunch at the famous Jalan Kayu prata shop...and not forgetting the tasty otah and soya bean drinks from the shops along that stretch of shophouses at Jalan Kayu. It was a great morning for all of us!
More aboutColour My Day!

Thanks for the Scrum Training

Diposting oleh good reading

I'm a certified Scrum master; I learned the secret handshake and everything!

I highly recommend taking the class, even if you have read a lot about scrum or are working in a scrum organization. Ken had very good insights, was thoughtful in answering questions and sent me home reflecting many things.

As for my fellow classmates, I'd like to thank everyone who supported the leukemia and lymphoma society with your tardiness! For those who are curious, $47 was the total penitance; though the number of late resources was quite less -- quite a generous group :)

Slightly off topic, if you are in Boston and are looking for an Italian restaurant, you must try Giacomo's (Ken, you really missed out!). The new law that lets you bring your bottle of wine home, makes the affordable wine menu great even for the designated driver, who happened to be me.

Speaking of driving in Boston... hmm... its too late to get started on that one.
More aboutThanks for the Scrum Training

Scrum and the product owner

Diposting oleh good reading on Rabu, 04 April 2007

Oksana and I (do we ever do anything alone?) are in Boston for Scrum training with Ken Schwaber this week. The class is interesting; I know a lot about scrum and have been practicing (or trying to practice) it since 2003.

One thing that I kept reflecting on during the class, is the true value of the product owner.

Before Oxygen, I always lacked the single wringable neck. I met with stakeholders, had iterations, backlogs, daily meetings -- everything, but the true product owner. Most times, I would have buy in from users and developers to participate in meetings and monthly reviews, but I never had what I have at Oxygen and it was a flawed way of working.

There is a conflict of interest between the product owner and a developer. Yes, you share a goal, however, its the developers job to expose risk and estimate effort and the product owners job to evaluate the information to make decisions that will decide the fate of the project.

It wasn't until training today and working with people that didn't have the luxury of the product owner that I remembered the pain lacking one. I've been trying to write about this and I have no words...

Luckily, Ken did a few weeks ago, this is what I want to say. I really loved reading it when Ken wrote it; today I appreciated how lucky I am (once again).
More aboutScrum and the product owner

A call to women developers

Diposting oleh good reading on Selasa, 03 April 2007

An Italian blogger, rosalba, has started a collection of blogs, articles, books, code samples and anything else development related written by women.

I think its great; if you're out there, you should let her know!
More aboutA call to women developers

Strawberry Sponge Cake

Diposting oleh good reading


I attempted to bake a "proper" layer cake that is fully frosted and decorated with fresh cream today. Although I know that piping with whipped cream is not as easy as buttercream, I went ahead with my little project as I find buttercream too sweet to my liking. Little did I know that my project turned out to be such a tedious task!

I started off making the sponge cake using a recipe from a Chinese cookbook. The recipe is slightly different from the usual ones that I have came across. It uses quite a large amount of sugar (1 cup), salad oil instead of the usual butter, with the addition of fresh milk and some salt. As my intention was to make a strawberry layer cake, I thought it was ok for the sponge cake to be on the sweet side, as the strawberries that I bought were a little too tart. I was hoping the recipe would give a moist sponge unlike those genoise which tend to be dry.

All went well until the cake was in the oven for 20mins. The cake top started to brown quickly, likely due to the high sugar content. The baking time is supposed to be around 35mins as stated in the recipe. After another 5 mins, coupled with the cake top "going-to-turn-black" and a slight burning smell, I made the decision to change the cake to a lower-rack position. When the recommended baking time was up, the cake was still not ready. It wobbled when I gave the cake pan a slight jerk. As such I let it baked...and baked...and baked! The cake was only done after it was in the oven for more than 55mins! I didn't know what went wrong, but I think having closed and opened the oven too many times to check, lowered the temperature too much. I had to slice off the slightly burnt top before frosting it.


I engaged my little assistants to help me assemble the cake. They took turn to fill the cake with whipped cream and lined the layer with circles of strawberries.


I arranged the strawberries vertically, thinking that the effect would be great on the cake slice. But with this arrangement, it was not easy to fill up the strawberry layer with the cream. I poured and filled the cream haphazardly and top it with the other cake layer...keeping my fingers crossed that the cake would be ok. My elder boy was eager to frost the exterior and so I let him have a go. Eventually I got to shoo them off as they were merrily "scraping" away the crumbs instead of frosting the cake! I proceed to cover the sides with toasted almond silvers. I didn't know it would be such a challenging affair...I had to tilt the cake a little with one hand, and cover the sides with the almond silvers with the other...and all the while taking great care not to drop the entire cake.


The final step was to pipe some rosettes to decorate the top. ***Sigh***, sad to say the result was not too satisfactory. With the lack of skills and technique, plus, the fact that the whipped cream was not stiff enough(good excuse isn't it?) the rosettes appeared like some weired tornadoes :'(

I was dead tired after the whole cake was finally done! The photos didn't turn out well too, as it was too dark...not much naturally light in my house as it was a rather gloomy day. Nevertheless, the entire project was a great experience for me. By the way, the cake tastes good with the cream, strawberries and nutty almond combination. The sponge layer is sweet and moist, overall a tasty and yumilious cake ;-))


Ingredients:

4 eggs, bring to room temperature
206g caster sugar (advisable to reduce sugar amount by half, see comments here)
4g salt
140g cake flour
30g salad oil
30g fresh milk

filling & frosting:
300ml whipping cream (I used non-dairy)
250g strawberries

Method:

  1. Sift cake flour, set aside. Grease and line a 20cm round pan, set aside. Pre-heat oven to 180degC. Position rack at the lower bottom of the oven.

  2. With an electric mixer, whisk eggs and sugar & salt on HIGH speed for about 5 to 7mins, until the batter double in volume and is ribbon-like (the batter should leave a ribbon-like texture when the beater is lifted up). Turn to LOW speed and whisk for another 1 to 2 mins. Whisking at low speed helps to stabilise the air bubbles in the batter.

  3. Add sifted cake flour into the batter. With a spatula, gently fold in the flour until well blended.

  4. With a spatula, mix about 1/3 of the batter with the salad oil in a separate bowl. Fold in this mixture into the remaining batter. This method will help to ensure the oil will be fully blended and at the same time will not deflate the batter.

  5. Add in fresh milk and fold in gently with spatula.

  6. Pour the batter into the pan and bake for 35 mins, or until a skewer inserted in the centre comes out clean. Unmold and cool completely.

Assemble the cake
  1. With an electric mixer, whip the whipping cream still stiff.
  2. Slice the cake horizontally into 2 layers. Place one of the cake layers cut-side down on a cake plate. Spread the whipped cream over the layer.
  3. Arrange rings of strawberries to cover the whole layer.
  4. Fill with some more whipped cream. Top with the other cake layer, cut-side up.
  5. Spread the whipped cream over the top and side of the cake. Decorate as desired.
More aboutStrawberry Sponge Cake

Empty Interfaces

Diposting oleh good reading on Senin, 02 April 2007

A recent practice I've taken up is empty interfaces.

Why you ask? Generics!

I love generics, they've added a whole new world to my design, but when it comes to using a generic interface, I find it best to wrap it in another interface, even if that interface is empty.

Here are some reasons:

1. The name is longer and intellisense isn't smart enough to fill in the types -- more typing (on the keyboard) is never fun (though visual assist does guess pretty well)

2. The name does not imply its responsibilities. Sometimes the generic interface is all you need, but the type of the interface is too generic to understand its responsibilities and behaviors.

3. If you need to add something extra to the interface, it will be quite painful to replace usages with an explicit interface.

4. A generic type name is an ugly type as a string -- I can never remember how to put a generic in the application configuration.

5. Less encapsulation -- if you have a generic interface that has two types, one type is implementation specific (like its used to consume another generic interface) and one type is consumer specific, consumers need to have more knowledge about implementation than they should, just to use the interface.

Here is a reason not to:
1. FxCop -- it gives you a warning... Here is what I think -- FxCop is great at giving warnings, but thats its job, it doesn't understand context, FxCop is not a reason on its own not to do something :)
More aboutEmpty Interfaces