Sweet Buns

Diposting oleh good reading on Minggu, 31 Desember 2006


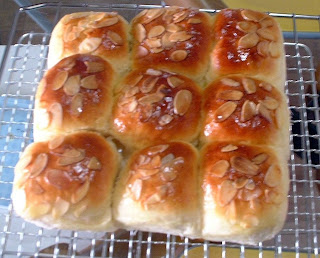
I love bread. I have bread for breakfast almost everyday ever since I was young. This is my first attempt in making bread buns, like those "6-in-1" buns available at neighbourhood bakery shops. I have always wondered how they "join" or "mold" the bread into 6 buns. Thanks to the many food blogs out there, I was able to learn how this is done from step-by-step photos shared by bloggers. In case you are as ignorant as me, this is done simply by placing 6 doughs into one baking pan. The individual buns will join together after they are baked! Now, why I did'nt think of that?!

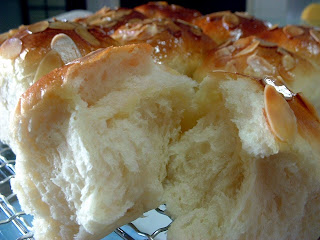
As I do not have a heavy duty mixer, I made the bread by hand. It is not easy. You will need to knead the dough continuously for at least 25 mins. The hard work did pay off though, the buns turn out to be very fluffy and soft. I was not very good in shaping the dough, they came in "all shapes and sizes" despite the fact that I weigh the dough to ensure each one was of equal weight.

I adapted the recipe from this site.


Ingredients:
(make around nine 60g portions)

150g bread flour
150g cake flour
5g active dry yeast
3g salt
125g milk
1 egg
60g caster sugar
50g butter
(1 egg, beaten, for glazing)

Method:
  1. Mix all dry ingredients in a mixing bowl. Add in milk, egg and butter. Mix into a dough.
  2. Place the dough on a lightly floured work surface. Knead the dough until the gluten is fully developed (see tip below) and the dough is elastic, smooth and non-sticky. It will take about 25 mins to knead the dough by hand. Initially the dough will stick on to the work surface. Do not be tempted to add more flour or even give up kneading! After continuous kneading, the dough will no longer stick to the work surface.
  3. Place the dough in the mixing bowl and cover with a damp towel or cling wrap to seal in the moisture. Allow the dough to ferment(or proof) until double in bulk. This will take about 1 hr. To test whether the dough has been fully proofed, press a finger into the dough and withdraw quickly. It should leave a deep impression and spring back very slowly. For an insufficiently proofed dough, the impression will spring back instantly.
  4. Take out the dough and punch out the gas produced. Let the dough rest for about 15 minutes. Cover with a damp towel or cling wrap.
  5. Divide the dough into 60g portions. Shape and add fillings as desired. Arrange dough in a greased or lined pan. Let the dough proof for the second time for about 30-45mins. Cover with a damp towel or cling wrap.
  6. Brush the top with egg wash. Add almond flakes on the top of the buns, as desired.
  7. Bake for about 15 minutes in a preheated oven at 190 degC. Remove from pan and cool on wire rack.
Tip:
To check whether the dough is fully developed, take a small piece of the dough and stretch it with your fingers. If it can be stretched into a thin layer without tearing easily, the dough is fully developed.
More aboutSweet Buns

Oreo Cheesecake

Diposting oleh good reading on Sabtu, 30 Desember 2006


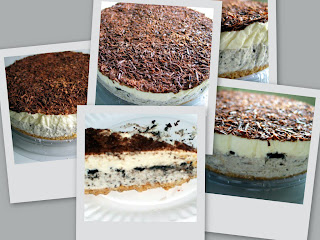
I made this No-bake Oreo Cheesecake for my younger one's birthday recently. His birthday cake was a bit small. As such I made this cheesecake to ensure everyone gets to eat a piece of cake. I was very glad that it was very well received. Thanks Evan, from Evan's Kitchen Rambling for providing the receipe. I am very inspired by her creations and her talents in both baking and photograpy. I modified the recipe a little and added chocolate shavings on top of the cake to decorate it a little.
Most instructions for cheesecakes call for the use of a springform pan or a loose-bottom pan, as cheesecakes cannot be turned out on the rack without collapsing. As I do not have any one of these pans, I improvised by following the tip from Kraft's website. Just line a 18cm round pan with a sheet of aluminum foil that extends out 2-3 cm at the side of the pan. When the cake is chilled, lift the cake out of the pan by the foil. Carefully remove the foil and transfer the cake to a platter. Decorate the top or side as desired.
The side of the cake looks a little crinkly because of the foil. Next time, I will use a strip of baking paper to line the side of the pan so that the sides will look neat.

Ingredients:

base:
110g digestive biscuits(about 8 pieces), chopped into fine crumbs
40g melted butter

filling:
300ml whipping cream (chilled, I used Bulla Thickened Cream)
1 tablespoon gelatin powder
3 tablespoon boiling water
10ml lemon juice
250g cream cheese, soften at room temperature
50g icing sugar
45ml fresh milk
1 table spoon vanilla essence
8 pieces of oreo cookies (coarsely chopped, with cream removed)
4 pieces of oreo cookies (finely chopped, with cream removed)(1 piece refers to half of the oreo cookies)

Method:

  • Mix biscuit crumbs & melted butter together and press firmly with the help of a spoon onto the base of a 18cm cake tin. Chill for 30 minutes.
  • Beat whipping cream with electric mixer until 70% stiff or until mousse-like. Do not over mix. Takes about 2 to 3mins on low speed. Keep in the fridge.
  • Place gelatin powder, lemon juice & boiling water in a bowl. Heat a pot filled with water until just simmering and place the bowl inside the pot. Dissolve gelatin, lemon juice & boiling water in the bowl. Keep warm.
  • With an electric mixer, beat cream cheese , icing sugar, milk and vanilla essence until smooth & creamy. Blend in gelatin solution. Blend in whipping cream with a spatula.
  • Pour half of the cheese mixture into a bowl. Stir in finely chopped oreo cookies. Mix well. Pour the mixture the cake tin. Chill for 15 minutes.
  • Sprinkle coarsely chopped oreo cookies on top of the first half of cheese mixture which has been chilled. Pour in the remaining half of the cheese mixture. Chill for 3 to 4 hours before serving. Remove from pan and decorate with chocolate shavings or as desired.

Tips:
To ensure easy whipping, make sure the cream is chilled. Chill the mixing bowl in the fridge for 15mins before using it to whip the cream.

To achieve a clean slice, heat up the knife before slicing (eg. soak knife in a cup of hot water or heat over a stove on low heat). Clean the knife after each cut.

More aboutOreo Cheesecake

Oreo Muffins

Diposting oleh good reading on Jumat, 29 Desember 2006


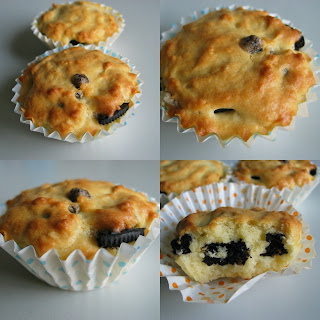
The males in my family loves oreo cookies. Upon their request, I made these oreo muffins for breakfast. I simply replace the chocolate chips called for in the recipe with oreo cookies chunks. Here's a simple and easy muffins for all those oreo fans out there. The recipe here makes 6 muffins, you can easily double it to make 12.

I bought these muffin liners from Diaso at Vivo city, it comes in various sizes. This size comes in 40 pcs and cost only S$2. It has a wax lining on it, as such, the muffin comes out clean and neat and will not stick onto the liner unlike the usual paper liners.

Ingredients:
(makes 6 muffins)

2oz butter, soften @ room temperature
35g caster sugar
1 egg, lightly beaten
105g plain flour (all purpose flour)
1 teaspoon baking powder
1/2 cup fresh milk
1/2 cup oreo cookie chunks

Method:

  • Preheat oven to 190 degC.
  • With an electric mixer, cream butter until soft.
  • Add in sugar and beat until light and fluffy.
  • Add in the egg gradually. Beat well each time egg is added.
  • Sift flour and baking powder. Fold flour mixture into the butter mixture, alternating with the milk.
  • Fill each muffin cup/liner with batter till half full. Sprinkle several oreo cookie chunks on top, then cover with a spoonful of batter.
  • Bake for 25 mins, until lightly browned. Cool the muffins in the pan for 5 mins before transfering to a wire rack to cool.
More aboutOreo Muffins

Journey to home baking

Diposting oleh good reading on Kamis, 28 Desember 2006


I finally bought a convection oven in August. I have stopped working since January this year to be a full time stay-at-home mum to take care of my 2 boys. I love baking, more than cooking meals for the family. Since I bought my little oven, I have been able to try baking various types of muffins, cookies & cakes. I have also managed to try frosting a layer cake. I realised that most of my friends do not bake or even cook frequently. I have came across many interesting recipes and bakes from the local food blogs here. By starting this blog, I hope I am able to get ideas and suggestions from fellow home bakers to improve my baking skills. At the same time I hope my creations and little experiments would also inspire others, who are like me, to start baking as a hobby. Here's my latest creation, Chocolate Fudge Brownies.

I followed the recipe from a cookbook for the base. The cake did'nt turn out to my expectation to be fudgy, instead, it's more cake-like and a bit dry. As such, I will not post the recipe here. The frosting is great. I melted some dark chocolate with whipping cream. It's very smooth and chocolaty. Yum yum! My LG likes the brownies, he finds it very tasty. I used little bear jelly gums to decorate the brownies as my younger boy luv candies.


More aboutJourney to home baking