NOVEMBER RECIPE MISSION ACCOMPLISHED: COCOA NIB & PECAN COOKIES

Diposting oleh good reading on Kamis, 29 November 2007

a stack of Cocoa Nib & Pecan Cookies

For my November Recipe Mission, Medrich's Nibby Pecan Cookie recipe was a cinch to make. I like the slice and bake method of making cookies, so I opted to do this rather than the roll & cut method, which to me seems like a whole lot of work. Besides, with a log in the freezer, I can make a few at a time so that my cookies will always be fresh. It's so convenient to have homemade cookies readily available.

the cocoa nibs are the darker bits while the pecans form a pretty mosaic

Anyone who knows me, knows that I hate nuts, raisins and other lumpy things in my desserts. However, in this case I made an exception because the nuts are not lumpy. The cookies themselves tasted sublime. They were delicate and crispy and short; not chewy at all. The cocoa nibs were distinguishable, but barely. I tasted primarily pecans. Next time, I would like to try an all cocoa nib cookie instead. Medrich has a few variations in her cookbook which call for different nuts to be used or for a chocolate cookie version. This to me sounds like overkill, but eh, it's chocolate, so it can't be that bad. I figure I would like the cocoa nibs to stand out because I paid an arm and a leg for them.

cross-section of the nibby cookies

In my version of the cookie, I employed all organic ingredients. I used organic cane sugar, organic flour etc and of course the cocoa nibs were organic too. What with my huge stash of vanilla beans, I think next time, I will scrape in a pod or two's worth of vanilla seeds into the batch of cookie dough instead of the vanilla extract. I'll omit the pecans and whatever else nuts 'cause they overpower the cocoa nibs and hopefully it'll taste yummy...we'll see how that turns out. I'm not particularly fond of chocolate cookies so most likely I'm not going to try Medrich's variation. I love dark chocolate (is there anything else worth eating?) and all chocolate desserts, but I prefer chocolate chunks in a non-chocolate cookie dough base because the quality of the chocolate chunks will stand out better and the non-chocolate cookie dough base is a better foil for the chocolate chunks.

This recipe is really nice and I appreciate how easy it was to put together. It's a keeper. I'll be looking for other ways to use these cocoa nibs I've got because they're a really cool ingredient to use. I love 'em 'cause they're crunchy and somewhat nutty in a chocolatey sort of way. Does that make sense? Ah well. They're good and good for you.

Check out the recipe here.

More aboutNOVEMBER RECIPE MISSION ACCOMPLISHED: COCOA NIB & PECAN COOKIES

NOVEMBER RECIPE MISSION: COCOA NIB COOKIES

Diposting oleh good reading

I'm still recovering from the flu...and it's been almost a whole month since I first caught this darn thing! Nevertheless, with a couple of days to spare, I am still going to post a November Recipe Mission. This month, my challenge is to make Cocoa Nib Cookies.

I have 2 bags of organic cocoa nibs I purchased a couple of months ago from Capers. The recipe I'll be using is adapted from Alice Medrich's Bittersweet...one of my favourite books. She calls for adding bourbon, but I chose almond extract...because I don't have bourbon.

In fact, bourbon sounds yummy. I've got to buy some. In fact I need to make a run to the liquor store soon because I'm out of vodka--having used up the last cup to preserve my recently purchased vanilla pods. I used the vanilla seeds for creme caramel (yum!) and dumped the empty pods in the vodka. I'm going to have vanilla extract in about a year, I think. It's already smelling nicely vanilla-like.

By the way, I purchased a whole whack of beautiful vanilla beans online. It's cheap...even with the additional $20 I had to pay for duties on top of the cost of shipping. I'm happy. I had Stomach figure out the per pod cost and I still come out ahead. It beats buying dried out pods from Safeway! I bought my vanilla beans from saffron.com and I am satisfied with my purchase. I purchased one half pound of Vanilla Tahitensis and a half pound bag of Vanilla Planifolia. The one bag I opened has 60 pods in it in a vacuum-sealed bag. They're very nice. I love fresh vanilla pods. I now have vanilla sugar (you store the pods in sugar) and the beginnings of extract (from the used up pods in vodka) on top of the scrumptious fragrant seeds to use. I plan to employ them in my Christmas baking this year.

I digress. Here's the recipe for the cocoa nib cookies. It'll be a perfect addition to a Christmas Cookie Box.

COCOA NIB & PECAN COOKIES
1 cup (3.5 oz) organic pecan halves, toasted & chopped
1/2 pound (2 sticks) organic unsalted butter, softened
3/4 cup organic cane sugar
1/4 t pink himalayan salt (slightly rounded)
1 t almond extract
1 1/2 t vanilla extract
1/3 cup organic cocoa nibs
2 cups unbleached organic all-purpose flour

  • Combine butter, sugar, salt, almond extract and vanilla in bowl of electric mixer and beat on high speed until smooth and creamy but not fluffy (1 minute). Beat in pecans and cocoa nibs. Turn off mixer and add all the flour at once. Beat on low speed until flour is incorporated.
  • Form dough into 12-inch log about 2 inches thick. Wrap in parchment and refrigerate for at least 2 hours, preferably overnight. (can be frozen 3 months)
  • Position racks in upper and lower thirds of the oven and preheat the oven to 350 degrees F.
  • Use a sharp knife to cut the cold dough log into 1/4 inch thick slices. Place cookies at least 1 1/2 inches apart on parchment-lined cookie sheets.
  • Bake for 12 to 14 minutes, or until the cookies are light golden brown at the edges, rotating the cookie sheets from top to bottom and front to back halfway through the baking. Let cookies firm up on the pans for about 1 minute before transferring them to a rack to cool completely. Store cookies in airtight container for at least 24 hours for best flavour before serving.
  • can be stored in airtight container for at least 1 month

More aboutNOVEMBER RECIPE MISSION: COCOA NIB COOKIES

A sticky little secret

Diposting oleh good reading on Rabu, 28 November 2007


I had someone ask on my other blog how I got this hairbow to stick to Little Squishy's head. I tried EVERYTHING to get them to stick to The Princess's head when she was an infant. KY, Karo's Syrup, etc. They would just fall off and leave a sticky mess. I just resorted to brain squeezers, which aren't my favorite, but what do you do?

When I had The Pea, a darling nurse in the hospital told me a little secret. Use Elmers Glue. It is water soluble and if you just get their hair wet before you wash the rest of their body at bathtime, by the time you get around to washing their hair, the glue is soft enough to be scrubbed out. Make sure you catch the ribbon. I have had more than my share almost go down the drain.
More aboutA sticky little secret

CAKEBRAIN'S BLACK SESAME MACARONS

Diposting oleh good reading on Jumat, 23 November 2007

black sesame macarons with black sesame buttercream

Here's the recipe for the yummy Black Sesame Macarons I made a while back.

Cakebrain's Black Sesame Macarons
Makes 35
225 gr powdered sugar
100 grams ground almonds
25 grams ground black sesame
3 egg whites (about 100gr) at room temperature
25 gr granulated sugar

In a food processor, run the nuts, black sesame and powdered sugar until the mixture is finely ground. Run through a sieve if needed.

Whip the egg whites until foamy, slowly add the granulated sugar and continue whipping until they are glossy (stiff peaks).

Slowly fold the nut/sesame/sugar mixture into the whites with a wide spatula. The mixture should "flow like magma". When you form a peak, it should slowly dissolve back into itself and flatten.

Fill a pastry bag with the batter (I use a Wilton #12 tip) and pipe small rounds onto parchment lined baking sheets. I like to make small macarons about 3/4 inch to one inch in diameter. If you make your macarons too big (over an inch) they take longer to bake and may collapse if taken out too early.

Let the macarons rest for 20 minutes while you preheat the oven to 315degrees Fahrenheit.
Bake one tray on the middle rack for about 8 minutes. Look at the macarons. By this time, the feet should be forming. Whoopee! Once the feet have formed, lower the oven temperature to 300degrees F. Open and close the oven door slightly to allow a little of the heat and moisture to come out. Bake a further 4-6 minutes at the lower temperature.

Let cool, remove from the parchment paper and fill with buttercream or ganache.
More aboutCAKEBRAIN'S BLACK SESAME MACARONS

Chocolate Marble Bread II

Diposting oleh good reading

Made this strange, almost alien looking loaf of bread this afternoon. This is my 3rd attempt on a Chocolate Marble Bread. I still finds it very tricky to roll out the dough without having the chocolate paste oozing out. I used the Hokkaido Milky Loaf recipe to make the bread dough as I need to use up some leftover whipping cream. I followed the rolling and folding method as shown here (I don't understand a single word in this wesbsite though) but instead of slicing the dough into short cylinders, I cut them into 4 long ones and stack them length wise, two on top and two below. I came across this shaping method when I was browsing some Chinese cookbooks at a bookstore yesterday.


It's obvious that I didn't do a good job in rolling out the dough...they were in various sizes. I was quite certain that I wouldn't be able to get the nice swirls as the one in the cookbook.

While I was preparing to make the chocolate paste, my little one offered his assistance. I had to decline as it involved mainly stirring the paste over the stove. He was very disappointed, but ran off to play on his own. His brother was down with a flu (again!) and was resting. When he saw me kneading the dough (I made the bread by hand), he came along and asked whether he could help me with it. Although I would rather not have him around while I am making bread, I simply couldn't say no, especially after I saw the great enthusiasm in his eyes.


I got him to wash his hands, but I didn't notice that his fingers were still covered with ink stains until he started kneading away! I had to keep my fingers crossed that no one would suffer from any stomach upset after eating this bread ;)

It's quite amazing how kids can pick up things so fast. I didn't teach him or show him on purpose how to go about kneading the dough...but he was able to mimic the action quite well. We took turns to knead the dough until it was fully developed. I managed to take a short video clip of him in action, and it's going to go under our collections of home videos! Do take note that this is not a demo on kneading :)


The dough rise, shaped, proofed and was finally baked. The entire process took about 4 hrs. Despite the ugly exterior, the cross section of the loaf didn't look too bad, although I must say, the swirls were not too distinctive.


Once the bread was cooled off, my boy requested for a small piece to try. After the first bite, he asked for a whole slice. He ate it with great gusto...enjoying his fruit of labour!


Ingredients:
(makes one loaf)

chocolate paste
20g cake flour
50g sugar
1 egg white
80ml milk (warmed)
18g cocoa powder
10g butter

bread dough
270g bread flour
30g cake flour
5g active dry yeast
15g milk powder
40g caster sugar
4.5g (3/4 teaspoon) salt
125g fresh milk
Half an egg
75g whipping cream (heavy cream)

Method:

chocolate sheet
  1. Mix sugar and cake flour into the egg white until smooth.
  2. Place milk in a saucepan and heat till just simmering.
  3. Add coca powder into the milk and stir till cocoa powder is incorporated into milk.
  4. Add egg white mixture into the cocoa mixture and stir over low fire till mixture thickens and form a thick lump. (please refer to this site for the texture of the finished chocolate paste)
  5. Add in butter and stir till incorporated.
  6. Leave to cool. Place in a plastic bag and roll into a square (about 14cm x 14cm). Keep refrigerated before use.

bread dough

  1. Place all dry ingredients into a mixing bowl. Mix the ingredients with hand. Make a well in the centre of the flour mixture. Pour the lightly beaten egg, milk and whipping cream into the well. Mix the ingredients to form a soft dough.
  2. Turn out the dough onto a lightly floured work surface. Knead for about 15 ~ 20mins until the dough becomes smooth, elastic and non-sticky.
  3. Smooth the dough into a round ball. Let it rise in room temperature in a mixing bowl, covered with cling wrap. Let dough rise for 60mins or until it double in bulk.
  4. Remove dough and punch out the gas. Turn the dough onto a lightly floured work surface. Roll out the dough into a rectangle (about 45cm x 20cm). Place the chocolate sheet on the middle of the dough. Wrap both ends of the dough over to cover the chocolate sheet completely. Take note that the dough should be rolled long enough for both sides to fold over the chocolate sheet. Seal the edges tightly. The dough should now be about 15cm x 20cm.
  5. Roll dough from centre to the edges to form a long rectangle (about 45cm x 20cm). Do this gently to prevent the chocolate paste from oozing out. Fold the dough into 3 folds.
  6. Repeat step 5 above.
  7. Finally, roll dough to about 40cm x 18cm. Cut into 4 individual rectangles (each about 10cm x 18cm). Note that the 18cm length is the length of my loaf tin, you may adjust according to the length of your pan. Roll up the each dough tightly, swiss-roll style, to form a roll with a length of 18cm. Place two dough (length wise) in a lightly greased loaf pan and stack on the other two rolls. Let proof for another 1 hour or until the dough rise to about 80% of the loaf pan. Cover with the lid (for a pullman tin).
  8. Preheat oven to 200 degC but bake at 180 degC for about 35- 40 minutes. Remove from oven and unmould immediately. Let the loaf cool off before slicing.
More aboutChocolate Marble Bread II

Mass Effect or Rock Band?

Diposting oleh good reading on Rabu, 21 November 2007

That is what I said to myself when I got home from the store yesterday.

Decisions, decisions...

I started with Rock Band -- we had a full band waiting to play (myself, husband, sister and brother-in-law). I needed to set everything up before they came over. (i.e. I wanted the drums all to myself)

Having 4 friends rocking out is really a blast! My sister thinks we should dress up and do a show on Thanksgiving for our family. I'm not sure, will they appreciate our musical talent?

Can someone tell me how to stop playing the same songs over and over again? If I have to sing In Bloom one more time...

My sister and her husband went home after a few hours of rocking and it was on to Mass Effect. It looks great! Only problem... How do I play? KOTOR is one of my favorite games of all time and so far this game feels more like Halo than role playing... Need to work on using powers better... I figured out the equipment screen though!

I couldn't agree with Penny Arcade more :P (read all 3)
More aboutMass Effect or Rock Band?

Whatever happened to sustainable pace?

Diposting oleh good reading

Who practices sustainable pace?

Development is an art. Its a mental challenge (emotion if you pair). As a day goes by, an individuals definition of quality changes depending on their mood and energy.

Over short periods of time a team can keep up long hours; especially if there is positive momentum or results in sight.

But permanent hours to get more out the door? Does this really work with out sacrificing quality and practices?

How many times are corners cut to meet a deadline? Was it ever too much to write that test first? Was code copied without refactoring to remove duplication? Is there spike code in production cause it worked?

Is that our risk to take?

Can a person control burnout or realize the compromises they make? People have an amazing ability to adapt to any situation. In a bad situation, we forget, we lie (mostly to ourselves), we ignore and we accept things we shouldn't.
More aboutWhatever happened to sustainable pace?

Chicken Pie

Diposting oleh good reading

Made this chicken pie for lunch today. This is my very first attempt at making a pie. I have never thought I would be able to make a savoury pie, as I can't really cook I always stay away from any bakes that require some form of cooking.

Just last week, my cyberfriend, VB, sent me photos of her lovely chicken pie. She followed the recipe posted by Baking Mum. Instead of making into small individual pies, she made it into a big one. The pie crust was a beautiful golden brown..and it looked very flaky and yummy! I was so inspired with her beautiful pie that I wanted to make one right away :D
I followed the recipe posted by Peony of My Culinary Journal, who has adapted the same recipe from Baking Mum. Like VB, I made mine into big ones...since I do not have a big enough pie pan, I made mine into two medium sized pies...using a 20cm and a 18cm tart pan. I didn't brush on any egg wash on the crust as I do not like the glossy effect after baking.


From the many cookbooks that I have borrowed, I have seen beautiful photos of pies decorated with pretty trimmings and decorative edges. Since I do not have any experience to come up with those intricate trimmings, I simply pressed a fork around the edge of the crust to make it more presentable. With a small piece of dough, I cut out the 'leaves" with a knife since I do not have any nice cookie cutters to do the job. The veins are marked using the back of the knife. I simply place them on top of the crust and cut a few slits on the top before baking. As the dough was rather soft to work with, the leaves were not of the same size and thickness :'(


I was quite surprised that the 'veins' of the leaves were still visible after baking.


As my pie pans do not come with a loose bottom, I lined two stripes of parchment paper at the bottom of the pan. When the pie was done, I tried lifting it out from the pan with the stripes of paper. However, the crust started to crack. In the end, I had to invert the pie onto a plate, and then invert it again onto a serving plate.


My niece came over for to our place today, and so the four of us each had a quarter of the pie. We liked the buttery, crisp crust very much. It is not overly flaky like a puff pastry, but tasted just right for a short-crust pastry. We have varied opinions about the fillings though. Thanks to my lousy cooking skills, my elder boy and my niece felt that the potatoes were too mushy for their liking...but they like the other stuff in the fillings. Whereas my younger boy and I find the soft and mushy potatoes tasty. The kids had fun trading away the stuff in the fillings among one another!


Upon the request by the kids, I had removed all the green peas from the mixed vegetables...all the 3 of them hate peas! So there is not a single green in the pie!


This is the other smaller pie I reserved for my better half. Since there were no extra dough, I didn't manage to decorate the top of this pie. I was glad that he liked it. He ate 3/4 of the pie right after dinner...and he liked the mushy potatoes fillings too :D
More aboutChicken Pie

Morning Scrum -- Remote Style

Diposting oleh good reading on Selasa, 20 November 2007

This is what life at Oxygen looks like in the morning (from the comfort of my home):

More aboutMorning Scrum -- Remote Style

the joy of pair programming

Diposting oleh good reading

I started speaking about pair programming because I didn't like it and I needed to understand this practice better.

Sometimes I still don't.

But, I admit this:
Pairing is a great practice.

Great, but surprisingly difficult.

The ideal pairing situation requires both people to be expert developers. They need to be open to the other person's idea. And in this case (expert developers with good, strong opinions), its likely to bring pain.

If the pair is not parallel in skill (which is often the case), the stronger person must slow down and take on a mentoring role. Being a mentor when you want to be as productive as possible is frustrating. Many developers are poor teachers, but communication and discussing ideas is key to creating a great solution.

Every person you work with is different and you create a unique pair. You will go at different speeds, create different designs, even make different jokes.

Pairing is a good mechanism for teaching, but the real strength is in design and code. I have seen no other practice keep every team member familiar with every project, design and decision.

The whiteboard is rarely used because the pairing session isn't about code, its about creating. The design decisions are made when the pair needs to make them. Any previous design or decision may not be the best solution when (and if) its needed.

If discussion can be avoided, don't do it. The best way to be productive is to keep coding and evolving. Focus on small steps to deliver functionality quickly and ensures CI success.

With pairing every moment is a code review. If the team switches pairs and owns the code, everyone is familiar with everything. No reviews, no whiteboards, no documentation.

Imagine the possibilities.
More aboutthe joy of pair programming

GET YOUR FLU SHOTS

Diposting oleh good reading on Jumat, 16 November 2007

Bebe had the flu, I caught it next, Bib's got it now and now Stomach has it. This started near Hallowe'en and I'm still coughing! Won't be posting until everyone's better...
More aboutGET YOUR FLU SHOTS

Matcha Red Bean Loaf

Diposting oleh good reading on Kamis, 15 November 2007

Beware! This is going to be a super long-winded post!!!

Besides MH, another blog visitor, Celine has informed me that she has baked a milk loaf by spreading the dough with a mixture of softened butter, minced garlic, fresh parsley and fresh oregano, then sprinkled with some Parmesan (must be fresh?!), rolled up and baked. Wow, this combo is really mind-blowing isn't it?!

Thanks to growing up in a traditional Chinese family. I am really ignorant when it comes to fresh herbs. I won't be able to tell the difference between a bay leaf, oregano, or basil if I happen to see them! and in my mind I kept mixing up Rosemary with Thyme!! So, as much as I would like to try Celine's loaf, I thought I should just keep to things that I am familiar with ;)

Hence, this lead me to bake a matcha or green tea loaf using the same milk loaf recipe.


The exterior of this loaf looks perfectly normal, just like a usual loaf of bread.


From the top view, it somehow reminds me of a traditional pillow which my deceased grandmother used to sleep with. It's those Chinese traditional kind of 'pillow' that was made with a block of wood with very nice carvings on the sides, which looks something like these. Guess you have to be as old as me to have seen one of these ;)

Sorry, I've digressed! Well, what I really wanted to say is, looks can be very deceiving.


After I sliced the loaf into half, I was quite taken aback by this huge 'tunnel' that had formed just underneath the crust! Thanks to my cyberfriend, vb, this reminded me that it appeared not too different as compared to the CTE tunnel, lolz!!!

I believe I didn't do a proper job while knocking down the dough after the first rise. A giant air bubble must have been trapped there, and it grew and grew and grew while the dough was proofing the second time! I really find bread-making a very challenging task, there are so many unknowns and variables that could affect the outcome of the bread...be it the weather, the yeast, the amount of the ingredients, the time taken to knead the dough, etc, etc. On the other hand, it is also all these uncertainties that make bread-making more fun than other cakes and bakes :p

A couple of blog visitors have lamented that they are not able to make a loaf of bread as they don't own a bread machine. It was with this in mind that I made this loaf solely by hand. I have also taken a few step-by-step photos to show those of you who may wish to give it a try. These photos were not very well taken, as it was very tricky trying to juggle the camera while my hands were covered with dough.


Starting from the top left hand photo, the dough was form by mixing all the ingredients (except the butter) and kneaded by hand for less than 5 minutes. It was not sticky at all but the texture was very soft. Then I proceed to add in the butter to the dough...a process which I would prefer to leave it to the bread machine to do. I don't really like the oily, gooey, feeling by kneading the butter into the dough. It took a few mins of squashing and squeezing before the butter gets all absorbed into the dough. At this stage, the dough will start to get very sticky, it helps if you have a simple tool like a dough scrapper (the beige thing on the bottom right photo), to scape up the dough at the same time when you are kneading. A plastic spatula can also do the job.


After about 15mins of kneading (starting from the mixing of the ingredients), the dough had became smooth, and no longer stuck to my hands (see top left photo). Ok, I tried taking a photo of the 'pane test' or stretch test, but it was difficult trying to take a photo with just one hand while the other is pulling /stretching the dough at the same time. How I wished I could have another set of arms, haha! Anyway, you will notice that in the top right photo, the edges on the hole appeared jaggered. This means that the dough has not been fully developed. I gave the dough another 5mins of kneading and did the stretch test again. This time, the dough can be stretched quite thinly before it started to tear, and the edges of the hole looked smooth (bottom left photo). See the nice smooth dough on the bottom right? The dough was all ready for the first rise. So in total, it took me about 20mins to knead the dough before it became smooth and elastic.


The rest was easy, after the first rise, I roll out the dough and spread it with some Japanese red bean paste and roll it up, swiss-roll style. I had initially planned to make it into a square loaf using my pullman tin. but, when I was about to cover the tin, I realised that the dough had climbed over the brim! I should have covered it with the lid when the dough had reached almost 80% of the height of the tin :(


Despite the huge tunnel, the bread tasted as soft and airy. Although I must say, after cooling, the fragrance from the green tea vanished almost completely. The green tea flavour was very subtle (I used 2 teaspoons of green tea powder), I could hardly taste it :,(

Ingredient
(original recipe from here)

25g caster sugar
5g salt
250g bread flour
4g (1 teaspoon) Instant yeast
2 teaspoons green tea powder
143g fresh milk (I used HL low-fat fresh milk)
35g egg
38g butter (unsalted)
filling: red bean paste

Making Bread by Hand:
  1. Place caster sugar, salt, bread flour, green tea powder and yeast into a mixing bowl. Mix the ingredients with hand. Make a well in the centre of the flour mixture. Pour the lightly beaten egg and milk into the well. Mix the ingredients to form a soft dough.
  2. Turn out the dough onto a lightly floured work surface. Knead for about 5 mins until the dough becomes smooth and non-sticky. Knead and mix in the butter into the dough.
  3. Continue to knead dough for another 15mins until it becomes smooth, elastic and no longer sticks to hand and work surface.
  4. Smooth the dough into a round ball. Let it rise in room temperature in a mixing bowl, covered with cling wrap. Let dough rise for 60mins or until it double in bulk.
  5. Remove dough and punch out the gas. Turn the dough onto a lightly floured work surface. With a rolling pin, roll out the dough into a big rectangle. The width of the dough should be slightly bigger than the length of your loaf tin/pan. Roll out the dough as long as you can manage. Spread the dough with a layer of red bean paste(or any filling of your choice). Roll up tightly (make as many rolls/turns as you can) swiss-roll style. Pinch the dough to seal the seam tightly.
  6. Place dough (seam side down) in lightly greased bread tin/pan. Cover with cling wrap and let the dough proof for the second time for about 45~60 mins, until it fills up 80% of the tin/pan.
  7. Bake at pre-heated oven at 180 ~ 190 deg C for 30 to 35mins.
  8. Unmould the bread immediately when removed from the oven. Let cool completely before slicing.
More aboutMatcha Red Bean Loaf

Ladies' Kisses (Baci Di Dama)

Diposting oleh good reading on Selasa, 13 November 2007

Ever since I bought this book, "The Cookie and Biscuit Bible" from Borders several months ago, one particular recipe, the Ladies' Kisses, from this book has always been on the back of my mind. However, I have never gotten around to make them until last Friday morning.


In order to write up this post, I did a little search on the internet, to find out more about these cookies. It is only at this moment that I learn that the Italian name for these cookies is Baci di Dama, which literally means Kisses from a Lady! Now then I understand that a fellow flickr member has actually given me the name in her comment, but I wasn't able to read the language she wrote ;')

These bite-sized Italian cookies were originally created in the Piedmont region of Italy, an area famous for its prized hazelnuts. 'According to a legend, they were created by a chef who worked for the Savoia Royal family and he wished to impress the King Vittorio Emanuele. The name is not clear but most probably it seems to represent a kiss between two lovers and the shape itself resembles lady lips.'

I was rather amused after reading this. It was exactly what my elder boy had deduced!! After he took a bite of this mini-sandwich cookie, he studied it, and told me he knew why they are called Ladies' Kisses. He pointed out that his half eaten cookie looked just like a person's pair of lips...I could still remember his sheepish grin at that moment :) I couldn't help but agreed with him.


I made these cookies with my younger boy as he didn't need to go to school that morning. The night before, he reminded me that if I were to bake anything, I'll have to inform him so that he could be involved right from the beginning. When he spotted me weighing the butter, he came along and 'scolded' me for not letting him know that I was about to start my baking session! I quickly assured him that I had not worked on anything yet as we needed time for the butter to soften. I guessed he was not very convinced, as he continued to hang around in the kitchen 'watching' after me ;)


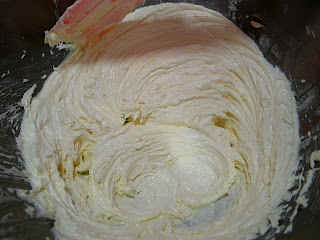
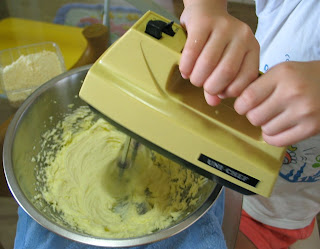
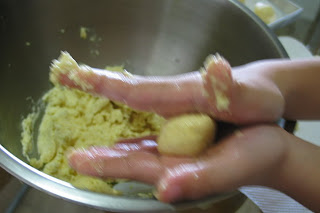
We went on to measure out the ingredients together, with his help, we got flour, sugar all over the place. He helped me creamed the butter and sugar until it turned pale and fluffy. Then we added in the egg, followed by almond and flour until it reached this stage:


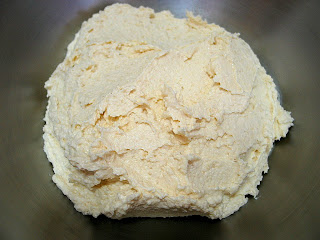
The cookie dough was very wet, no wonder it had to be refrigerated for at least 2 hours before you could work on it.


Here comes the fun part...rolling out the dough into small balls. Initially I used a measuring teaspoon to scoop out the dough thinking that it would help to ensure the cookies were of the same size. It didn't work as the dough was always stuck to the measuring spoon. In the end, we just made them by rough estimation. This part of our baking session brought back fond memories of how I used to roll those traditional 'Tang Yuan' during Yuanxiao when I was very young. Maybe I should try make some Tang Yuan for this coming Yuan Xiao, instead of relying on frozen ones?!


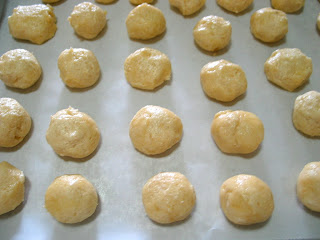
Cookie doughs waiting to go into the oven...notice the differences in sizes and shapes? In the midst of baking and cooling off, I told my boy that if the cookies were tasty, we could gave some to his Chinese Calligraphy teacher the next day, since it would be the last lesson for this year. Based on the look and fragrance from the cookies, he suggested that we should just wait till they become adults before giving cookies to their teacher...as by then, it would then really be the last lesson! He told me, they will only master the art after they have become adults. Trust a greedy kid to come up with these sort of excuses!


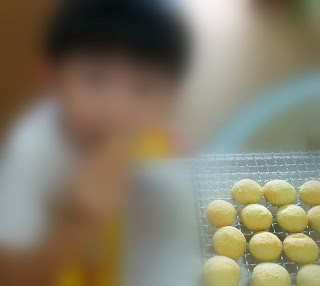
That was him, stealing cookies one after another from the rack!


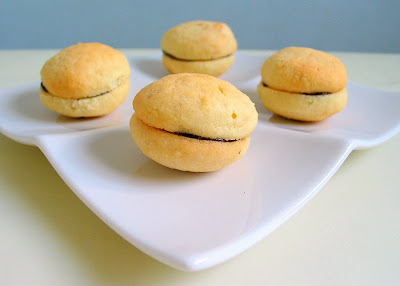
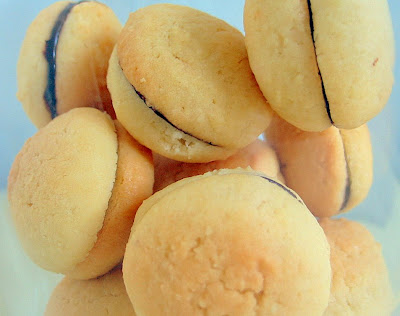
I melted some chocolates and sandwiched the cookies together. It was tricky trying to find matching pairs of cookies. The cookies didn't look exactly like those in the cookbook...a more 'authentic' look should be something similar to these or these baked by other flickr members. Since this is the very first time I have tasted such cookies, I wasn't sure whether I have baked them the way they should be. The cookies were not the very crunchy type (unlike those Horlicks Doggies cookies), but I like the taste of ground almonds in them. The males in my family loved them dearly! Was it because of the name?!! They kept coming back for more. Luckily I reserved one small box for the teacher, as they were all gone by breakfast the next day!


The next time I were to make these again, I will use ground hazelnuts instead of almonds, and sandwich them with nutella instead :)

In case you are interested to try this out, here's the recipe:

Method:
(makes 20)

150g (10 tablespoons) butter, softened
115g (1/2 cup) caster sugar
1 egg yolk
2.5ml (1/2 teaspoon) almond essence/extract (I replaced with vanilla)
115g (1 cup) ground almonds (almond powder)
175g (1 1/2 cups) plain flour

filling: 50g plain (semisweet) chocolate, melted

Ingredients:

  1. Cream butter and sugar with an electric mixer until light and fluffy.
  2. Beat in egg yolk, almond essence, followed by ground almonds and flour until evenly mixed.
  3. Chill for about 2 hours until firm.
  4. Prehear oven to 160 degC (325 degF). Line baking sheets with parchment paper.
  5. Break off small pieces of dough and roll into balls with your hands, making 40 altogether.
  6. Place the balls on the baking sheets, spacing them out as they will spread in the oven.
  7. Bake for 20 mins or until golden. Let cool in the baking sheet for a few mins. Transfer to cooling rack to cool.
  8. Melt chocolate in a bowl over a pan of simmering water. Use it to sandwich the cookies in pairs, leave to set before serving.
More aboutLadies' Kisses (Baci Di Dama)

'Egg less' Raisins & Chocolate Chips Muffins

Diposting oleh good reading on Sabtu, 10 November 2007

Woke up early this Sunday morning just to make this batch of Raisins & Chocolate Chips Muffins. I thought they look lovely, with the nice golden, slightly crackly domes. You would probably not believe that these muffins were made with a major flaw! I have forgotten to add in one important ingredient :'p


Last evening, I went to a nearby convenient store, with the intention of getting a loaf of bread for our breakfast this morning. As it was already quite late, our usual brand/flavour bread was already sold out. The other loaves left on the shelf didn't look appealing to me. I decided on the spot that I should make some muffins first thing in the morning. So, just before bedtime, I scanned through various cookbooks to look for a suitable recipe. I got nothing from the book "Muffin Bible" and not a single appropriate recipe from the book "500 cupcakes & muffins" as well. Finally, I reached out for a book on bread making, and I found 'the' muffin recipe! It is meant for a Cranberry Nut Loaf, but it can be adapted for Cranberry Nut muffins, Blueberry Nut muffins, and even turned into a Banana loaf. I went to bed thinking that since it is such a versatile recipe, I thought I could use it as a base and add in some left over raisins and chocolate chips.


This morning, my little one woke up as early as me, and as usual, he offered to help me with the baking, while his brother was still 'frozen'(a term my younger one likes to use) in deep sleep ;)

He helped me with the sieving and mixing of the raisins and chocolate chips. All went well until we started to prepare the wet ingredients. I added the sugar into the melted butter and got him to stir it with a manual whisk. The mixture became lumpy. So I though I should add in the milk right away, and maybe the problem could be solved. No, it didn't help, I had to take over the stirring, but there were still many small lumps in the mixture. I had no choice but to pour it into the dry ingredients, hoping things would work out on its own. Fortunately, the liquid mixture was incorporated into the batter with just a few gentle folding, though I did noticed that the batter was on the dry side. It was only after I put the muffins into the oven, then I noticed that the egg was still sitting on the counter!! It was already too late, I simply couldn't do anything about it. I left the muffins to bake in the oven, wondering how rubbery or rock hard the texture would be without the egg. Believe it or not, this is the very first time, I have ever forgotten to add in any ingredients in my baking session! I was really depressed!


The muffins took a little longer than the recommended time to bake. Initially I thought they would never rise, but to my surprise, a nice dome was formed on each of the muffins. I couldn't wait to test it, while it was still pipping hot, I took one bite and was soooo relieved that this egg-less muffin tasted as good as the usual muffins I have made. The texture was surprisingly very soft and fluffy! The sweetness is just right, and the raisins and chocolates made it even more delicious! I was so pleased with the result and it lifted up my spirits instantly!

My elder boy woke up just in time for his breakfast and we had a wonderful, hearty breakfast on this lovely Sunday morning =)


Ingredients:
(makes 8 muffins)

250g plain flour
1 1/2 teaspoons baking powder
1/2 teaspoon baking soda
1/2 teaspoon salt
1/2 cup chocolate chips
1/2 cup raisins
1 egg, beaten (I have forgotten to add in!)
60g unsalted butter, melted
175ml milk (I used low-fat fresh milk)
150g granulated sugar (I reduced it to 125g sugar)

Method:
  1. Pre-heat oven to 180degC (350 degF).
  2. Melt butter in a saucepan, over low heat, set aside to cool.
  3. Sieve together flour, baking powder, baking soda and salt into a mixing bowl.
  4. Add chocolate chips, raisins and mix with a spatula. Make a well in the centre.
  5. Place egg, melted butter, milk and sugar in another bowl. Mix until thoroughly combined. (To cut down on washing up, I mixed these ingredients into the saucepan which I used to melt the butter).
  6. Pour the liquid mixture into the flour. With the spatula, gently fold all the ingredients to form a wet batter. Just mix until the flour are incorporate into the batter. DO NOT Over mix.
  7. Spoon batter into paper muffin cups. Bake for 15~20mins (mine took almost 25mins) until muffins turn golden brown or a toothpick inserted into the centre comes out clean.
  8. Let cool on a wire rack.
Recipe source: adapted from Bread baking by hand or bread machine, by Eric Treuille & Ursula Ferrigno
More about'Egg less' Raisins & Chocolate Chips Muffins

Working remotely

Diposting oleh good reading on Rabu, 07 November 2007

For the past few months, I have been working for Oxygen remotely. We learn better ways to adapt to the environment everyday, and overall it has been successful. Ken has posted plenty of pictures of our remoting adventures and the worst part is that I miss everyone.

I love working from home, however, it takes a lot of discipline -- and not just for me. My teammates need to be aware that they need to speak a little louder or stand by a camera and I need to stay away from halo during the day :P

Personally, I find it easy to stay in a work mode while I'm at home. Pairing is quite effective remotely. I tend to keep better focus while I'm remoting with a pair than in person.

Meetings are a lot more challenging. Good microphones and video feeds are a must if you are to have any chance of "being" in the meeting. When I first started working from home, I wasn't able to participate in meetings at all, but with help of some additional media equipment, I can go to every meeting in my pajamas :)

If you are working from home, here is some advice:
  1. Have space dedicated to work. This helps you stay focused and keeps you from working too much. If I setup shop in my den, chances of me working extra hours while my husband plays xbox is dramatically increased.
  2. Be honest and open about communication limitations. Its better to interrupt if your call drops off or someone is too far from the microphone than miss something.
  3. Respect your coworkers during meetings and while they're talking. Just because they can't see you surfing the web while they are talking about some deployment doesn't make it okay.
  4. Take breaks, walk the dog, get some exercise. Believe it or not, its easier to sit on the computer during lunch than in the office. Its just as important to walk around when you are at home. And stay away from the snacks in the kitchen!!
  5. Get a really good espresso machine.
  6. Visit the office. Even if you don't have to come in, its good to keep the bonds strong with teammates. If you are too far to come in on a whim, try to work something out with your company that lets you come in not just when you have to, but when you want as well.
More aboutWorking remotely

Pork Floss Loaf with Cheese toppings

Diposting oleh good reading on Selasa, 06 November 2007

I was pleasantly surprised to receive comments from a blog visitor, MH, that she has been baking the milk loaf with great success. She had even tried adding pandan juice to the recipe. This prompted me that I should go ahead with the idea of turning it into a matcha green tea loaf...something which I had in mind for quite sometime. However, I realised that my boy, who happens to be my main target 'audience' may not like green tea in his bread. He will much prefer a pandan loaf, but I don't have any pandan essence or a blender to make the pandan juice. So I thought I should just fill the loaf with some pork floss since he always choose the pork floss buns whenever we get breads from the nearby bakery shop.


Having attempted to make a pullman bread using this recipe without much success (as it didn't reach the top of the tin), I decided that I should make a 'mountain-shape' loaf. I added some grated mozzarella cheese and some dried parsley on the top to add some flavour.


I used my bread machine to knead the dough so that I could use the time to prepare lunch. I set the machine to the Dough function, and let it knead for the fixed timing of 20mins. At the end of the cycle, I stopped the machine, re-started it and let it knead for another 20mins. The dough was still quite sticky after 40mins. I suspected either I have added a little too much egg or I would have over knead it. I guess, 30mins of kneading should be just right. Nevertheless, I left it to rise in room temperature and was very pleased to see that it had double in bulk within an hour.

After punching down the dough, I gave it a few kneading...but to my horror, the dough became sticky again! Since I have already gone to this stage, I went ahead and tried my best to flatten the dough with my fingers and topped the surface with pork floss. I had to use a spatula to help scrape the dough from the work surface and slowly rolled it up, swiss-roll style. I left it in my pullman tin, and let it proof for the second time. I was initially quite skeptical that this bread would ever rise, as the dough simply didn't look right. The surface wasn't smooth and was very blemish. I didn't even have the mood to take a photo of it! To my surprise, after an hour, it reach to the top of the tin looking as though it would burst through the cling wrap any time. This was despite the gloomy and cool weather yesterday. I remembered the other time the same dough took at least 2 hours to double in bulk during the second proofing.


I brushed the top with the left over egg (the recipe uses less than one egg), and covered it with grated cheese and send it into the oven. I knew for sure the top will get burnt, as such, when the cheese started to brown (within 10mins) I covered the top with foil and let it bake till the required time. I was so glad that the bread turned up so tall! This is the 'tallest' bread I have ever made. The top was overly brownish, but the sides were browned to a nice golden brown. As the cheese got stuck to the side of the tin, I had to use a knife to go around it to get the bread out of the pullman tin.


I hardly could wait to slice the bread to check on the inside. I must say this recipe is truly amazing! Thanks to the originator for sharing such a wonderful recipe. The bread was very airy, soft, and cottony! I tasted one slice while it was still warm....yummy!


The bread remain soft the next day, and I only kept it in a plastic bag. My boy told me the bread was very soft, and he even ate the crust too. He would usually leave behind a square rim of crust whenever he eats a sandwich loaf. My better half liked it too but told me to add more pork floss next time ;)

If you are keen to give this bread a try, I have got some tips here:

Tip 1: As the top of the loaf is rather soft, you may not want to dent it while removing it from the tin/loaf pan. So, when turning the bread out from the tin, place the tin on its side and slowly shake and ease the loaf out...do be careful of the hot tin!

Tip 2: Due to the cheese toppings, it was kind of difficult to slice through the top crust from the top, ie with the loaf standing upright. The crust was very thin, and I almost squashed the entire loaf ;p I learned that it is much easier to slice it by placing the loaf on it's side.

Hope this helps :)

More aboutPork Floss Loaf with Cheese toppings

Homemade Pizza

Diposting oleh good reading on Sabtu, 03 November 2007


I made this Hawaiian Pizza a couple of days back for lunch. As it was the first time I attempted to make a pizza from scratch, I thought a Hawaiian Pizza would be just simple enough for me to handle. In fact, my kids very much prefer Hawaiian Pizza over other toppings. I used the most basic ingredients...grated cheese, canned pineapples and some ham. As for the tomato sauce, I used some leftover store-bought pasta sauce. I wasn't really sure whether the pizza would turn out edible, so I actually had a plan B in mind...ie to bring the kids to the McDonald's if all else failed.

The pizza dough was rather easy to work with as compared to some other bread doughs. There were only basic ingredients such as flour, salt, water, oil and yeast. The dough was not sticky at all, so it was a breeze kneading it. I followed the instructions and knead the dough for about 10 mins by hand. The dough rise beautifully within an hour's time, thanks to the good sunny weather on that morning :)


It was only after reading some pizza-making recipes that I learned that the mozzarella cheese has to be added in two layers...that is, after spreading the pizza sauce over the dough, a layer of cheese has to be added, followed by the toppings, before covering the entire surface with another layer of cheese again. I always thought that the cheese is added only on the top most layer.


Since the recipe is meant for a 12in pizza pan, I knew that I would have extra dough left as my biggest tray is about 10in. So I took out some dough (without even weighing it!) and made 3 mini-pizza (as I was left with the last 3 paper cases).

The pizza took about 25mins to bake, and it turned out that I didn't add enough sauce and definitely not enough cheese! You see, the tool that I used to grate the cheese, is actually not suitable...the grated cheese were too thin...as compared to those ready-grated ones. Hence, the pizza was not cheesy enough :(


Like I have always mentioned, I am blessed with 2 kids who are not very fussy with food...they usually eat whatever I cook for them. I didn't have to execute plan B at all and they ate the pizza with real gusto! I think they were probably very hungry after school, and my elder boy thought that the pizza tasted better than those he had eaten from pizza outlets, lolz! I will certainly make this again during the school holidays, and they will get to make and design their own personal pizza :)

I have included the pizza dough recipe here, for those who are interested to give it a try. Do take note that the recipe will yield a thick crust, similar to pan-pizza. If you are a fan for thin crust, then this is not for you ;)


Ingredients:
(make one 12in pizza dough)

340g (2 3/4 cup) bread flour
2 teaspoons fast acting dry yeast
1/2 teaspoon salt
200ml lukewarm water
2 tablespoons extra-virgin olive oil (I used pure olive oil)

Method:

  1. Use a 30cm (12in) round pizza tray. Grease the tray. (I used a baking tray, lined with parchment paper).
  2. Mix flour, salt and yeast in a mixing bowl. Make a well in the centre and add the water and olive oil. Mix with hand to form a soft dough. If needed, add a little more water.
  3. Turn dough out onto a lightly floured work surface and knead for 10 mins or until the dough becomes smooth and elastic. Place dough in a lightly greased bowl, cover with cling wrap and leave to rise for 1 ~ 1.5hrs until double in size.
  4. Turn out the risen dough onto a lightly floured work surface and knock it down to release the air. Give it a few gently kneading. Roll or press out to a round to fit the pizza tray, place dough on tray.
  5. Spread pizza sauce over the pizza base to within 1 cm (0.5 inch) of the edge. Arrange a layer of grated cheese, followed by preferred toppings. Sprinkle the top all over with grated cheese.
  6. Leave the pizza in a warm place for about 15mins. Preheat oven to 220degC (425 degF)
  7. Bake pizza for 20~25mins or until the crust has risen and is golden and the cheese has melted. Serve warm.
Recipe source: adapted from Baking with Love (Readers Digest)
More aboutHomemade Pizza