FRESH BERRY TARTS WITH COCONUT PASTRY CREAM

Diposting oleh good reading on Jumat, 30 Mei 2008

fresh berry tarts with coconut pastry cream

Long time no see, everyone!

I have been on hiatus.

During my "cleansing/detoxification" of sugar for the last few weeks, I had tons of marking as this is the end of the school year.

As I type this, my last huge pile of projects awaiting marking is sitting on my dining room table: board games, poetry anthologies, art work, dioramas, video-taped skits and other such creative takes on "To Kill a Mockingbird Pride Projects" (so-named for the pride each student is supposed to have, for having created projects that showcase their individual talents). The last few make-up exams are being scheduled, a handful of anxious individuals have yet to recite their memorized "Tomorrow and tomorrow" Macbeth soliloquies, and a stack of textbook receipts for lost books are awaiting my attention. I recently powered through 2 class sets of essays and I'm feeling euphoric. The marking burden is starting to lift slightly from my achey shoulders.

I figured it was time to celebrate with a batch of pastry cream! However, you know me...I had to tinker with the classic flavour of vanilla and add something to it. I decided upon Coconut flavoured pastry cream. From the market I had purchased a fresh little box of blueberries and a huge box of strawberries. In my freezer I had on hand a 24/pack sleeve of frozen tart shells and a half a can's worth of leftover Coconut milk.

I decided that Sherry Yard's Pastry Cream recipe with the Coconut Variation would best suit the bill today. I opted to use 3 large eggs in the recipe instead of the 5 large egg yolks. I thought it would be lighter and less yellow, lending to a more coconutty flavour and appearance.


Yard's recipe is so easy. I was happy with the results of using the whole eggs. The cornstarch I used to thicken the pastry cream enabled me to make the pastry cream in practically a couple of minutes! I was whisking away and it was pretty instantaneous how it thickened to a pudding consistency. It was smooth and though I strained it as directed, only a few bits were left in the strainer. It wasn't grainy at all. Yum. The flavour was very nice. I'll be using this one again.

COCONUT PASTRY CREAM
from Sherry Yard's The Secrets of Baking
yield: 2 to 2 1/4 cups, enough for two 9-inch tarts or 24 mini tarts

1 cup milk
1 cup unsweetened coconut milk
1/2 cup sugar
1 1/2 t finely chopped orange zest [I left this out entirely]
2 t vanilla extract
3 T all-purpose flour or cornstarch
pinch of salt
5 large egg yolks or 3 large eggs, chilled
1 T unsalted butter, softened
  • If you will need to cool this quickly, line a baking sheet with plastic film and set aside.
  • Bring the milk, coconut milk, 1/4 cup sugar, and vanilla to a simmer in a medium nonreactive saucepan over medium heat
  • Meanwhile, sift together the remaining 1/4 cup sugar, the flour or cornstarch, and salt onto a piece orf parchment paper. Whisk the egg yolks or eggs in a large bowl. Add the sfited dry ingredients and whisk until fluffy.
  • When the milk comes to a simmer, remoe from the heat and ladle out 1/2 cup of the hot milk mixture. Drizzle it slowly into the eggs while whisking. Once the 1/2 cup nilk is incorporated into the eggs, pour the mixture back into the hot milk, whisking constantly. Be sure to scrape all the eggs into the pan with a rubber spatula.
  • Immediately begin to rapidly whisk the pastry cream. In less than 1 minute, it will boil and begin to thicken. Continue to whisk for about 3 minutes, or until it has the consistency of pudding. To test the cream for doneness, tilt the saucepan to one side. The cream should pull away from the pan completely. Rinse and dry the large bowl.
  • Strain the pastry cream through a fine-mesh strainer back into the bowl. Add the butter and stir until it is metled and incorporated. If the cream seems grainy, pulse it in a food processor until smooth. The cream is now ready to use, or it can be cooled to room temperature and refrigerated for up to 3 days. To cool the pastry cream quickly, spread it out on a baking sheet lined with plastic film. To prevent a skin from forming as it cools, place a sheet of plastic film directly on the surface.

FRESH BERRY TARTS

I used fresh strawberries and blueberries, but I imagine raspberries and blackberries would be equally good. I can envision sliced mangos, kiwi and other soft-fleshed fruit being equally delicious resting on the pastry cream.

1 "sleeve" of frozen tart shells (24 count)

1 cup fresh blueberries

4 cups strawberries, sliced

  • Bake the frozen tarts as directed on the package. Mine called for 12 minutes at 375degrees F.
  • Wash and prepare the fruit. I tasted the strawberries and didn't find them sweet enough. Unfortunately, it isn't strawberry season in Vancouver yet. When it is, I'm definitely going to make this recipe again. Local is the way to go with fruit. Today, I used those honking huge California strawberries that look kind of malformed...and they were slightly white inside. I know that's not a good sign. But that's all that I could find this time of the year. sigh. The way I fixed this washed out strawberry flavour problem was I sprinkled a couple of tablespoons of granulated sugar on the sliced strawberries. I allowed the berries to macerate a bit in the sugar and eventually it produced this syrup at the bottom of the bowl. I was short on time and didn't save the juices to reduce on the stovetop to a thick syrup--but if you had the time, you should. Then you'd incorporated the cooled syrup back into the berries.
  • I leave the baked tart shells unfilled, stored in a tupperware container until ready to serve.
  • When ready to serve, fill each tart shell with a tablespoon or so of cold pastry cream. Arrange your berries on top.
  • Refrigerate any leftover prepared tarts. The tart shells will begin to get soft from the moisture in the pastry cream and fruit so I try to consume them quickly after assembly.

******

What else can you do with pastry cream? Take a look at my Cream Puff Trio post!

I'm entering this berry tart in the Nutriferia Berrilicious Roundup. Go check it out!

Nutriferia badge
More aboutFRESH BERRY TARTS WITH COCONUT PASTRY CREAM

Eagle Creek

Diposting oleh good reading on Kamis, 29 Mei 2008

Last weekend, I went on a 3-day backpacking trip with some friends. We endured rain, snow, difficult river crossings and a vicious mouse attack, but managed to have a good time nevertheless. Here are a few pictures:

Punchbowl falls

Tunnel falls

Basalt cliffs

Apparently mice like cheese!
More aboutEagle Creek

Vaccines

Diposting oleh good reading on Rabu, 28 Mei 2008

I am a label reader. Whenever I'm thinking about buying food in a box, which is rare, I typically read the whole label to look for sinister ingredients. So when I got a booster vaccine for tetanus last week, naturally I asked for the product information.

Along with a nice dose of tetanus and diphtheria toxoids, my medial deltoid received 0.28 mg of aluminum, up to 0.3 micrograms of mercury, and up to 100 micrograms of "residual formaldehyde". I got the vaccine because I like being able to chew, but I wasn't able to lift my arm for several days. I don't know if that was due to an immune response to the tetanus and diphtheria (probably) or if it was caused by the aluminum, mercury and formaldehyde they injected into my arm.

We work with formaldehyde in my lab, and I can tell you it is not to be messed with. I had to take an entire training course just to use it, during which I learned that if there's enough of it to smell, it's toxic. 0.1 parts per million in the air is enough to cause a burning sensation in the mucous membranes. We always use it in the fume hood. Formaldehyde is a toxin, a carcinogen, and a teratogen (causes birth defects). So I'm sure you'll understand why I wasn't too happy about having 100 ug of it injected into my body.

I'm not criticizing the concept of vaccines, I just wish they'd make more of an effort to clean them up!
More aboutVaccines

I feel like I'm taking crazy pills..

Diposting oleh good reading

Today, I was trying out a wpf grid control and couldn't figure out how to style or data bind or do anything with it in xaml.

I sent the sales rep an email asking for some examples and I was told data binding, templates and styles were not currently supported (dependency properties it seemed too).

With that, I thanked them for their time, and said databinding and styling were a priority so we could not consider their grid.

I didn't expect to hear much after that, but I was informed that those "bells and whistles" were not as important as the other features only their grid supports...

While I would argue these "extras" are a foundation of WPF, I don't think that should matter.

Why are my priorities not valuable?

When listening to user feedback on our applications and products, we can get defensive.

We're all human and insecure, so I guess that could explain it.

However, I would rather focus on a different issue -- what is guiding our decisions, priorities and emotional responses?

Why is the response to user feedback a reason instead of thank you?

All feedback is an opportunity to create a better product. It is great service your users provide (usually for free!).

One of the greatest technical challenges in Ript was adding the ability to rip Flash. It took many, many spikes. I think most other companies would have put it aside -- it didn't add much value, wasn't going to make us money, isn't something that will make a person use the application and certainly cost time and money.

So, why did Gerry make it a requirement?

During user testing, we noticed people thought they were doing something wrong when they couldn't rip flash. They don't understand that some images are flash and some are images.

Gerry could have said document how to determine if an image is Flash so users will know why they can't do something.

But, she understood that it didn't matter if the behavior was documented. If a person thinks its broken, begins to lose trust or feels they are doing something wrong, they are alienated. They will not feel confidence in themselves or the usefulness of the program.

Before working with Gerry I didn't understand this concept. I would have put flash aside. However, her decision is what made her a great product owner.
More aboutI feel like I'm taking crazy pills..

Our Travel Footprints

Diposting oleh good reading

By the time this post is published, I will probably be looking out from the window...


and we should be landing in a short while...


and begin our much awaited holidays. It has almost becoming a routine that we visit California once in every two years. If not for the long flight, I bet we would have returned to this place much more frequently!


Not unlike our previous trips, we will make it a point to include many outdoor activities for the kids...lots of rounding around in the park, hiking, picinics, kite flying...


and a mini golf session is a must...


and cherry picking at Brentwood!


This has to be one of my favourite outdoor activities!! I am looking forward to stuffing myself silly with all these cherries again!


and not forgetting these sweet and juicy peaches.

The main highlights of this visit will be a round trip to Lake Tahoe and Yosemite. The last time we went to Lake Tahoe was almost 8 winters ago. I am sure the place will be equally beautiful during the summer.


This will be the first time I will be entering Yosemite by the Tioga Pass entrance. My husband was so happy to know that the Tioga Road has opened and much earlier this year! He can't wait to show us the beautiful scenery along this road that literally cuts across the park from the west to the east.


For the past weeks, I have been reading up on the various hiking trails at the Yosemite. This time round we will give the Mirror Lake trail a miss. I think we are really fortunate to be able to visit this lake twice, both in the winter and in the summer!


I will love to go up to the Glacier Point again.


This photo was taken at the Glacier Point...the view is really incredible, isn't it?! It's really worth the one hour drive up from the valley to the summit. You get to see the entire valley from up here.

We are planning to take the trail to the top of the Sentinel Dome this time...I read that it's quite an easy one-hour trail and I am looking forward to experiencing the panorama views from the summit. We are keeping our fingers crossed that we have enough time to take another hike...up to the top of Vernal Fall. I'm sure it will be fun to be so close to a water fall.


Another place that I will really love to visit is the Big Sur along Highway One.


We never seems to be able to make the trip down ever since we went there several years back! I just want to show my younger boy the magnificent views from the various vista points along this scenic drive. To me, this is the most scenic drive on earth! Somehow, I know, we won't be able to include this place in our trip this time...there are simply too many places to visit and too little time :(

Besides all the sightseeing, we will be indulging ourselves with food that we have been craving for the past two years...my boys have already drawn up a list of eating places that we must go...Krispy Kreme donuts, Popeye's chicken, In & Out burgers, etc, etc.

I will be back in a couple of weeks' time with lots of photos and stories to share with you :)
More aboutOur Travel Footprints

Exercise Didn't Keep Us From Getting Fat

Diposting oleh good reading on Selasa, 27 Mei 2008

One of the surprising things I noticed when I was poring over data from the NHANES survey (US CDC National Health and Nutrition Examination Survey) from 1975 to 2006 is that the number of inactive people has diminished in that same time period from 50% to 24%. This is shocking to most people. We have this romanticized idea that in the 1970s people were more active, as if everyone chopped wood and walked 15 miles to work in the morning. The reality is, there were office jobs, housewives and cars without the large numbers of runners and gym-goers we have today.

Granted, NHANES data are self-reported and should be taken with a grain of salt. However, Chris at Conditioning Research pointed me to a study looking at changes in energy expenditure from the 1980s to the present in North America and Europe. It doesn't suffer from the same biases because it's based on direct measurement rather than self-reporting. Here's the executive summary: we're expending slightly more energy than we used to, partly because we exercise more and partly because it takes more energy to move our heavier bodies around.

I'm certainly not blaming the obesity problem on an increase in physical activity, but I do think we can safely rule out inactivity as the reason we've gotten fatter. In my mind, this only leaves one major possible cause for the obesity epidemic: changes in diet. Don't get me wrong, I think exercise is good. It has numerous positive effects on physical and mental health. But it's not as powerful of a tool for fat loss and general health as diet.

Anecdotally, I do know several people who lose fat when they exercise regularly. I also know some who don't lose fat when they exercise. Exercise and a healthy diet converge on some of the same metabolic pathways, such as sensitivity to insulin. But diet changes are far more effective than exercise at correcting metabolic problems. The reason is simple: the problems a person corrects with a good diet are caused by a poor diet to begin with.


More aboutExercise Didn't Keep Us From Getting Fat

For the Love of Muffins

Diposting oleh good reading on Jumat, 23 Mei 2008

I love baking muffins, and nothing beats having a homemade muffin over a cup of hot coffee for breakfast!

Whenever I need to bake something quick and easy, muffins would always be the number one choice. It is also a great way to use up whatever ingredients before the expiry date ;)


I made this batch of yummy muffins following a recipe which is meant for a chocolate chips & crumble muffins. Instead of chocolate chips I replaced it with some left over peanut butter chips. I was quite happy with how the muffins turned out, it was worth the little extra effort required to make the chocolate crumble toppings.


I was quite pleased with the series of photos I took too :) No, I am not referring to the sharpness, the colour and exposure of the images...they failed very badly in these areas. The only thing I liked about the photos was that they were able to capture how 'voluptuous' these 'mountain-high' muffins turned out when I took them out of the oven ;)

By the way, did you know that there were actually three muffins in the above image?


This recipe calls for rubbing in the butter to flour instead of the usual way of using melted butter or creaming butter with sugar. The resulting batter was rather watery as compared to the usual thick and gooey mixture which I was more familiar with. I filled a few of the muffins cups almost to the brim (I used only 10 muffin cups instead of the recommended 12), as such a couple of them had batter spilled over the cups...looking not too different from a volcanic eruption!


I had some difficulty rubbing in the butter while making the chocolate crumbles...I guess the flour was too little for the amount of butter used. Most of the crumbles were really huge!


This recipe yields soft and fluffy muffins, although they were not as moist as what I would expect. The peanut butter chips and the chocolate crumbles really enhanced the texture and flavour of the muffins. I love the slightly crisp crust most :)


Peanut Butter Chips Crumble Muffins

Ingredients
(makes 12)

250g self-raising flour
1 teaspoon baking powder
a pinch of salt
50g butter
100g soft light brown sugar
150g peanut butter chips or chocolate chips
2 eggs, lightly beaten
225ml milk
2 teaspoons vanilla extract

for the Chocolate Crumble Topping:
50g plain flour
1 tablespoon unsweetened cocoa powder
40g butter
2 tablespoons caster sugar


Method

  1. For the chocolate crumble topping, sift flour and cocoa powder into a bowl. Mix in the sugar and rub in the butter until the mixture resembles coarse breadcrumbs. Set aside.
  2. Mix flour, baking powder and salt in a mixing bowl. Rub in the butter until the mixture resembles breadcrumbs. Stir in the sugar and the peanut butter chips.
  3. In another bowl, mix eggs, milk and vanilla extract. Pour the liquid mixture all at once into the dry ingredients. With a wooden spoon or spatula, mix until just combined. Do Not Over Mix. The batter should remain lumpy.
  4. Fill paper muffin cups with batter sprinkle with the crumble toppings. Bake in a preheated oven at 200degC for 18-20mins, or until well risen and firm to the touch. A skewer inserted into the centre should come out clean. Let cool completely.
Recipe source: adapted from Muffins Galore, Catherine Atkinson
More aboutFor the Love of Muffins

California "Raw" Almonds

Diposting oleh good reading on Selasa, 20 Mei 2008

I bought about a pound of almonds yesterday for a backpacking trip I'll be doing this weekend. I like to soak raw almonds, then lightly toast them. It sweetens them and breaks down some of their anti-nutrients.

When I arrived at the grocery store, the only raw almonds they had were from California. I prefer to buy domestic products when I can, but in case you haven't heard, "raw" almonds from California are no longer raw. They are required to be sterilized using steam or antiseptic gases, despite their relative safety as a raw food.

The worst part is that they are not required to label them as pasteurized; they can still be labeled as raw. The Almond Board's argument is that there's no difference in quality and pasteurized almonds are safer. I find this highly offensive and deceptive. It flies in the face of common sense. If you walked up to someone in the street and asked them what the phrase "raw milk" means, would they say "oh yeah, that means pasteurized"? A raw seed can sprout. A pasteurized seed can't. Remember all those enzymes that break down anti-nutrients when you soak beans, grains and nuts? Denatured by heat.

I tried soaking them like I would regular raw almonds. I covered them in water overnight. In the morning, I noticed that the soaking water was milky and had an unpleasant smell. The outer layer of the almonds (the most cooked part) was falling apart into the water. They also didn't have the crisp texture of soaked raw almonds.

Tonight, I toasted them lightly. They definitely taste "off", and the texture isn't as good. There's no doubt about it, pasteurized California almonds are inferior. Despite my preference for domestic products, I'll be buying Spanish almonds the next time around. If enough of us do the same, we'll hit the Almond Board in the only place that counts: its wallet.

One of the most irritating things is that the new rule is designed to edge out small producers. I can't see any other reason for it. Raw almonds are a safe food. Far safer than lettuce. Should we pasteurize lettuce? Pasteurization requires specialized, expensive equipment that will be prohibitive for the little guys. I'm sure the bigger producers will generously offer to fill the production gap.

More aboutCalifornia "Raw" Almonds

Yummy Blog Award

Diposting oleh good reading


I received this Yummy Blog Award from Sunshinemom recently! Thanks so much for passing on this award to me! Although I secretly think that I don't really deserve this award (these four Chinese words describe how I feel: 受之有愧!)...but I certainly don't mind bagging an award, as I have not received an award for ages ;)

Ok, here are some rules for the ‘Yummy Blog’ award Receiver :
The person who receives the award should display the "Yummy Blog !" logo on their blog and also the meaning of the award which is:
"Yummy blog award is the award given to the blog with most yummy recipes/photos."

The receiver should also quote their favorite yummylicious :) dessert(s) that they have ever prepared/eaten. Don’t restrict yourself to any dessert, chocolate bars also welcome. Also the receiver should pass on the award to four other bloggers whose blog they find "yummy" and let them know about the rules.

My favourite dessert is:

Ice Kacang! A multi-coloured 'mini-ice mountain'...which is made of ice shavings, topped with colourful red and green sweeteners, condensed milk and corns . At the bottom of the ice, is a plate of red beans, grass jelly, tiny jelly cubes and some attap chee (seed of the attap or nipah palm). This has been my No. 1 favourite dessert since young!

It's my pleasure now to pass the award to these truly deserving Yummy Award Recipients:
1. Anne of Simply Anne's for all her gorgeous cakes!
2. Lynn of Cookie Baker Lynn for her yummy ice creams, breads, pies, cookies, cakes, etc, etc, etc!
3. Mandy of Fresh from the Oven for her wonderful dishes and lovely cakes and cookies!
4. Patricia of Technicolor Kitchen for her devilious-looking chocolate cakes, cookies and lots of other countless delicious dishes and recipes which she has been sharing with us. Most of all, I really appreciate her forever encouraging words and comments that she has been leaving with not just me, but many other fellow bloggers!

More aboutYummy Blog Award

Real Food VII: Lentils

Diposting oleh good reading on Senin, 19 Mei 2008

Lentils are a healthy food that comes with a few caveats. They have more protein and less carbohydrate than any other legume besides soybeans and peanuts, and they contain a remarkable array of vitamins and minerals, particularly B vitamins. One cup delivers 90% of your RDA of folate, so between lentils and liver there's no need for those sketchy prenatal vitamins.

Lentils must be properly prepared to be digestible and nutritious!
I can't emphasize this enough. We did not evolve eating legumes, so we have to take certain steps to be able to digest them adequately. As with all beans and grains, proper soaking is essential to neutralize their naturally occurring toxins and anti-nutrients. Anti-nutrients are substances that interfere with the absorption of nutrients. Soaking activates enzymes in the seeds themselves that degrade these substances. It also cuts down substantially on cooking time and reduces flatulence.

Phytic acid is an anti-nutrient that's abundant in beans, grains and nuts. It can dramatically
reduce the absorption of important minerals such as iron, calcium, magnesium and zinc, leading to deficiencies over time. It may be one of the main reasons human stature decreased after the adoption of agriculture, and it probably continues to contribute to short stature and health problems around the world.

Lentils and other seeds also contain trypsin inhibitors.
Trypsin is one of the digestive system's main protein-digesting enzymes, and seeds probably inhibit it as a defense against predators. Another class of toxins are the lectins. Certain lectins are able to bind to and damage the digestive tract, and even pass into the circulation and possibly wreak havoc. This is a short list of a few of the toxins found in beans and grains. Fortunately, all of these toxins can be reduced or eliminated by proper soaking. I like to soak all legumes for a full 24 hours, adding warm water halfway through. This increases the activity of the toxin-degrading enzymes.

Here's a method for preparing lentils that I've found to be effective. You will actually save time by doing it this way rather than cooking them without soaking, because they cook so much more quickly:
  1. 24 hours before cooking, place dry lentils in a large bowl and cover with 2" of water or more.
  2. After 12 hours or so, drain and cover the lentils with very warm water (not hot tap water).
  3. Drain and rinse before cooking.
  4. To cook, simply cover the soaked lentils with fresh water and boil until tender. I like to add a 2-inch piece of the seaweed kombu to increase mineral content and digestibility.

many thanks to *clarity* for the CC photo
More aboutReal Food VII: Lentils

Strawberry Spinach Chicken Salad

Diposting oleh good reading

Ingredients:
  • 4 cups torn baby spinach leaves
  • 2 cups cubed cooked chicken
  • 2 cups strawberries, cut in half
  • 1 cup green grapes
  • 1/4 cup Italian salad dressing
  • 1/4 cup orange juice
  • 1 Tbsp. Dijon mustard
  • dash pepper
  • 2 Tbsp. sliced almonds, toasted

Preparation:

Arrange spinach on four chilled plates. Place chicken onto spinach and top with strawberries and grapes. In small bowl, combine salad dressing, orange juice and mustard and mix well. Drizzle over salads and top with almonds. Serves 4
More aboutStrawberry Spinach Chicken Salad

Simple Wholemeal Bread

Diposting oleh good reading on Minggu, 18 Mei 2008

Made this wholemeal loaf a few days ago. It's a simple almost no frills everyday kind of bread. The steps involved in making this bread are quite easy. The only thing that you need is lots of time and patience. This bread uses a 'sponge dough' method...which requires 90mins of extra proofing time as compare to other breads that use the 'straight dough' method.


I read that the 'sponge dough' method would yield a softer bread texture. The crumbs was indeed light and soft, and the bread stayed fresh and soft for 3 days. I didn't even have to toast it before serving. It tasted great with my favourite blueberry jam, and I love the nice fragrance from the wholemeal flour. Even my kids, who don't really fancy any kind of wholemeal grains in their bread, didn't make a single complain :)


Simple Wholemeal Bread

Ingredient:

(A)
120g wholemeal flour
85g bread flour
4g (1 tsp) instant yeast
130g water

(B)
85g bread flour
15g caster sugar
1 teaspoon salt
10g milk powder
50g water

(C)
15g unsalted butter


Method:
  1. Mix the dry ingredients in (A) in a mixing bowl. Make a well in the centre and add in the water. Mix by hand to form a soft dough. Place dough in a mixing bowl, cover with cling wrap and let it rise for 90mins.
  2. Place the ingredients in (B) in the pan of the bread machine (according to the sequence as stated in the instruction manual of your bread machine). Add in the soft dough in Step 1.
  3. Select the Dough function of the bread machine and press start. After about 8mins of kneading, add in the 15g of butter (Ingredient C). Let the machine continue to knead the dough. After the kneading cycle has stopped (20mins), Stop and Restart the machine. Continue to let the machine knead for another 10mins.
  4. Stop the machine and place dough in mixing bowl, cover with cling wrap and let it rise till double in volume for about 60mins.
  5. Remove dough and give a few light kneading on a lightly floured work surface. Press out the trapped air as your knead. Divide into 3 equal portions and shape into balls. Cover with cling wrap, let the doughs rest for 15mins.
  6. Flatten and roll out each dough into an oval shape (20cm by 10cm). Roll up swiss roll style and pinch the seams in place. Place in a pullman tin (size, 7.5"x4"x4", well greased), seams side down. Cover the lid and let dough proof for 60mins or until the dough rise up to 90% of the height of the tin.
  7. Bake at preheated oven at 190 degC for about 30mins.
  8. Remove from oven and unmold immediately. Let cool completely before slicing.
Recipe adapted from 孟老师的100道面包
More aboutSimple Wholemeal Bread

US Fructose Consumption Trends

Diposting oleh good reading on Sabtu, 17 Mei 2008


As you may have noticed, I suspect fructose is involved in overweight and other health problems. It seems to have adverse effects on fat deposition in the liver and insulin sensitivity that could be related to its association with weight gain. I looked through USDA estimated per capita consumption of different sweeteners to get an idea of how fructose consumption has changed in the US in the time since adult obesity rates have doubled.

In 1970, we ate an estimated 72.5 lb/year of cane and beet sugar (sucrose) per person, which is 50% fructose and 50% glucose. We also ate 0.4 lb/year of corn syrup, which is most commonly 55% fructose, 45% glucose. Consumption of other unspecified sweeteners was 12.0 lb/year, for a total intake of 84.9 lb/year of added sweeteners.

In 2007, we ate an estimated 44.2 lb/year of sucrose, 40.1 lb/year of corn syrup, and 12.9 lb/year of other unspecified sweeteners, for a
total added sweetener intake of 97.2 lb/year. Doing the math, and generously assuming that the "other" sweeteners are 100% honey (~50% fructose), here are the results:
  • 1970: 42.5 lb/year of added fructose.
  • 2007: 50.6 lb/year of added fructose.
At 19%, it's not a staggering increase, but it's definitely significant. I also think it's an underestimate, because it doesn't include fruit juice or total fruit consumption, both of which have increased. Other notable findings: grain intake has increased 41% between 1970 and 2005, due chiefly to rising consumption of processed wheat products. Added fats and oils have increased 63% in the same time period, with the increase coming exclusively from vegetable fats. The use of hydrogenated shortening has more than doubled.

What has caused the dramatic expansion of American waistlines in the last 30 years? No one knows for sure, but I think it's probably related to diet since the percentage of people who exercise has actually
increased in the same time period. My money is on the wheat and sugar, with possible contributions from hydrogenated oil, polyunsaturated vegetable oils and chemical pollutants. The reason is that wheat and sugar seem to have devastating metabolic effects on populations throughout the world, such as the Pima.


More aboutUS Fructose Consumption Trends

Q&A

Diposting oleh good reading on Jumat, 16 Mei 2008

I recently went through my comments and realized there are quite a few ?'s that I haven't answered. I will answer what I do...and I hope that cosmetologists all over the world don't throw tomatoes at me.


Ready, Set, GO!


***I have a question -- where do you get your flowers and how do you attach them? (OK, technically 2 questions...sorry). The flowers are so cute!

***I want to know where you got the flowers too. I looked for some at Michael's and Joann's and didn't find anything.


I buy most of my flowers at Robert's. They go 40% off quite often. I also find a bunch at dollar stores. Go figure.


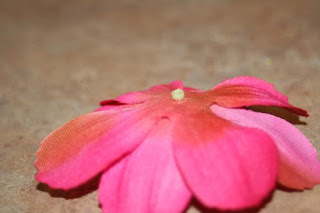
Remove the underside of the flower


Trim the stem leaving enough so that the petals still stay on.


Like so


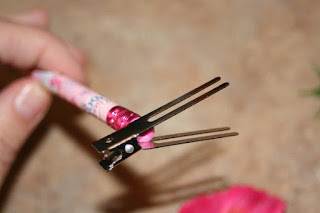
Open your alligator clip up (a box of 100 at Sally's Beauty Supply goes for $4.99 in my neck of the woods) and I use a pencil eraser to hold it open. It doesn't slip that way and you don't have your glue hitting the other side of the clip.


Put a decent amount of hot glue on the stem and the petals. I use a high temp glue gun. The low temp seems to fall off for me.


Press the prong onto the hot glue right above the stem. The pencil is great as well because you don't burn your fingers...I learned THAT from experience. TRUST ME.

***I was wondering what kind of shampoo and conditioner do you use or use for the kids?

My kids, like any other child the world over, hate getting their hair washed. I LOVE the feel of conditioned hair and I refuse to go without it. Right now I am currently in love with Aussie's Moist 2 in 1 shampoo. It makes my girls hair so silky and soft and CLEAN...which is SUPER important with as much product as I use in their hair. And I only have to rinse once.

For me I use their Cleanse and Mend line. This month anyways.


***Unfortunately my little 3 year old HATES her hair being combed or done. I seriously came within seconds of buzzing off all of her hair!!! If you have any ideas to help me I would greatly appreciate it. We use a good conditioner and detangling spray in her hair, but she doesn't care...I need some help before CPS gets called on me because my daughter is screaming crazy at 8 every morning!!! HELP!!!
I have been doing my kids hair since they were born. I honestly think that is the best tip. Then they just don't know any different. I know that when I have my nieces over and I do their hair, their routines are different than mine, so I load up the bathroom with books and if all else fails, I turn on ELMO while I am doing their hair. Distraction is the best remedy. I think it also helps if you let them have a comb and help you. What little girl doesn't love to look in the mirror?


***My problem is that I have a 2 year old daughter with really fine, straight hair. The back is long but the top is not as long. I can get it into pigtails but always have to use a clip on the side to keep the shorter hair out of her face. Do you have any recommendations for cute hair styles?

I don't know if moms who are patiently waiting for their daughters hair to grow are going to like my answer. Cut it. I keep my daughters hair trimmed in little bobs until it is all one length and it can grow out pretty and even. Even my baby has short hair in the back that keeps getting trimmed. You can do a lot with a bob on the top. If you do want to keep it long, you will have to keep using that clip or you can do a lot of puffy-type braids. Part it down the middle and do a row on each side. Find a good stylist that specializes in kids haircuts and is FAST and I would cut it into a cute bob.

***What would you recommend if I am looking to buy a flat iron especially for curling with? I know you use a flat iron most of the time to curl the girls' hair. I want to buy one but don't know what kind works best for this purpose.

This is the one I use. $16 at Wal-Mart. It is the brand Andis. I know lots of women love their Chi. But I am not about to spend that kind of money. It is strictly a personal preference. My sister has a Chi and it doesn't curl nearly as well as this one does. For straightening, I LOVED it, but I rarely straighten my daughters hair.

My requirements for a flat-iron is that it has to be weighted and have ceramic plates and a heat control and it has to have a beveled edge so that I can make those cute curls. And it has to be inexpensive. I have had this one for 3 years now and it is still going strong. My younger daughter has more delicate hair and I turn the heat down to a 10 to curl her hair. My oldest has tough hair and needs hers on a 15. I am getting my old lady mom hair and I go up to a 20 for myself.


***But I must get some cute hair bows, please tell me you will be selling them or doing more giveaways.

I am absolutely doing more giveaways. Probably every other month. Watch for my 4th of July giveaway. I may start selling them, but when I start doing things for profit, they stop becoming fun for me. I know of several ladies that do sell them and I will start to post links on my blog.


***Do you have a tutorial or tips on French braiding?

I have one in the works.

***How old is your daughter? My little one is 2 and I am so nervous to use a straightener or curling iron on her hair for fear that it will fry it. When did you first start?

My baby is 6 months, but that isn't the one you are asking about. My oldest is almost 8 and my blond just turned 4. I started curling their hair as soon as they had enough that could be clamped down into a curling iron or flat iron. The oldest hair took it's time coming in and I started curling hers around 15 months. Before I curled it I used an ity bitty round curling brush and blew it into curls. My middle daughter had way more hair and I curled her hair before her 1st birthday.


***Can you teach me how to make those adorable bows!?!?

Unless you want to come to my house, I can't right now. I plan on doing a tutorial about how I make them, but with raising kids and all, I haven't had the time quite yet. This website has some excellent tutorials on how to make the bows. I mostly use the pinwheel bow because I can just wrap the center with thread and I am too lazy to pull out the needles and sew. I am going to have some bow making parties at my home but unless you live close, it would be hard.


***My daughter just turned 3 and has more hair than I know what to do with. It is beautiful and long - but she doesn't like having her hair done - and when I do it - it only looks nice for about 5 minutes (a little tom-boy trying to keep up with big brother). So, my questions are... are there styles that are better for rough and tumble kids? AND are there any products that are better for them? Any suggestions?


My biggest suggestion that I would do a lot of ponytails, Indian braids or French braids. I am going to be showing a bunch of basics next week and I should have those all included. Smocking is a fantastic way to keep those wisp's out of her face as well...and they don't fall out as easily as ponytails. When you do her hair, make sure you wet it thoroughly before you pull it back and use a wax or a putty or a max hold hair gel to tame those fly aways. Also, after you wash it, put some Infusium 23...anti-frizz in her hair. It makes it soft and sleek.


***Would you be willing to show a Morning picture and an After-school picture?


Sure. I can tell you that after they are done playing, there are definitely fly aways. It has gotten much better since I have started using Infusium 23 leave-in-treatment. It is a must have at our house now. Would you judge me if I told you that I am mostly concerned that they go to school looking nice so their teachers know that I make an effort. They always come home with SOMETHING on their shirts no matter how hard I try.


***Scarlet has more hair right on top of her head than one may think or notice. When I was a baby I had hair just like her. I remember seeing picture of me with a curl on the top of my head going from front to back... I think it looks cute...Is that still cute to do? and if so, how would I curl such fine, baby soft hair?


I did that all of the time on my babies heads. I think it is darling and absolutely still in.

When I do it, I wet my daughters hair and put in some heavy hold hair gel. I take my comb and part it and comb the hair up to the center...like a faux hawk. Then I just curl the hair around my finger or the comb. The comb has always worked the best for me. Comb the side you want to be the underside of the curl and swoop it up and towards yourself.

Any other questions for me? I am in a chatty mood today.

More aboutQ&A

Lessons From the Pima Indians

Diposting oleh good reading on Kamis, 15 Mei 2008

At 38% and climbing in 2006, the Pima indians (Akimel O'odham) of Arizona have the highest rate of diabetes of any population in the world. They also have staggering rates of obesity (~70%) and hypertension.

Things were very different for them before 1539, when the Spanish first made contact. They lived on an agricultural diet of beans, corn and squash, with wild fish, game meat and plants. As with most native people, they were thin and healthy while on their traditional diet.

In 1859, the Pima were restricted to a small fraction of their original land along the Gila river, the Pima Reservation. In 1866, settlers began arriving in the region and diverting the Gila river upstream of the reservation for their own agriculture. In 1869, the river went dry for the first time. 1886 was the last year any water flowed to the Pima Reservation in the Gila river.

The Pima had no way to obtain water, and no way to grow crops. Their once productive subsistence economy ground to a halt. Famine ensued for 40 desperate years. The Pima cut down their extensive mesquite forests to sell for food and water. Eventually, after public outcry, uncle Sam stepped in.

The government provided the Pima with subsidized "food": white flour, sugar, partially hydrogenated lard, and canned goods. They promptly became diabetic and overweight, and have remained that way ever since.

The Pima are poster children for mainstream nutrition researchers in the US for several reasons. First of all, their pre-contact diet was probably fairly low in fat, and researchers love to point out that they now eat more fat (comparable to the average American diet). Another reason is that there's another group of Pima in Mexico who still live on a relatively traditional diet and are much healthier. They are genetically very similar, supporting the idea that it's the lifestyle of the American Pima that's causing their problems. The third reason is that the Mexican Pima exercise more than the Arizona Pima and eat a bit less.

I of course agree with the conclusion that their lifestyle is behind their problems; that's pretty obvious. I think most Pima know it too. If they got their water back, maybe things would be different for them.

However, the focus on macronutrients sometimes obscures the fact that the modern Pima diet is pure crap. It's mostly processed food with a low nutrient density. It also contains the two biggest destroyers of indigenous health: white flour and sugar. There are numerous examples of cultures going from a high-fat diet to a lower-fat "reservation food" diet and suffering the same fate: the Inuit of Alaska, the Maasai and Samburu of Kenya, tribes in the Pacific Northwestern US and Canada, certain Aboriginal groups, and more. What do they all have in common? White flour, sugar and other processed food.

The exercise thing is somewhat questionable as well. True, Mexican Pima exercise 2.5 times more than Arizona Pima, but the Arizona Pima still exercise much more than the average American! Women clock in at 3.1 hours a week, while men come in at a whopping 12.1 hours a week! I am a bike commuter and weight lifter, and even I don't exercise that much. So forgive me if I'm a little skeptical of the idea that they aren't exercising enough to keep the weight off. 

The history of the Pima is a heart-wrenching story that has been repeated hundreds, perhaps thousands of times all over the world. Europeans bring in white flour, sugar and other processed food, it destroys a native populations' health, and then researchers either act like they don't understand why it happened, or give unsatisfying explanations for it.

The Pima are canaries in the coal mine, and we can learn a lot from them. Their health problems resemble those of other poor Americans (and wealthier ones also, to a lesser extent). This is because they are both eating similar types of things. The problem is creeping into society at large, however, as we rely more and more on processed wheat, corn, soy and sugar, and less on wholesome food. Obesity in the US has doubled in the past 30 years, and childhood obesity has tripled. Diabetes is following suit. Life expectancy has begun to diminish in some (poor) parts of the country. Meanwhile, our diet is looking increasingly like Pima reservation food. It's time to learn a lesson from their tragedy.
More aboutLessons From the Pima Indians

Loop-de-loop

Diposting oleh good reading

Wet the hair and part it down the middle...or in my case, a slant to the middle.


Part it from the center to the ear.


Pull into a ponytail and on the last pull through, only pull it 1/2 way through with the excess out the bottom.


Pull the bottom half AND the excess into another ponytail


On the last pull through of the ponytail, only pull it through 1/2 way, only this time leave the excess out on top.


Like so.


The part should look like a "t".
Curl the pieces of hair that you have out. I actually have a picture, but my flat iron looks really gross and needs to be cleaned. So you don't get that picture.


Put some flowers or bows on the top.


There you have it...a loop-de-loop.


More aboutLoop-de-loop