Tampilkan postingan dengan label Tarts. Tampilkan semua postingan

Simple Chocolate Tart

Diposting oleh good reading on Jumat, 03 Mei 2013

I had wanted to make a banana cream pie using the left over tart crust from making the matcha cheesecake tart. However, I had to reserve my whipping cream for a batch of mango hokkaido cupcakes which I had planned to bake for my baking kaki (kaki refers to friend, buddy).


A quick glance through my ever growing list of to-dos, I settled on this simple chocolate tart recipe taken from my current favourite cookbook...Home Baking 星期天的烘焙时光 (loosely translated as Baking on a Sunday).

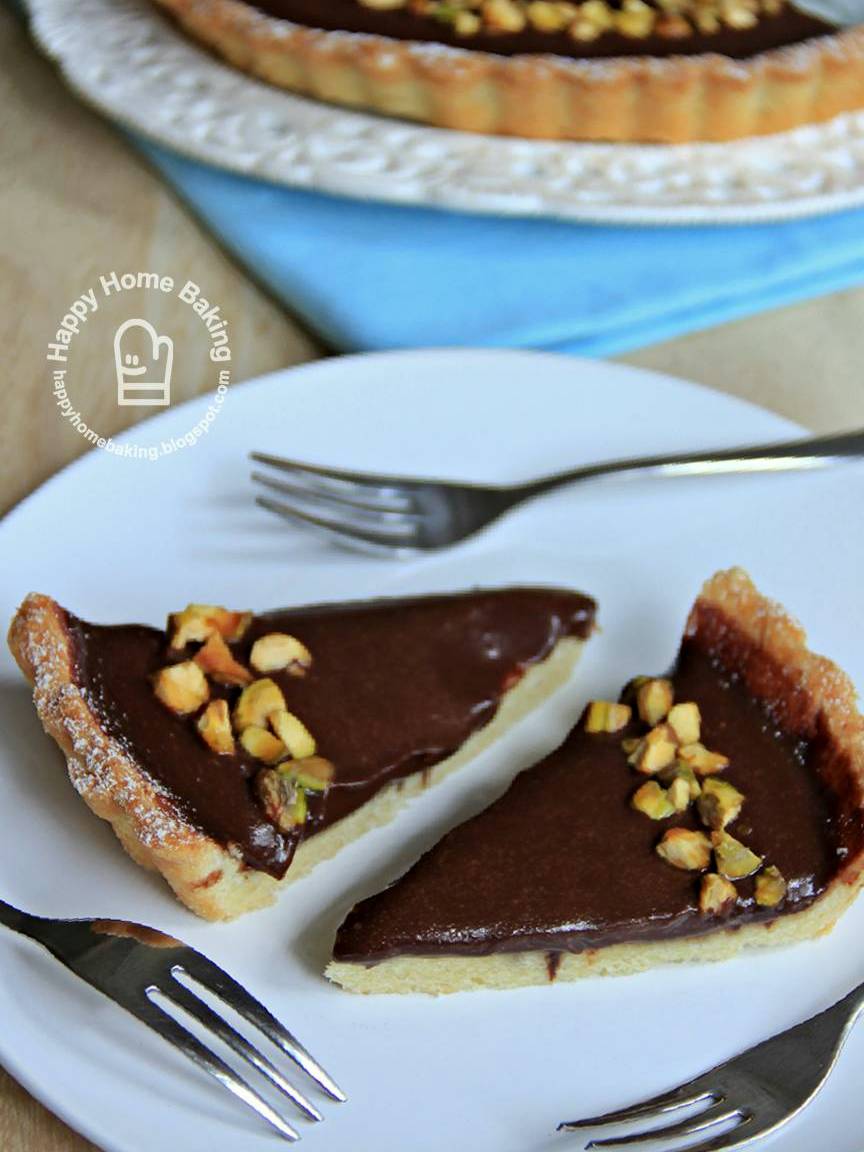
This chocolate tart is made simply by pouring chocolate ganache onto a pre-baked tart crust, and then decorated with some chopped pistachios. Since I have made the dough pastry earlier all I had to do was to thaw the frozen dough in the fridge (over night), this saves me one step of making the dough from scratch :)


The original recipe requires dairy whipping cream or heavy cream to make the chocolate ganache. I was very reluctant to get a tub of dairy cream just for this, as I always have problem finishing the leftovers. This caused me to switch on my 'experimental mode'....why not substitute the heavy cream with milk ? I had great success making homemade chocolate fondue with low fat milk (see here)...so I was confident that it would work the same for this chocolate tart.

I did a search online and learned that milk can be used to make chocolate ganache, as long as some butter is added. Bingo! What a coincident that this chocolate filling also requires butter! And, the rest is history...


I shall let the following pictures speak for themselves...


Since I couldn't make a banana cream pie, I had, on purpose, used banana flavoured low fat milk to make the chocolate filling. Even with untrained palate, my younger child was able to detect the strong banana flavour in the chocolate tart. Well, I am not sure whether this is actually a good thing as it means that the milk is loaded with too much artificial flavouring!

Following the instructions in the recipe, I had also added some Kahlua coffee liqueur to the chocolate filling. With an equally untrained palate, I wasn't able to tell whether a tart is spiked with alcohol, lol. The only difference I could detect was, the filling was slightly bitter after I added in the Kahlua...but there wasn't any coffee taste to it. Either the amount of liqueur used is too little or its presence was overshadowed by the chocolate or the banana flavoured milk.

Nevertheless, this simple tart serves as a delightful dessert...something I will certainly make again. Nothing beats a homemade tart crust that perfectly complements the smooth and velvety chocolate filling (with just the right consistency, not too runny and not too firm)...and not forgetting the pistachios...you will never go wrong matching nuts with chocolate!


Chocolate Tart
(makes an 18cm tart)

Ingredients:

for the tart crust:
(Note: the ingredient makes 2 tart crust dough, you may freeze the second dough up to 2 weeks for later use).
150g unsalted butter, cut into small cubes, softened at room temperature
80g caster sugar
1 egg, lightly beaten (about 55g without shell, use room temperature egg)
250g cake flour
60g ground almond (almond powder)

for the filling:
120g dark chocolate, finely chopped (I used bittersweet mini chocolate chips)
30g unsalted butter
85ml fresh milk (I used banana flavoured low fat milk)
2 teaspoons Kahlua coffee liqueur (omit if not available)

some chopped pistachios for decorating

Method:

to make the tart crust:
  • Lightly grease an 18cm tart pan (with removable base) with butter, set aside.
  • Toast almond powder at 100 degC for 10 mins. Stirring in between. Let cool.
  • Beat sugar and butter with a ballon whisk until the mixture turns pale. Add the egg gradually (a tablespoon at a time), mix well after each addition. Add the ground almond and fold with a spatula. Sieve over the flour. Mix with spatula and gather the mixture with hand to form a soft dough.
  • Weigh and divide the dough into 2 egual portion. Flatten the dough to form a round disc. Place each dough into separate ziplock or plastic bags. Leave one of the doughs to chill for about 1 hour. Store the other dough in the freezer compartment for later use for other types of tarts. (Note: Alternatively, you may divide the crust ingredients into half and make only 1 portion).
  • Remove dough from fridge and roll out the dough in between 2 sheets of baking paper (I used two plastic sheets cut-out from clear plastic bags) to about 23cm in diameter. Remove one side of the baking paper/plastic sheet. Gently lift up the other sheet of baking paper/plastic (with the pastry dough still on it) and flip the dough over the prepared tart pan. Remove the baking paper/plastic sheet. (Don't worry if some parts of the dough broke off. It can be moulded easily back into the tart pan.) Mould the dough into the tart pan, smoothing the edges and the rim carefully.
  • Prick the dough surface with a fork (this helps to prevent the pastry from puffing up when baking). Cover and chill the moulded tart crust in the fridge for 20mins (this helps to prevent the pastry from shrinking too much after baking.)
  • Line a sheet of parchment paper over the tart base. Place baking beads/weights on the parchment paper (I used green beans as baking weights), enough to cover the tart base.
  • Bake in pre-heated oven at 180 degC for 20 mins. Remove the baking beads and parchment paper. Put it back into the oven and continue to bake for another 15~20mins until the crust is golden browned. Let cool completely. Leave the crust inside the tart pan, do not unmould.
to make the filling:
  • Place milk and butter in a saucepan, bring to a simmer. Once the butter is melted, turn off the heat. Add in finely chopped chocolate (or chocolate chips) and leave it for about 1 min. Stir until all the chocolate melts and the mixture becomes smooth. Leave to cool. Add in Kahlua, stir to combine.
  • Pour the chocolate mixture into the tart. Chill the tart in the fridge until the chocolate mixture is set. Unmould tart and decorate with chopped pistachios as desired. 
Recipe source: 甜点新手零失败教室 and Home Baking 星期天的烘焙时光

More aboutSimple Chocolate Tart

Matcha Cheesecake Tart

Diposting oleh good reading on Kamis, 11 April 2013

It has been a while since I last updated my blog. I can't think of a valid excuse except that I keep procrastinating...before I knew it, another week has flown by.

I have several posts lining up...and I will kick start with this matcha green tea cheesecake tart.


I can't remember exactly when my baking friend gave me a pack of expensive looking Uji matcha powder. Probably we have been meeting up so often, and also she has been showering me with gifts and baking ingredients, and buying me lunch one after another, to the extend that I have problem keeping track! It is a happy problem and I hope you are now green with envy, no pun intended (^^)!


I confessed to my baking friend as I was feeling very guilty that the green tea powder is going to expire soon. She came back with a very good tip, that is, to store the matcha powder in the freezer, it helps to keep it longer. Of course, the very first thing I did after hearing such good advice was to pop the whole pack into the freezer. But, it didn't stay there in the cold for too long ;)

Age is really catching up, I can't recall how I stumbled upon this green tea cheesecake tart recipe here. I was sold after going through the list of ingredients. I have all the items on hand! No special trip to the baking supply store is required. Best of all, according to the site, the recipe is shared by Chef Tomoko Higashiguchi of Patisserie Glace. I have not been to this cafe, but I believe it will be something really delicious.

I didn't follow the recipe to the T though. Instead, I made the tart crust using another recipe from a cookbook. Comparing the two, they are almost identical, except that there is ground almond for the recipe from the cookbook. I have been making tart crust with ground almond and I do think the presence of ground almond does make a difference to the taste.

As for the cream cheese filling, all went well until the last step when the matcha powder is added. According to the recipe, I am suppose to stir in the matcha powder and create a marbling effect. However, I had problem blending the matcha powder to the mixture. I couldn't create any marbling effect after lots of stirring and mixing. Despite the amount of stirring, the matcha powder still didn't dissolve completely! See the speckles of green tea all over?!


My piping skill sucks, and I knew I wouldn't be able to create that beautiful floral motif as shown in the picture from the site. I knew the effect wouldn't be great, so I didn't put in my best effort and didn't do it wholeheartedly. This is the best I could manage and from a distant, it didn't look too ugly ;)


I don't know whether I have added a tad too much lemon juice than necessary, but the very first bite into the green tea cheesecake filling didn't leave me with a good impression. The filling is a little too tangy. However, subsequently, I found myself getting used to the slight tang and the taste got better and better. It was a very refreshing treat with a nice matcha flavour without being overpowering.

Is it really worth the effort to put this together? I'll have to say yes, especially when my family members love it!


I am submitting this post to Aspiring Bakers #30: it's Tea time! (April 2013) hosted by Food Playground.


Matcha Cheesecake Tart
(makes an 18cm tart)

Ingredients:

for the tart crust:
(Note: the ingredient makes 2 tart crust dough, you may freeze the second dough up to 2 weeks for later use).
150g unsalted butter, cut into small cubes, softened at room temperature
80g caster sugar
1 egg, lightly beaten (about 55g without shell, use room temperature egg)
250g cake flour
60g ground almond (almond powder)


for the filling:
1 teaspoon gelatine powder
15ml water
100g cream cheese, leave to soften at room temperature
40g caster sugar
40g plain yogurt
2 teaspoon lemon juice
200g whipping cream (I used non dairy whipping cream)
2 teaspoons matcha/green tea powder

Method:

to make the tart crust:
  • Lightly grease an 18cm tart pan (with removable base) with butter, set aside. 
  • Toast almond powder at 100 degC for 10 mins. Stirring in between. Let cool.
  • Beat sugar and butter with a ballon whisk until the mixture turns pale. Add the egg gradually (a tablespoon at a time), mix well after each addition. Add the ground almond and fold with a spatula. Sieve over the flour. Mix with spatula and gather the mixture with hand to form a soft dough.
  • Weigh and divide the dough into 2 egual portion. Flatten the dough to form a round disc. Place each dough into separate ziplock or plastic bags. Leave one of the doughs to chill for about 1 hour. Store the other dough in the freezer compartment for later use for other types of tarts. (Note: Alternatively, you may divide the crust ingredients into half and make only 1 portion).
  • Remove dough from fridge and roll out the dough in between 2 sheets of baking paper (I used two plastic sheets cut-out from clear plastic bags) to about 23cm in diameter. Remove one side of the baking paper/plastic sheet. Gently lift up the other sheet of baking paper/plastic (with the pastry dough still on it) and flip the dough over the prepared tart pan. Remove the baking paper/plastic sheet. (Don't worry if some parts of the dough broke off. It can be moulded easily back into the tart pan.) Mould the dough into the tart pan, smoothing the edges and the rim carefully. 
  • Prick the dough surface with a fork (this helps to prevent the pastry from puffing up when baking). Cover and chill the moulded tart crust in the fridge for 20mins (this helps to prevent the pastry from shrinking too much after baking.) 
  • Line a sheet of parchment paper over the tart base. Place baking beads/weights on the parchment paper (I used green beans as baking weights), enough to cover the tart base. 
  • Bake in pre-heated oven at 180 degC for 20 mins. Remove the baking beads and parchment paper. Put it back into the oven and continue to bake for another 15~20mins until the crust is golden browned. Let cool completely. Leave the crust inside the tart pan, do not unmould.
to make the filling:
  • Dissolve the gelatine in water and set aside for 10min. 
  • Combine the sugar and yogurt in a pot over medium heat to dissolve the sugar. Stir in the gelatine solution until it’s dissolved. Remove from heat.
  • With a balloon whisk, whisk cream cheese until smooth. Gradually add in the yoghurt-gelatin solution and mix to combine. Add in the lemon juice, mix to combine.
  • With an electric whisk, whisk the non-dairy whipping cream until soft peaks form. With a spatula, fold in 1/3 of the whipping cream to the cream cheese mixture. Fold in the remaining whipping cream to the cream cheese mixture.
  • Add in the matcha powder and mix until blended. 
  • Pour the mixture into the tart pan until it is full. Pour the remaining mixture into a piping bag and pipe a floral motif on the cake.
  • Chill the tart for at least 2 hours until it is firm. Unmould before serving.
Recipe source: 甜点新手零失败教室 and here.
More aboutMatcha Cheesecake Tart

Let the pictures do the talking

Diposting oleh good reading on Kamis, 18 Agustus 2011

I'm at a little lost for words...

so, I shall leave the pictures to do most of the talking...


"Flowers always make people better, happier, and more helpful;
they are sunshine, food and medicine for the soul.   Luther Burbank"

Here's a basket of pink roses, gerberas, carnations, that was delivered to my doorstep a few nights ago. What a lovely surprise! I can't even remember when was the last time I have received flowers...it must have been a decade ago. Thank you AK and AM, you have certainly brightened this aunty's day, and many days that followed. Oh how I love the fuchsia theme :) 


Those flowers certainly make me feel better, so much so that I have chosen to bake an apple frangipane tart...something that requires a little extra effort to put together. I don't even mind the trouble.


Besides flowers, an apple a day is something I need to keep myself healthy. This is the first time I am baking something with apples. Yes, the very first time since five years into my baking journey. Pardon my ignorant, I didn't know that the skin would turn a ugly dull brown after spending 45mins in the oven. Next time I should just peel the apples. Most apple tart recipes would recommend a good coating of apricot jam over the apple slices when the tart is out from the oven. I never like glossy looking pies or tarts, so I skip the step and dust it with some icing sugar instead.


A rather cheery and sunshine looking apple tart, don't you think so? I wish I could share it with my friends...hey, someone should start a food dispatch service here!


The pastry crust and frangipane filling (pastry cream made with grounded almond along with sugar, butter, and eggs) tastes really good...but I can't say the same to the baked apple slices. Well, they are a bit soft...a texture I am not used to associating it with crunchy, juicy apples. The tart is best served on the day it is baked, somehow the crust will lose some of its crisp when left over night...could it be due to the high humidity? (If this happens, just warm it in the oven and the tart will taste like freshly baked.)


I am submitting this apple frangipane tart to Aspiring Bakers #10: Easy as Pie (August 2011) hosted by Janine of Not the Kitchen Sink! Thanks Janine for hosting this round and Small Small Baker for championing this monthly baking event!

I thought I would leave the pictures to speak for themselves, alas, I am the one who did most of the talking (*^_^*)


Apple Frangipane Tart

Ingredients:
(makes one 18cm tart)

pastry crust:
40g unsalted butter, soften at room temperature
30g caster sugar
1 tablespoon (15g) lightly beaten egg
20g almond powder (grounded almond)
80g cake flour

frangipane:
60g unsalted butter, soften at room temperature
50g brown sugar
1 egg, lightly beaten
1 teaspoon vanilla extract
80g almond powder (grounded almond)
10g cake flour

topping:
2 apples, cut into thin slices
15g unsalted butter, melted
icing sugar for dusting


Method:
  • Lightly grease an 18cm tart pan (with removable base) with butter, set aside.
  • Toast almond powder at 100 degC for 10 mins. Stirring in between. Let cool.
pastry crust:
  • With a manual whisk, cream butter and sugar till light and fluffy. Dribble in the egg, whisk and mix well. Add in the almond powder and fold with a spatula. Sieve over the flour and fold in with the spatula. Gather the mixture to form a dough.
  • Flatten the pastry dough to form a round disc. Roll out dough in between 2 sheets of baking paper(I used two plastic sheets cut-out from clear plastic bags) to about 23cm in diameter. Remove one side of the baking paper/plastic sheet. Gently lift up the other sheet of baking paper/plastic (with the pastry dough still on it) and flip the pastry dough over the prepared tart pan. Remove the baking paper/plastic sheet. (Don't worry if some parts of the pastry broke off. It can be moulded easily back into the tart pan.) Mould the pastry into the tart pan, smoothing the edges and the rim carefully. (If the pastry is too soft to handle, chill the rolled out dough in the fridge for 10~15 mins before moulding.)
  • Prick the pastry surface with a fork (this helps to prevent the pastry from puffing up when baking, refer picture of a baked pastry crust here). Cover and chill the moulded pastry in the fridge for 20mins (this helps to prevent the pastry from shrinking too much after baking.)
  • Brush the top of the rim with some egg wash (optional). Bake in pre-heated oven at 180 degC for 10~12 mins or until the pastry is lightly golden browned. Let cool and set aside.
frangipane:
  • With a whisk, cream butter and brown sugar till the mixture turns fluffy. Add in the egg gradually, mix well each time the egg is added.
  • Add in grounded almond powder. Fold with a spatula till well incorporated. Sieve over the flour onto the mixture. Mix with the spatula. Add in vanilla extract and mix well.
  • Spread 1/3 of the filling onto the cooled pastry crust. Line with some apple slices. Spread the remaining filling evenly, ensure the edges are filled up. Arrange apple slices on top. (Make sure the apple slices are well drained.) Brush the melted butter over the apple slices.
  • Bake in pre-heated oven at 170 degC for 40 ~ 45mins, until the edges and filling turn golden brown. Leave to cool for a few minutes. Unmould and let cool completely, and dust with some icing sugar. Best serve on the day it is baked.
Recipe Source: adapted from Delicious!! Baked Cakes, Ikuko Omori
More aboutLet the pictures do the talking

fruity march

Diposting oleh good reading on Selasa, 22 Maret 2011

Most of the time, I am able to get it right the first time...but lately, my baking fairy must have left my kitchen...even a batch of simple chocolate chip muffins I have to make it twice to get it right. Not forgetting those banana walnut muffins which looked horrendous and have got a rubbery crumb (I didn't want to post it, to avoid any visual pollution...), and a banana sponge cake that still needs some improvement.


This is my second fruit tart in two weeks. The first one was made with a crumb crust...a lousy decision I made...the recipe was taken from a book dedicated to nothing but tarts. It is a lazy crust made with digestive biscuits, those biscuit base commonly used for no-bake cheesecakes. Even though the crust was pre-baked in the oven, it was still too fragile and crumbled the moment I tried to cut a slice. This is a classic case of the Hokkian/Chinese saying...利害就好,不要假利害! which means, it is good to be "clever", but not "too clever".


Well, practice makes perfect...especially for self-taught home bakers like me. This time, I learned my lesson and went back to my trusted pastry crust recipe. It takes a few extra steps to prepare it, but the effort does pay off! This pastry crust is made by creaming butter and sugar, followed by egg and flour...slightly different from the more commonly used method of rubbing butter with flour. Maybe that is why it uses a lot less butter?

The creme patissiere or pastry cream is a thick custard filling made by cooking milk, eggs, sugar, some flour over the stove. Corn flour is added to help thicken the mixture. Vanilla pods are usually boiled together with the milk before the seeds are scraped out and added to the mixture. Since I do not have any vanilla pods, I substitute with pure vanilla extract. This pastry cream tastes way better than most store bought tarts which I believe the custard fillings are made with custard powder. I do not have a well trained palette, but I have made enough fruit tarts to be able to tell the difference. The recipe may look super long and complicated, but the crust and pastry cream can be made ahead of time, and when ready to serve, you are left with the simple task of putting them together.


I am submitting this fruity tart to Aspiring Bakers #5: Fruity March hosted by Jess of Bakericious. I am glad I am finally able to participate in this event. Thanks Jess for hosting this round and Small Small Baker for championing this monthly baking event :)


Fresh Fruit Tart
Ingredients:
(makes one 18cm tart)

Pastry Crust:
80g cake flour
20g almond powder (grounded almond)
30g caster sugar
40g unsalted butter, soften at room temperature
1 tablespoon (15g) lightly beaten egg

Pastry Cream:
200ml milk
2 egg yolks
40g caster sugar
1 tablespoon plus 1 teaspoon* cornflour
1 tablespoon plus 1 teaspoon* plain flour
10g butter
2 teaspoons vanilla extract

Toppings:
fresh fruits such as strawberries, kiwi fruits, orange, peaches, etc


Method:

Pastry Crust:
  • Lightly grease an 18cm tart pan (with removable base) with butter, set aside.
  • Toast almond powder at 100 degC for 10 mins. Stirring in between. Let cool.
  • With a manual whisk, cream butter and sugar till light and fluffy. Dribble in the egg, whisk and mix well. Add in the almond powder and fold with a spatula. Sieve over the flour and fold in with the spatula. Gather the mixture to form a dough.
  • Flatten the pastry dough to form a round disc. Roll out the dough in between 2 sheets of baking paper (I used two plastic sheets cut-out from clear plastic bags) to about 23cm in diameter. Remove one side of the baking paper/plastic sheet. Gently lift up the other sheet of baking paper/plastic (with the pastry dough still on it) and flip the pastry dough over the prepared tart pan. Remove the baking paper/plastic sheet. (Don't worry if some parts of the pastry broke off. It can be moulded easily back into the tart pan.) Mould the pastry into the tart pan, smoothing the edges and the rim carefully. (If the pastry is too soft to handle, chill the rolled out dough in the fridge for 10~15 mins before moulding.)
  • Prick the pastry surface with a fork (this helps to prevent the pastry from puffing up when baking). Cover and chill the moulded pastry in the fridge for 20mins (this helps to prevent the pastry from shrinking too much after baking.)
  • Brush the top of the rim with some egg wash (optional). Bake in pre-heated oven at 180 degC for 20~25 mins or until the pastry is lightly golden browned. Let cool before removing the crust from the tart pan.
Pastry Cream:
  • In a saucepan, bring milk slowly to the boil and remove from the heat.
  • In a mixing bowl, with a manual whisk, whisk egg yolks and sugar until the mixture turns pale and thickens (takes a couple of minutes). Sieve over the corn flour and plain flour. Whisk until the mixture becomes smooth (a few quick stir).
  • Add in the hot milk gradually to the yolk mixture, whisk constantly to prevent curdling.
  • Pour the mixture over a sieve and return it to the saucepan. Heat gently, stirring constantly with a whisk or a wooden spoon until the mixture just starts to boil. When it boils, continue to stir constantly for another 1 minute, the mixture will become thick and hard to stir. It is important to stir the mixture constantly as it cooks so that it thickens but doesn't turn lumpy.
  • Remove from heat and whisk in the butter and vanilla extract (or other liqueur such as Grand Marnier, Brandy, Kirsch, Rum as desired).
  • Pour into a clean bowl and cover the surface of the pastry cream with cling wrap (this is to prevent a skin from forming). Set aside to cool completely. Keep in fridge until needed. When ready to use, just whisk it with a spoon and the cream will become spreadable.
To Assemble:
  • Spread the pastry cream evenly onto the pastry crust. Top with sliced fruits. Best serve on the day it is made. Keep for one day if refrigerated.
*Note: for the pastry cream, I only made 2/3 portion as the original recipe is enough to fill a bigger tart. As a result the amount for the corn flour and plain flour was a little unusal!

Recipe Source: adapted from (1) Delicious!! Baked Cakes, Ikuko Omori, (2) Fresh Baked by Louise Pickford
More aboutfruity march

1st bake of the year

Diposting oleh good reading on Selasa, 15 Februari 2011

I thought I have lost it....


but it came back...


I have taken a long break from blogging. It has been months since I last baked something. Even a brand new oven failed to tempt me. It was left cold, seating in the cabinet for 2 months since it was installed. It was left untouched most of the time, except for the occasional visitors...without fail, anyone who came to visit my newly renovated kitchen would open the oven door to take a peep ;)

Baking is the last thing I had in mind for the past few months. I was left alone to tackle the humongous task of packing, unpacking, shifting...not forgetting the endless 'cleaning sessions'. The entire process, has reunited me with every single corner of my house! I have also been taking my own sweet time to unpack the 30 over boxes of stuff. It could take me one whole morning to find the 'right home' for each single item in just one box. I spent quiet moments, looking through all the keepsakes which I have been keeping over the years. I am also suffering from the 'new house syndrome'...being over zealous in trying to keep the house pristine clean. I hope I am able to get over it really really soon!

All the cleaning, scrubbing, and endless chores has taken its toll on me. I was in no mood to bake anything and nothing seems to inspire me. I even harboured the idea of giving up blogging altogether. Leaving the blogosphere as quietly as I have entered it four years ago.

It was one of those spur-of-the-moment thingy when I gave the new comer a thorough clean up.  Once I turned on the oven for the first time, the 'sparks' that I have been waiting for has finally ignited my passion for baking.


My first bake of the year is this Strawberry Galette. It is nothing new to me. I tried making it when I first saw it over at Laurreen's blog, Eat and Be Happy, except that mine is a far cry from hers ;)


This strawberry galette(French free form tart) is the right choice for a first bake from a new oven. It is very simple to put together and I would say it is not that sensitive to the oven temperature as compared to a chiffon cake. I adapted the recipe from joyofbaking and replaced some of the plain flour with wholemeal ones. It is a delightful dessert, best served freshly baked over a cup of tea. You also get to enjoy the wonderful aroma when it is baking in the oven. My clueless kid came to ask me what our neighbour was cooking when he smelt something really nice from the living room. It has been so long that he has already forgotten the familiar buttery fragrance that used to fill our kitchen :')

The next time I were to make this again, I would use more strawberries, I only used slightly half a punnet, stingy me! See, there is always a 'next time'. I believe it is this exact 'next time' mentality that keeps me going. There is always something I could improve upon and done better the next time.


Strawberry Galette
Ingredients:

pastry:
125g plain flour
50g wholemeal flour
1/2 teaspoon salt
1 tablespoon granulated white sugar
113g unsalted butter, cold, cut into small cubes
2 tablespoons ice water

filling:
1 punnet (250g) strawberries
2 tablespoons granulated white sugar
1 teaspoon corn starch

1 egg plus1 tablespoon water, lightly beaten
1 teaspoon granulated white sugar


Method:
1. Mix plain flour, wholemeal flour, sugar, and salt in a mixing bowl. With finger tips rub the cold butter into the dry ingredients until the mixture resembles coarse crumbs. (It is important that the butter be cold so when it is cut into the flour mixture it becomes small, flour-coated crumbs. I use a fork to work the butter into the dry ingredients. If the butter starts to melt away during this process, stop and place the mixture in the freezer for 10-15 mins to prevent the butter from melting further. Continue the process when the mixture is well chilled.)

2. Add the ice water and mix until the mixture comes together to form a dough. Pat the dough into a round disc, place in a plastic bag or cover with cling wrap and leave it in the fridge for at least 1 hour to chill the butter and allow the gluten in the flour to relax.

3. Wash the strawberries, remove the stems and cut into halves or thick slices. Toss the sliced strawberries with the sugar and cornstarch.

4. To prevent the dough from sticking to work surface, roll out the chilled dough in between 2 plastic sheets or parchment papers to a 11" round. Transfer the pastry to a baking tray lined with parchment paper.

5. Layer the strawberries, overlapping each other in a circle on the dough, leaving a 1"~2" border. Fold the edges over the strawberries. Brush the dough with egg wash. Sprinkle with 1 teaspoon of sugar. Bake in preheated oven at 200degC for 20 to 25 minutes or until the crust is golden browned.

Recipe source: adapted from joyofbaking.com and very inspired by Eat and Be Happy.
More about1st bake of the year

Is it a Tart or a Pie?

Diposting oleh good reading on Rabu, 03 Juni 2009

I couldn't help but grabbed 6 lemons when I saw them on the supermarket cart two weeks ago. They look so fresh and are much larger than the usual ones I bought. It was such a good deal, I got them at 35 cents each, almost half of what I usually have to pay.


With such beautiful lemons, I thought I should really get my hands to work on this Lemon Meringue Pie recipe which I have been keeping for the past two years. I didn't have the courage to take up the challenge to make such a pie as the recipe looks so intimidating which entails putting three totally different parts together. I am comfortable with making the crust, but the lemon fillings requires the use of the stove, something which I am really bad at it; and till now it remains a mystery whether I have been beating the egg whites correctly? On top of that, I have never even tasted a lemon meringue pie!

Anyway I felt very brave the other day, and went ahead to give it a try. After looking through the recipe, I didn't like that the pastry crust requires more butter than the usual tart recipe that I am familiar with. So I made the crust by adapting the peach tart recipe, which is a good thing, since I do not own a pie pan or a dish, I could turn it to a tart instead of a pie.


As usual, before I jump-in to make something alien, I looked up the internet for more information. It is interesting to learn that besides the type of pan to use, there are other differences between a lemon meringue Pie and a lemon meringue Tart. The filling of a lemon meringue Pie comes in the form of a custard, made with little or no butter and uses cornstarch or flour for thickening. While a lemon meringue Tart is filled with lemon curd which does not contain cornstarch or flour. The filling for the Tart contains more lemon juice and zest than the custard filling of a Pie. The lemon curd is made with butter which makes the texture smoother and creamier.

Another general difference between a Pie and a Tart is the amount of filling that goes into it. A Pie will hold more filling as compared to a tart since it is baked in a deeper pan. With the sheer amount of filling, the sides of a Pie would collapse if it were removed from its pan, and for this reason, pies are usually served from their baking pans. With less filling in a Tart, the crust plays a more prominent role in terms of texture and flavour, and so, it is important to make sure the crust is tasty.


With the above findings, I realised that what I have made is neither a Lemon Meringue Pie or a Lemon Meringue Tart :')

The filling is meant for a pie but since I used a tart pan, it is now a tart. Other than the crust, I followed the rest of the recipe rather closely. I even attempted to pipe a 'decorative' border around the rim of the tart. I have meant to pipe 'shells' just like the ones in the recipe, however, with zero skills and knowledge on piping, I ended up with just a border of undulating waves!

If you were to do a search on lemon meringue pie, it is inevitable that you will come to know that the meringue can actually "weep". Although I tried to follow some of the tips here, here and here to prevent my pie from crying, my tart still weeps a little. It also doesn't help that the meringue in this recipe is made the "Italian way"...that is, a hot sugar syrup is added to the beaten egg whites to cook it...this is suppose to make the meringue more stable. Well, besides my lousy skills plus my unreliable oven, I have nothing else but the humid weather to blame for my sobbing tart.


Other than the weeping bit, I really like the taste of this dessert. I am also surprised at the interesting flavours it offers...a combination of a little sweetness and a little tartness. The meringue on top is pillowy soft, fluffy, and sweet, very much like biting into cotton candies. The custard filling is very refreshing with the right tartness that balances well with both the sweet meringue and the crust. I'll have to classify this tart under the category: 'can't stop at just one slice'.


Lemon Meringue Tart/Pie

Ingredients:
(makes one 18cm tart)

Pastry Crust:
100g cake flour
30g caster sugar
40g unsalted butter , soften at room temperature
1 tablespoon (15g) lightly beaten egg

Filling:
250ml milk
3 egg yolks
60g caster sugar
25g cornstarch
30g unsalted butter, cut into cubes
zest of 1 large lemon
juice of 1 large lemon (about 70-80 ml)
(use a strainer to remove any seeds and pulp from the juice)

Meringue
3 egg whites
50g caster sugar

sugar syrup:
3 tablespoons water
100g caster sugar


Method:
    For Pastry Crust:
  1. Lightly grease an 18cm tart pan, set aside. Sieve flour, set aside.
  2. With a manual whisk, cream butter and sugar till light and fluffy. Dribble in the egg, whisk and mix well. Sieve over the flour in 2 to 3 additions into the batter. Fold the mixture gently with a spatula each time the flour is added.
  3. Form and shape the pastry into a round disc. Roll out the pastry in between 2 sheets of baking paper or 2 sheets of cut-out plastic bags, to about 23cm in diameter. Remove one side of the baking paper. Carefully flip the pastry over the prepared tart pan. Remove the other baking paper. Mould the pastry into the tart pan, smoothing the edges and the rim carefully. If the pastry is too soft to handle, chill it in the fridge for 10~15 mins.
  4. Chill the moulded pastry in the fridge for 20mins. (This helps to prevent the pastry from shrinking too much after baking.)
  5. Use a fork to prick holes on the pastry surface. Brush the top of the rim with egg wash. Bake in pre-heated oven at 180 degC for 10~12 mins until the edges turned slightly browned. Let cool completely.
  6. For Filling:
  7. In a mixing bowl, with a manual whisk, whisk egg yolks with a little bit of the milk. Add in sugar and corn flour, mix well.
  8. In a saucepan, bring the remaining milk to a simmer. Remove from heat and add the hot milk gradually to the yolk mixture, whisk to combine. Pour the mixture over a sieve and return it to the saucepan. Boil the mixture on Low heat, stirring constantly with a wooden spoon until the mixture just starts to boil. When it boils, continue to stir constantly for another 1 minute, the mixture will become very thick and very difficult to stir. It is important to stir the mixture constantly as it cooks so that it thickens but doesn't turn lumpy or get burnt at the bottom.
  9. Remove mixture from heat and whisk in the butter, lemon zest and lemon juice. Pour the filling into the baked pastry crust and smooth the top. Chill tart in fridge.
  10. For Meringue:
  11. To make the sugar syrup: in a saucepan, stir water and sugar and bring the syrup to a boil. Turn to low heat.
  12. In a clean mixing bowl, with an electric mixer, beat the egg whites until soft peaks form. Gradually add the sugar and continue to whip at the same time until stiff peaks form.
  13. Slowly drizzle it the hot sugar syrup into the beaten egg white in a steady stream and continue to beat the mixture at the same time until the egg white becomes thick and glossy.
  14. With a spatula, pile the tart surface with about 2/3 of the meringue. Shape the meringue into a tall dome and gently press down on the meringue to get rid of any air pockets. Make sure the edges are all covered with the meringue, leaving no filling exposed. Work quickly before the meringue starts to cool and set, make a few decorative swirls and peaks with the back of a spoon. Place the remaining meringue in a piping bag and pipe a decorative border on the rim of the tart. Bake the tart in a pre-heated oven at 230 degC for 2 to 3 mins or until the meringue is lightly browned. Remove from oven and let cool. Refrigerate until ready to serve. Best served on the day it is made.


More aboutIs it a Tart or a Pie?

Wholemeal Banana Tart

Diposting oleh good reading on Sabtu, 23 Mei 2009

My elder son can swim far better than his brother, but when it comes to running, he is not better off than me. He went for his 'long-distance' run early this morning. It was part of his school's annual physical fitness test. Although it was only 1.6 km, to him, who has got a pair of elephant's legs, is almost equivalent to a mini-marathon ;)

In order to give him an extra boost of energy, I made something with banana for his breakfast today.


I have planned to make a banana tart using the same old Peach Tart recipe. However, when I was gathering the necessary ingredients, I realised that I have ran out of ground almond. I was not prepared to get out of the house to buy a pack of ground almond, and neither was I keen to bake a banana cake. So I looked around for a suitable substitute...and when I spotted the pack of wholemeal flour, I knew instantly that my problem was solved.


I was a little hesitant to use the wholemeal flour for the pastry base, my main concern was whether the pastry would be able to form a dough or hold it's shape. But I went ahead and gave it a go. Lady Luck was with me, the pastry dough was not very much different from the usual ones using ground almond. I was also surprised that even without the almond, the finished tart shell was emitting a nice buttery aroma when it was cooling on the rack.


This Wholemeal Banana Tart is not as pleasing to the eyes as compared to the lovely Peach Tart. The banana slices turned black upon baking, no amount of icing sugar could cover up the undesired appearance :'(


Nevertheless, it smells and tastes really really delicious. I love the nutty texture of wholemeal flour, although the filling was slightly sweet due to the generous amount of bananas I have added to the filling. My kids have no complaints though. The tart shell was crisp on the day it was baked, sadly, it softened when left over night, I wonder whether the mashed banana was the main culprit?

My boy clocked in 10min 4sec for his run which is 1.5mins faster than his usual timing. No, I won't attribute it to this tart, I think it was his determination and the set of goals that he had set that made him pushed himself to his limit. It is my wish to see him having the same zeal in everything he does.


Wholemeal Banana Tart

Ingredients:
(makes one 18cm tart)

pastry:
40g unsalted butter , soften at room temperature
30g caster sugar
1 tablespoon (15g) lightly beaten egg
20g wholemeal flour
80g plain flour


filling:
60g unsalted butter, soften at room temperature
50g brown sugar
1 egg, lightly beaten
80g wholemeal flour
10g flour
1 teaspoon vanilla extract
2 large bananas, mashed


2 bananas, thinly sliced (optional)
icing sugar for dusting (optional)

Method:
    Pastry base:
  1. Lightly grease an 18cm tart pan, set aside. Sieve flour and set aside.

  2. With a manual whisk, cream butter and sugar till light and fluffy.

  3. Add in the egg gradually, whisking the batter till well mixed each time the egg is added.

  4. With a spatula, fold in the wholemeal flour.

  5. Sieve over the flour in 2 to 3 additions into the batter. Fold the mixture gently with the spatula. Gather and form the pastry into a round ball.

  6. Roll out the pastry in between 2 plastic sheets or baking paper to about 23cm in diameter.

  7. Remove one side of the plastic sheet. Carefully turn/flip the pastry and place it over the prepared tart pan. Mould the pastry into the tart pan, smoothing the edges and the rim carefully. If the pastry is too soft to handle, chill it in the fridge for 10~15 mins before rolling.

  8. Chill the pastry in the fridge for 20mins. (This is to prevent the pastry from shrinking upon baking.)

  9. Use a fork to poke holes on the pastry. Brush the top of the rim with egg wash. Bake in pre-heated oven at 180 deg C for 10 ~12mins until the edges are slightly browned. Let cool completely.

  10. filling:
  11. With a whisk, cream butter and brown sugar till the mixture turns fluffy. Add in the egg gradually, mix well each time the egg is added.

  12. Add in wholemeal flour and the plain flour. Fold with a spatula till well incorporated. Add in vanilla extract followed by the mashed banana, mix well.

  13. Spread the filling onto the cooled pastry base. Ensure that the edges are filled up. Line with banana slices (optional). Bake in pre-heated oven at 170 deg C for 30 ~ 35 mins, until the edges and filling turn golden brown. Let cool, and dust with some icing sugar (optional).

    Recipe Source: Delicious!! Baked Cakes, Ikuko Omori

More aboutWholemeal Banana Tart

Tart it Up!

Diposting oleh good reading on Selasa, 21 Oktober 2008

This is a very much delayed post. I have been keeping this in my draft box for almost a month. Whenever I wanted to work on this post, some other new and more 'exciting' stuff got into it's way :(


I remembered getting pretty nervous with the recipe as it was my maiden attempt at making crème patissiere or pastry cream as filling for this fresh berry tart. As usual, I tend to shy away with anything that has got to do with the stove. Before I set off to make the pastry cream, I checked the internet to get some idea how to really go about making it. The recipe makes it sound so simple, but I was certain that chances of me getting it right the first time would be very slim. I felt more confident after looking at the step-by-step photos from here and here. Even though I can't read the language in the second website, the pictures speak for themselves.


I was so glad when I managed to 'cook' the pastry cream without burning it...well almost...I must confess that there was just a tiny bit of brown layer at one corner, right at the bottom of the pan ;) The pastry cream was very smooth and not lumpy, most importantly, it tasted very very good! It was way better than any custard fillings which I have tasted before...and I suspect some of those tart fillings that I have tried were made with custard powder. The original pastry cream recipe calls for vanilla seeds, I didn't want to take the risk to put my precious vanilla pods (a gift from vb) to waste, I flavoured the pastry cream with vanilla extract instead.


I always fall back on this same recipe to make the pastry case...primarily because I think it doesn't use as much butter as compared to other shortcrust pastry recipes. The finished tart was dust generously with icing sugar...but it melted away as I was taking photos of the tart. That was because I have left the tart to chill in the fridge while I was doing the cleaning up. The strawberries were as tangy as usual (**sigh**), fortunately the icing sugar helped to make them less sour. The pastry cream greatly enhanced the overall taste of the tart. It was simply delicious...light and refreshing...especially after it was chilled in the fridge. We had it right after dinner, and the four of us finished up 3/4 of the tart. We could have devoured the entire thing, but I insisted that we kept some 'leftovers' just so to make me feel less greedy ;) My husband was full of praises, which was something not to be expected on a 'regular basis". I didn't even have the chance to take a photo of a slice as whatever that was left was gone first thing the next morning.


Ingredients:
(makes one 18cm tart)

Pastry Case:
80g cake flour
20g almond powder
30g caster sugar
40g unsalted butter , soften at room temperature
1 tablespoon (15g) lightly beaten egg

Pastry Cream:
200ml milk
2 egg yolks
40g caster sugar
1 tablespoon plus 1 teaspoon* cornflour
1 tablespoon plus 1 teaspoon* plain flour
10g butter
1 tablespoon vanilla extract

some strawberries, blueberries
icing sugar for dusting

Method:

Pastry Case:
  1. Lightly grease an 18cm tart pan, set aside.
  2. Toast almond powder at 100 degC for 10 mins. Stirring in between. Let cool.
  3. Sieve flour and almond powder, set aside.
  4. With a manual whisk, cream butter and sugar till light and fluffy.
  5. Dribble in the egg, whisk and mix well.
  6. Sieve over the flour/almond meal mixture in 2 to 3 additions into the batter. Fold the mixture gently with a spatula.
  7. Form and shape the pastry into a round disc. Roll out the pastry in between 2 sheets of cling wrap or baking paper (I used two sheets of cut-out plastic bags) to about 23cm in diameter.
  8. Remove one side of the cling wrap/baking paper. Flip the pastry over the prepared tart pan. Remove the other cling wrap/baking paper. Mould the pastry into the tart pan, smoothing the edges and the rim carefully. If the pastry is too soft to handle, chill it in the fridge for 10~15 mins.
  9. Chill the moulded pastry in the fridge for 20mins. (This helps to prevent the pastry from shrinking too much after baking.)
  10. Use a fork to poke holes (as many holes as you can) on the pastry surface. Brush the top of the rim with egg wash. Bake in pre-heated oven at 180 degC for 10~12 mins until the edges turned slightly browned. Let cool completely.


  11. Pastry Cream:
  12. In a saucepan, bring milk slowly to the boil and remove from the heat.
  13. In a mixing bowl, with a manual whisk, whisk egg yolks and sugar until the mixture turns pale and thickens. Sieve over the corn flour and plain flour. Whisk until the mixture becomes smooth.
  14. Add in the hot milk gradually to the yolk mixture, whisk constantly to prevent curdling.
  15. Pour the mixture over a sieve and return it to the saucepan. Heat gently, stirring constantly with a whisk or a wooden spoon until the mixture just starts to boil. When it boils, continue to stir constantly for another 1 minute, the mixture will become very thick and very difficult to stir. It is important to stir the mixture constantly as it cooks so that it thickens but doesn't turn lumpy.
  16. Remove from the heat and whisk in the butter and vanilla extract (or other liqueur such as Grand Marnier, Brandy, Kirsch, Rum as desired).
  17. Pour into a clean bowl and cover the surface of the pastry cream with cling wrap and set aside to cool completely. This is to prevent a skin from forming. After cooling, the pastry cream will be very thick. When ready to use, just whisk it with a spoon and it will become spreadable.


  18. Assemble:
  19. Spread the pastry cream evenly onto the cooled tart case. Arrange strawberries/blueberries on top and dust with icing sugar. Best serve on the day it is made. Keep for one day if refrigerated.
Recipe Source: adapted from (1) Delicious!! Baked Cakes, Ikuko Omori, (2) Fresh Baked by Louise Pickford

Note: for the pastry cream, I only made 2/3 portion as the original recipe is enough to fill a much bigger tart. As a result the amount for the corn flour and plain flour was a little unusal!
More aboutTart it Up!

Blueberry Tart

Diposting oleh good reading on Sabtu, 05 Juli 2008

During our usual weekend grocery shopping, I bought a pack of blueberries which was on discount. This is not the first time I bought fresh blueberries, but it seems such a small pack now...especially compared to the 1 lb (more than 500g) pack we bought from Costco (a wholesale club) when we were in the States.

Although blueberries have got very high antioxidant activity, we don't really enjoy eating them plain, unlike strawberries. So, I use them to make a fruit tart.

This photo was created using the dumpr site's 'amazing circle' effect. I was surprised that the orange peels which I placed in the centre of the tart has now been transformed into the circumference. How interesting!


I followed a tart recipe which is quite similar to the peach tart I made previously. Although the original recipe is meant for a strawberry tart, I went ahead with it as I prefer frangipane fillings over a custard one. However, I was quite disappointed with the amount of fillings used...it was too little for me! I would have to double the portion for the fillings or follow the recipe under this Triple Almond Tart, the next time I make this.


Instead of making some strawberry jam as called for in the recipe, I slabbed the tart surface with a layer of Smucker's blueberry jam before topping it with blueberries. I never knew that it could be a tiring business to arrange the blueberries one by one! It was a good thing that I used this brand of jam (my favourite)...as I could use one or two berries from the jam to double up as fresh ones...to fill up the missing gaps ;)

This tart proved to be a good way to get the kids to eat the blueberries fresh. The sweetness from the jam made up for the slight tangy taste of the berries. I love the pastry crust most.


Ingredients:
(makes one 18cm tart)

pastry:
80g cake flour
20g almond powder
30g caster sugar
40g unsalted butter , soften at room temperature
1 tablespoon (15g) lightly beaten egg

filling:
2 teaspoons cake flour
40g almond powder
3 tablespoons brown sugar
30g unsalted butter, soften at room temperature
2 tablespoons (30g) lightly beaten egg
1 teaspoon Rum (I replaced it with vanilla extract)
some blueberry jam
some fresh blueberries
icing sugar for dusting

Method:

Pastry base:
  1. Lightly grease an 18cm tart pan, set aside.
  2. Toast almond powder at 100 degC for 10 mins. Stirring in between. Let cool.
  3. Sieve flour and almond powder, set aside.
  4. With a manual whisk, cream butter and sugar till light and fluffy.
  5. Dribble in the egg, whisk and mix well.
  6. Sieve over the flour/almond meal mixture in 2 to 3 additions into the batter. Fold the mixture gently with a spatula.
  7. Form and shape the pastry into a round ball. Roll out the pastry in between 2 sheets of cling wrap or baking paper (I used two sheets of cut-out plastic bags) to about 23cm in diameter.
  8. Remove one side of the cling wrap or baking paper. Place pastry over the prepared tart pan. Mould the pastry into the tart pan, smoothing the edges and the rim carefully...if the pastry is too soft to handle, chill it in the fridge for 10~15 mins.
  9. Chill the moulded pastry in the fridge for 20mins. (This helps to prevent the pastry from shrinking too much after baking.)
  10. Use a fork to poke holes on the pastry surface. Brush the top of the rim with egg wash. Bake in pre-heated oven at 180 degC for 10~12 mins until the edges turned slightly browned. Let cool completely.

    filling:
  11. With a whisk, cream butter and brown sugar till the mixture turns fluffy. Add in the egg gradually, mix well each time the egg is added.
  12. Add in almond powder. Fold with a spatula till well incorporated. Sieve over the flour onto the mixture. Mix with a spatula. Add in rum (or vanilla extract) and mix well.
  13. Spread the filling onto the cooled pastry base. Ensure that the edges are filled up. Bake in pre-heated oven at 170 degC for 15~20 mins, until the edges and filling turn golden brown. Let cool.
  14. Spread a layer of blueberry jam on the tart surface. Arrange blueberries on top and dust lightly with icing sugar. Serve on the day it is made, keep in fridge if left overnite.
Recipe Source: adapted from Delicious!! Baked Cakes, Ikuko Omori

More aboutBlueberry Tart

It's MeMe time!

Diposting oleh good reading on Rabu, 20 Februari 2008


I have recently been tagged..by two fellow bloggers: Mrs B of Mrs Bs Baking and Bridget over at bake at 350, thank you!! :)

Here are the MeMe rules:
1. Link to your tagger and post these rules.
2. Share 5 facts about yourself.
3. Tag 5 people at the end of your post and list their names (linking to them).
4. Let them know they've been tagged by leaving a comment at their blogs.

I spent quite a fair bit of time trying to come up with 5 interesting facts about myself...I almost wanted to give up as I am really quite a boring person, yawn...zzzZZZZ

I guess most of my readers have the same common interesting in baking, so I would like to share with you things that are related to baking, blogging and photography:

  1. I own a small 'desk-top' size Tefal oven. It's only big enough to put in a tray not bigger than 12 by 10 inches! Due to the limited space in my kitchen, I have to keep it in the kitchen cabinet after each use.
  2. I am using a bread maker which is considered cheap and economical...the brand is Bluesky, and it cost only S$69.90...a cheap deal as compared to other brands which are in the range of a few hundreds. So far it has really served it's basic purpose.
  3. We live in a flat that has got 3 bedrooms and 1 study room...and the 4 of us occupy only 1 bedroom! I take most of my recent photos in one of my empty bedrooms!! It is the best or let's just put it as, the only, spot that I could get fair amount of natural light.
  4. I use a Canon Powershot G3 (4 mega pixel)to take all the photos I have posted here. So far, I could only manage to set the camera to the auto-mode, turn on the macro function, turn off the flash and shoot away.
  5. I use a free software, Picasa 2, to crop, adjust the contrast and sharpness of my photos. It's quite an idiot proof software...excellent for people like me ;)
Now I will like to tag the following 5 fellow bloggers:

1. Aimei at Baking Cottage
2. Ovenhaven at Epicurean Escapism
3. Mandy at Fresh from the Oven
4. My Home Kitchen
5. Cocoa at Maskan Istimewa


and here's a tart that I will like to share with all of you out there...thank you for taking the time to visit my humble blog. I truly enjoy reading all your comments and feedback :)

I shall name this the Triple Almond Tart...


here's a closer look...the tart was made with ground almond or almond powder (which means the same thing) for both the pastry base and the fillings...the top was then sprinkled generously with almond slices. I adapted the same recipe as the Peach Tart. As usual, I used a 18cm disposable foil tart pan, since I have only a normal 16cm tart pan...as a result I wasn't able to make nice scallop effect on the rim :(


the sides was ok though...thanks to the foil tart pans that I got from Phoon Huat...that has got the side scallop on the pan...I do noticed that those available in supermarkets come in straight edges/sides only.


Here's sending you a 'virtual' slice of the tart...trust me, this is really good stuff! Enjoy ;p

Ingredients:
(make one 18cm tart)

pastry:
40g unsalted butter, soften at room temperature
30g caster sugar
1 tablespoon (15g) lightly beaten egg
80g flour
20g ground almond

filling:
60g unsalted butter, soften at room temperature
50g brown sugar
1 egg, lightly beaten
80g ground almond
10g flour
1 teaspoon vanilla extract (the original recipe calls for 2 tbs of rum)
50g almond slices (as toppings), lightly toasted

Method:
  1. Lightly grease an 18cm tart pan, set aside.
  2. Toast ground almond (do it for both the pastry base and filling) at 100 degC for 10mins. Stirring in between. Let cool.

  3. Pastry base:
  4. Sieve flour and ground almond together, set aside. If the ground almond is too coarse for the sieve, don't worry, just dump it with the rest of the sieved mixture.
  5. With a manual whisk, cream butter and sugar till light and fluffy.
  6. Add in the egg gradually, whisk the batter till well mixed each time the egg is added.
  7. Add the flour/ground almond mixture in 2 to 3 additions into the batter. Fold with a spatula.
  8. Form and shape the pastry into a round disc. Roll out the pastry in between 2 sheets of cling wrap or baking paper or two sheets of cut-out plastic bags, to about 23cm in diameter.
  9. Remove one side of the cling wrap or baking paper. Place the rolled out pastry over the prepared tart pan. Mould the pastry into the tart pan, smoothing the edges and the rim carefully...if the pastry is too soft to handle, chill it in the fridge for 10~15 mins.
  10. Chill the moulded pastry in the fridge for 20mins.
  11. Remove from fridge, use a fork to poke some holes on the pastry. Brush the top of the rim with egg wash. Bake in pre-heated oven at 180 degC for 10~12mins until the edges are slightly browned. Let cool completely before adding the filling.

  12. filling:
  13. With a manual whisk, cream butter and brown sugar till the mixture turns fluffy. Add in the egg gradually, mix well each time the egg is added.
  14. Add in ground almond. Fold with a spatula till well incorporated. Sieve over the flour onto the mixture. Mix with the spatula. Add in vanilla extract and mix well.
  15. Spread the filling onto the cooled pastry base. Ensure the edges are all filled up. Sprinkle the surface with almond slices.
  16. Bake in pre-heated oven at 170 degC for 30~35mins, until the filling and almond slices turn golden brown. To prevent the almond slices from overly browned, bake the tart at a lower rack position for the first half of the baking time, then shift it up to the middle rack position...alternatively, you may cover it with foil halfway between baking.
Recipe Source: Delicious!! Baked Cakes, Ikuko Omori

    More aboutIt's MeMe time!

    Mushroom Pie

    Diposting oleh good reading on Senin, 03 Desember 2007


    No, this is not a Quiche Lorraine, but a Mushroom Pie.


    Made this pie for lunch yesterday, using a recipe from a Chinese cookbook. It was a breeze making the pie crust as the pastry was not overly soft or sticky. The only problem I had was the fillings! I didn't follow the recipe to use dairy whipping cream and milk to make the sauce as I ran out of cream. So I thought I could replace it with a ready-made pasta cream sauce which I bought recently.


    To our great disappoint, the sauce didn't taste very good! Not only there was too much sodium, the taste was a bit off!


    Thanks to my "temperamental" oven, the sides of the pie crust was not very browned, it was still quite pale when I unmold the pie. As a result it was not very crisp.


    Here's a photo of the innards. Not very appetizing...as the sauce was not white but light brown...it was a "grilled chicken sausage" flavour. I added fresh button mushrooms and some picnic ham to the sauce. I am lucky to be blessed with 2 boys and a cute niece who are not fussy eaters. The four of us gobbled down the entire 8" pie in no time!

    For those who are interested to try this out, I have posted the recipe here. I am sure if I were to make the fillings from scratch, this pie will really taste much better!


    Ingredients:

    pastry base:
    70g butter, chilled
    140g flour
    15g dry grated parmesan cheese
    2g salt
    50~60 ml ice water

    fillings:
    500g assorted fresh mushrooms
    25g butter
    salt and pepper

    sauce:
    60ml milk
    120g dairy whipping cream

    1 egg, lightly beaten (for brushing the pie crust)

    Method:

    fillings:
    - Stir fry assorted mushrooms with butter. Add salt and pepper to taste. Let cool.

    sauce:
    - Mix whipping cream with fresh milk.

    pastry base:

    1. Lightly grease an 8 inch pie pan, set aside.
    2. In a mixing bowl, combine flour, cheese powder and salt, stir to mix. Rub-in the butter into the flour mixture, until the mixture resemble crumbles. Drizzle the ice water over the mixture and mix to form a soft dough. Shape dough to form a round disk and store in a plastic bag or cling wrap. Chill in the fridge for at least 30mins or up to overnight.
    3. Roll out the pastry in between 2 sheets of cling wrap or baking paper (I used two sheets of cut-out plastic bags) to about 2~3mm in thickness.
    4. Remove one side of the cling wrap or baking paper. Place it over the prepared pie pan. Mould the pastry into the pan, smoothing the edges and the rim carefully.
    5. Use a fork to poke holes on the pastry. Line the pie crust with a piece of foil or parchment paper, and fill it with dried beans, uncooked rice or metal pie weights. Bake in a preheated oven at 190 degC for 10mins. Remove the weights and continue to bake for another 10mins. Remove from oven and brush the surface with the lightly beaten egg.
    6. Drain and add in the cooked assorted mushrooms.
    7. Pour over the whipping cream/milk mixture. Top with grated cheese. Bake at preheated oven at 160 degC for 30mins until the cheese turn golden brown.

      Recipe source: adapted from 曾美子的黃金比例蛋糕
    More aboutMushroom Pie