Tampilkan postingan dengan label DIY. Tampilkan semua postingan

Beyonce Inspired D I Y Necklace

Diposting oleh good reading on Jumat, 12 Juli 2013


I'm Obsessed with the Maasai inspired Melody Ehsani necklaces Beyonce wore for Flaunt Magazine. So much so I decided to try my hand at making one from Bungee cords so here goes......


I picked up these Bungee Cords or Luggage Straps from Clas Ohlson I used the 75cm length


N E E D E D
5 Bungee Cords
Thread
Ribbon
Glue Gun
Scissors


D I R E C T I O N S 
  • Cut off the clips from the bungee cords (you can keep them for future projects)
  • Set out how you would like your necklace to look before glueing, as it is harder to change once you start sticking things together
  • once you have decided on the shape and length of your necklace use your glue gun to glue the ends of the bungee cords to one another (this doesn't have to be too neat as you will cover the ends later)


  • once your glue is dry square off the ends of your necklace
  • using a strong ribbon, wrap around the end to hide your glue and roughly cut edges


  • once you have covered the ends of the necklace use a strong string or leather cord attach to the inside of your necklace with glue
  • To add extra strength to your necklace wrap with a contrasting ribbon this will also cover were you have glued the leather cord


  • now for the fun part! embellish your necklace, I used colourful thread, but you can use studs, gems or beads to make your necklace stand out
  • Use your glue gun to stick your embellishments to your necklace
  • For a more Beyonce esque necklace wear two and mix in other necklaces for a bolder look


You can be as creative as you like with this project, I've gone for a simple take, as I love the original pattern of the bungees. The total cost of this necklace was £7.50! 


More aboutBeyonce Inspired D I Y Necklace

D I Y Wax Print Cuff

Diposting oleh good reading on Selasa, 09 Juli 2013


I'm becoming slightly obsessed with 'Up Cycling' from bangles to candles stick holders I've literally covered everything in fabric, I stopped short of covering Freya! My current DIY attempt are these funky cuffs using jewellery found in the bargain bin.


N E E D E D 

1 Cuff (these are quite on trend so you can find them everywhere for a few pounds)
1 Cross (you don't have to use a cross, just something that you can wrap easily with fabric)
Glue Gun
Pencil
Scissors
Fabric


D I R E C T I O N S

  • Using a pencil mark out the fabric you need to cover the outside of you cuff
  • Good tip for measuring is to place cuff on fabric and roll it from one side to the other mark out a cm around the cuff
  • Cut out the fabric
  • Glue one end of the fabric to the inside of the cuff (this is where the cm extra fabric comes in)


  • Pull the fabric taut and repeat the glueing on other end of your cuff 
  • Fold in your edges so it is neat and glue along the length 
  • You should be left with a perfectly covered cuff


  • You may or may not want to line your cuff, if you do use the same method to measure a small piece of fabric
  • Make this fabric a cm smaller than you cuff by hemming the edges (you can use your glue gun for this)
  • Glue fabric into the cuff you need to work quickly as the glue dries very fast.


You should now have a perfectly covered and lined cuff you can leave as is or decorate, I chose to decorate with a fabric covered cross.


  • Glue a strip of hemmed fabric to the top of your cross (use about 30cm of fabric if it is to much you can always cut it off)
  • Wrap fabric around the cross pulling tightly as you do
  • secure end with more glue and cut off excess
  • using your glue gun apply glue to your cross and stick to your cuff


And there you have it, A funky wax printed cuff, I know you may not be able to get your hands on the exact items I used for this project but you can definitely find variations, use your imagination and get creative! 

If anyone would like to enquire about these cuffs or the Bangles from the previous post please email me NaturalBelle1983@gmail.com

More aboutD I Y Wax Print Cuff

D I Y Wax Print Bangle

Diposting oleh good reading on Sabtu, 06 Juli 2013


I'm revisiting wax prints, I've always loved the versatile fabric and bold textiles but I usually use the fabric for headwraps, but decided to upcycle some old bangles by covering them with fabric I brought from The Sheabutter Cottage. It's an easy way to update your accessories, it's cost effective and fun!


N E E D E D
Strong adhesive, I prefer a glue gun you can pick them up pretty cheap from craft shops
Scissors 
Old or cheap bangles
Strips of fabric about 40cm long


  • Cut your fabric into strips, I cut mine at about 40cm long, don't worry if it is too short as you can add more


  • Hem your strip of fabric, fold the fabric in on itself and stick roughly with glue gun. This prevents fraying edges


  • Use your adhesive to secure your hemmed strip of fabric to the inside of your bangle


  • Once secure, wrap fabric around the bangle, make sure you pull the fabric tautly (see below)


  • Finally secure the end of your fabric with adhesive make sure you glue to the inside of the bangle, if you have left of fabric neatly trim off the ends


And it's as simple as that! Be sure to stack them so they make an impact! and mix up your prints, You can get scraps of fabric from some haberdashery's for free if you ask for samples. 

Collection of DIY & brought bangles


More aboutD I Y Wax Print Bangle

The Clay: Moroccan Rhassoul Clay

Diposting oleh good reading on Sabtu, 18 Mei 2013


I finally found the time  to use my Rhassoul clay (300g at £8.70) from the Sheabutter Cottage, 
Rhassoul is a mineral-rich clay from Morocco. It's different from other cleansing clays, as it is very gentle and beneficial  for dry hair and sensitive skin and scalp. this clay is found in the Atlas Mountains of Morocco.
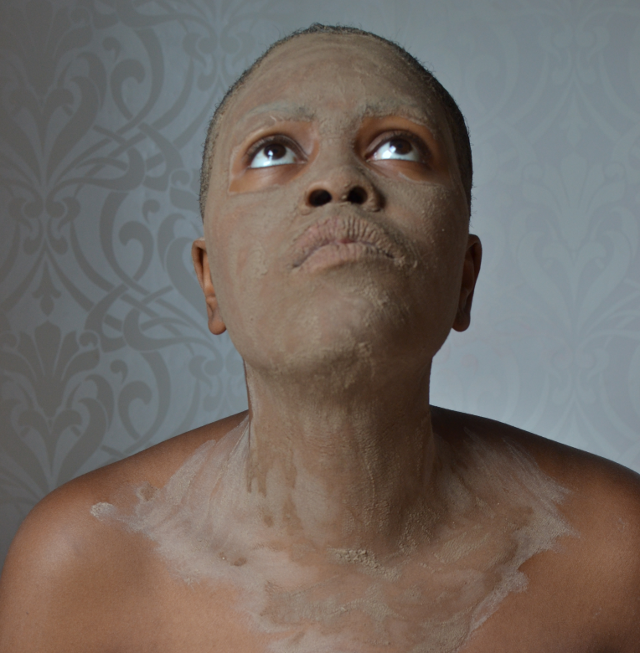
I used the clay on my hair and face and found the results great! I used the methods suggested by Akua Wood, (I have added extracts from her 'how to' below) I used the Rhassoul clay  for my hair and as a face pack, as suggested I did not use a conditioner after using the clay on my hair which felt odd but I actually didn't miss the conditioner. I aired dried my hair until it was almost  dry then I used a blow dryer as I wanted a stretched out big hair look. (I used coconut oil to seal when my hair was damp but no leave in conditioner) My hair feels very soft and my scalp feels so fresh!
Mostly I'm loving the effects the clay has had on my skin after just one application my face feels divine  when removing the clay I could feel the moisture from the clay on my skin which felt great! I'll definitely be adding the clay into skincare regimen from now on!


B E N E F I T S 

Completely non-irritating to skin and scalp
Cleans skin and hair without removing all of its protective sebum
Removes surface oil and oil from inside and around comedones (blackheads and whiteheads)
Leaves hair soft and shiny and enhances its volume
Gradually reduces the need for frequent hair washing
Removes dandruff and eases problems of excessively oily hair


HAIR

To make rhassoul mud for your hair, you will need:
50g of rhassoul, more if your hair is very long, less if you have short hair. Put the rhassoul into a
bowl and add 50mg of tepid water, which should be enough to cover the pieces. Don’t attempt to
stir the mixture at this stage, simply leave it to stand for a full 5 minutes or until the water is absorbed.
You will then find it easy to stir the mixture into a smooth paste, adding a little more tepid water if
necessary.

Apply the rhassoul mud to dry or damp hair. Work it through your hair and massage well into your
scalp.

For dry hair, leave on for 5-10 minutes.
For normal hair, leave on for up to 5-15 minutes.
For oily hair, it can be left on for 10-20 minutes.
Rinse thoroughly, then towel dry. Ideally, allow your hair to finish drying naturally


FACE

To make a face or body pack, including a foot pack for smoothing dry skin, follow the same
method as described above. Always think in terms of an equal figure of grammes and millilitres – for
example, 10g of rhassoul mixed with 10g of water; 100g of rhassoul mixed with 100g of water, and
so on. You will probably need extra water which can be mixed in after the rhassoul has swelled.
Face packs are normally left on the skin for 5-15 minutes, before rinsing thoroughly with warm water.
You might follow this treatment with a spritz of rosewater to tone and refresh. Body packs can be
left on for 20-40 minutes and then rinsed off under a warm shower or in the bath.

 FACIAL CLEANSER AND EXFOLIANT

Rhassoul is a great exfoliant and skin softener. The same rhassoul paste that you mix for your hair
can be used as a daily cleanser and skin polisher. For this purpose you may wish to mix a slightly
thinner paste the consistency of a cleansing lotion. Massage it gently into damp skin using circular
movements and then rinse. The paste will remove most make-up (except perhaps stubborn
waterproof mascara) and will leave your skin feeling velvety.


My hair after Rhassoul clay application wet and dry lightly blow dried and below my hair picked and styled as desired.


Price of the clay starts at £2.00 for 50g you can find out more about the clay and purchase it HERE


More aboutThe Clay: Moroccan Rhassoul Clay

The DIY: Flaxseed Gel

Diposting oleh good reading on Sabtu, 04 Mei 2013


My journey into DIY product making is getting rather exciting, I've been keeping it very simple (as I have NEVER made products before) and this evening I tried my hand at making Flaxseed Gel. 
I'm dedicated to my ECOstyler gel, however after reading the great benefits of Flaxseed  Gel I had to give it a go.

B E N E F I T S

Rich in Omega 3, Flaxseed also promotes hair growth as it contains phyto-estrogens, which may balance hormones so great for post natal hair fall,. Flaxseed Gel gives great curl definition, adds moisture and shine to hair with drying or flaking!


R E C I P E

1/2 cup of Organic Golden Lindseed (flaxseed)
2 cups of water
1 tbs of Aloe Vera Gel (great for added moisture)
Essential Oil (optional)


U T E N S I L S

Pan
Fine mesh strainer or stockings
Wood spoon
Bowl or jug
Sterile air tight jar


H O W   T O 

Add 2 cups of water and half a cup of flaxseed in a bowl on a low/medium heat


bring to a simmer and stir though out making sure the seed don't stick to the bottom of the pan (the consistency should turn a egg white like froth)


pour your the mixture into the strainer and push through (tights are probably easier to use)


you should be left with a bowl full of gel you can then add your Aloe Vera Gel and an essential oil of your choice. 


you can use the gel straight away for wash and go's, sleek styles or twist outs or decant into an air tight jar and refrigerate for up to 2 weeks.
You can also keep the used flaxseed to use again in the refrigerator 


 Making the Flaxseed gel was quite easy, but a bit messy and tricky to get through the strainer and it really doesn't look great (I have flashbacks of Cameron Diaz in There's Something About Mary!) But I've heard it works wonders can't wait to try it in a few days in place of my ECOStyler.

More aboutThe DIY: Flaxseed Gel