Tampilkan postingan dengan label Bread Buns. Tampilkan semua postingan

It's ham N cheese

Diposting oleh good reading on Kamis, 01 Agustus 2013


It's been sometime since I last posted something on bread buns. I have been making bread, albeit less frequent, but I didn't get around to post them.

After giving up on baking a nice Japanese souffle cheesecake, that doesn't sink like the titanic, I seek comfort by making a batch of bread rolls.

These are ordinary bread buns made with tangzhong or water roux method. The only difference is the way of shaping them to look like roses. I wrapped in ham and cheese slices to turn them into wonderful breakfast items. I tried two different method of shaping and only one of them worked well for me.


These rose buns are made by wrapping the ham and cheese slices with 3 separate pieces of dough, one after another. The texture of the bread was not affected by the layers of dough. They tasted so delicious freshly baked that I gobbled down two in a row, lol!


Care to join me for some tea? No dainty desserts and high quality tea, but I can always offer you a slice of homemade cake or a fat rose bun over a cup of lipton ;)


Ham and Cheese Buns
(makes 12 buns)

tang zhong (water-roux):
20g bread flour
100ml water

bread dough:
195g bread flour
90g cake flour
12g milk powder
30g caster sugar
6g salt
6g instant yeast

60g egg, lightly beaten
65g water
75g tang zhong (water-roux)

45g unsalted butter

6 slices of breakfast ham (round shape)
6 slices of sandwich cheese

to make tang zhong:
Place 20g bread flour in a saucepan. Add 100ml water, mix till smooth, making sure there are no lumps of flour. Cook over medium to low heat, stirring constantly with a hand whisk to prevent it from burning. Within 1 to 2 mins, the mixture will start to thicken, stop when you see traces in the mixture for every stir you make with the hand whisk. (Take a look at the video clip here.) The 65degC tang zhong is ready. Immediately transfer the hot tang zhong into a bowl and cover it with a cling wrap, making sure the cling wrap sticks onto the surface of the mixture. This is to prevent a film from forming on the surface. Leave to cool completely before using it.

to knead dough by bread machine:
* Place water, egg, tang zhong (use 75g), sugar, salt, bread flour, cake flour, milk powder in the pan of the bread machine (according to the sequence as stated in the instruction manual of your bread machine). Make an indentation on the flour and add in the instant yeast. Select the Dough function of the bread machine and press start. Leave the lid of the machine open (this is to prevent over heating). After about 10mins of kneading, add in the 45g of butter. Let the machine continue to knead the dough. After the kneading cycle has stopped (20mins), Stop and Restart the machine. Continue to let the machine knead for another 15~20mins. Remove dough from the bread pan.

* Place dough in a lightly greased (use vegetable oil or butter) mixing bowl, cover with cling wrap or a damp cloth and let proof in room temperature (around 28 to 30 degC) for about one hour, or until double in bulk.

* Remove the dough from the bowl and give a few light kneading to press out the gas in the dough. Divide the dough into 18 equal portions (30g each). Roll each dough into smooth rounds, cover with a damp cloth or cling wrap and let the doughs rest for 10mins.

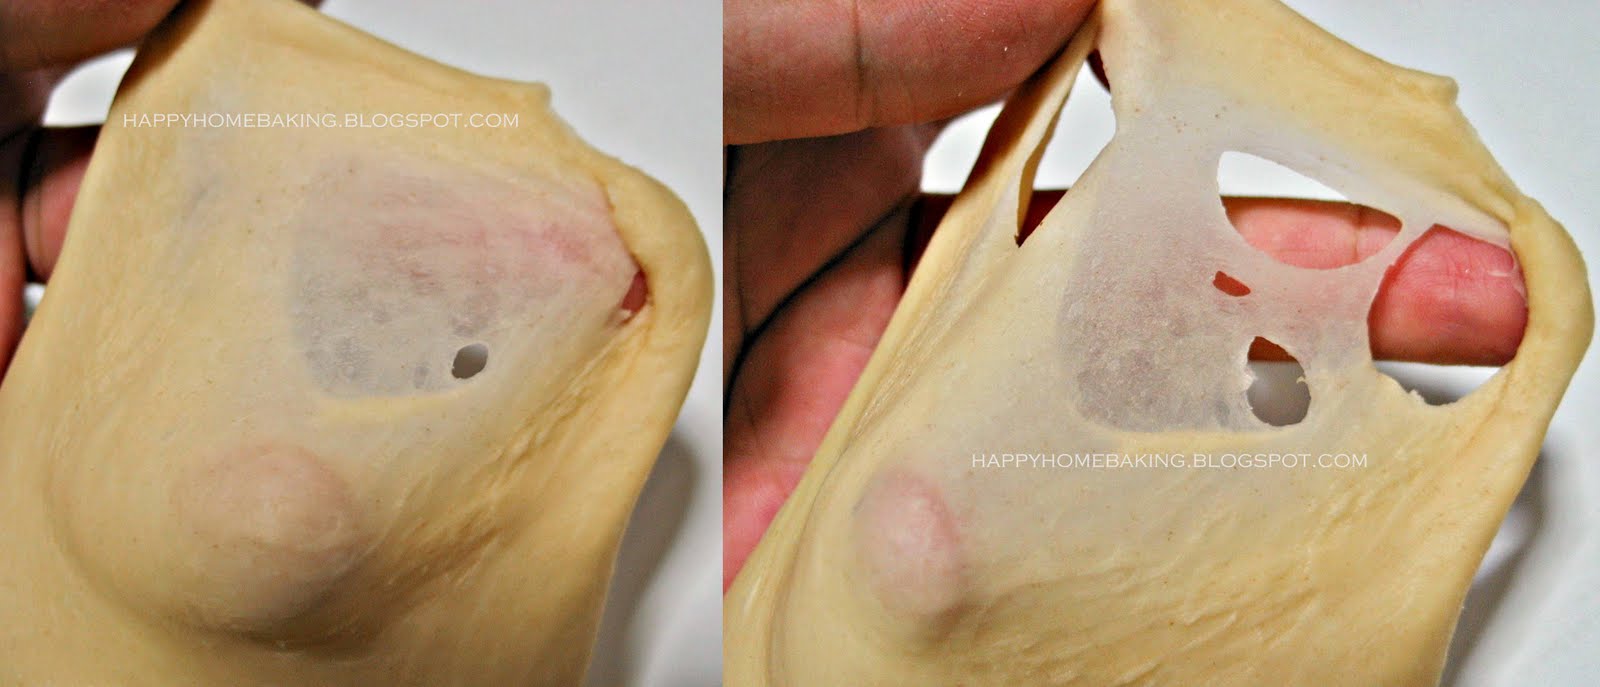
* On a lightly floured work surface, flatten each dough into a round disc about the size of the ham. Press out any trapped air as you flatten the dough.

* Place a slice of ham followed by a piece of cheese on a flattened dough. Roll up. Place the rolled dough, seam side down on another piece of flattened dough. Roll up again. Repeat with another piece of dough. Pinch and seal the seams and cut the roll into two equal halves. Place cut-side down on a greased (or lined with parchment paper) baking tray. Space doughs two inches apart to allow them to expand. Repeat with the rest of the doughs.

* Cover doughs with damp cloth or cling wrap and leave to proof for the second time for about 40mins, or until double in size.

* Bake in pre-heated oven at 180 deg C for 12 mins or until golden brown (tent with a foil if the top browns too quickly closer to end of the baking time). Remove from oven and transfer to wire track to let cool. Once cool, store immediately in an airtight container.

Recipe source: adapted from 65度C汤种面包, 陈郁芬
More aboutIt's ham N cheese

just for the record

Diposting oleh good reading on Kamis, 13 September 2012


I though it would take a while for me to update my blog, but I am glad I am able to do it much sooner. You see, I wasn't in the best mood to blog about anything, and had even harboured thoughts of giving it up altogether.


Thanks to these simple and tasty bacon and olive bread buns, I knew, I just need a good recipe ('good' here refers to simple and fuss free) to keep me going...to get me tuned on to the 'I must certainly share this recipe on my blog' mode.


Just like someone who left a comment on my blog, I didn't make these bread rolls all by myself. Yes, I relied on a bread machine to knead the dough. Other than that, everything was DIY, with my own pair of hands. The person's comment, at least as I have interpreted it, suggested that I got someone else to make the bread buns I posted sometime back. It was too good to be true, as the recipe I posted didn't work for this person at all. The other couple of 'accusations' that came with the comment certainly dampened my spirit. I started wondering whether what I have been doing all these while is really worth the effort? I know I should just ignore the comment, but I just didn't feel good.

Luckily, I bought a new book recently, it was on huge discount, and there are many recipes which I couldn't wait to try. I decided on these simple bread rolls to kick off the list. They are made with a straight dough method, no starter or water roux to complicate matters. I thought it would yield bread rolls with a hard crust, but I was wrong. They are soft dinner rolls instead. The buns are still soft the following day, I warmed them in the oven and slapped some butter over it for breakfast. It tastes equally delicious on its own too. I would add a pinch of mixed herbs the next time I were to make them...and serve them with thick, creamy soup as a light meal :)


最近的天气阴阴沉沉的,心情因为某种因素也灰灰的。莫名其妙被人冠上莫须有的罪名,第一时间就设法澄清。过后又觉得清者自清,况且人家在暗我在明,无需费舌解释, 只会越描越黑。可是自己心里还是放不下,很是纠结。尤其被人质疑我假手于人,真有点哭笑不得。还好买了一本好书,虽是食谱却像coffee table book, 令我爱不释手,翻了又翻。成功试做了这款培根黑橄榄面包,心情也跟着好起来,迫不及待要在这里分享。虽然没有假手于人, 不过还是借用面包机来操刀,帮我揉面团。用直接法做出来的面包还蛮松软的。培根和橄榄有点咸咸的,不过面包本身带点甜味,口感不错。刚出炉的面包配上一点牛油,很香很香。之前阴霾的心情也随着面包香一扫而空。多亏了这款面包,看来我还是会傻傻地继续与读者分享烘焙的喜悦和乐趣。


Bacon Olive Bread

Ingredients:
(makes 8 small rolls)

220g bread flour
20g cake flour
15g milk powder
35g caster sugar
4g salt
160g milk
25g olive oil
6g instant yeast
70g bacons (about 3 slices)
30g black olives


Method:

* Chop bacons into small chunks. Pan fry in a skillet or frying pan until bacons become crispy. Remove from pan and drain any excess oil on paper towels. Set aside to cool. Coarsely chop black olives, set aside (if necessary absorb any excess moisture from the black olives with paper towels).

to knead dough by bread machine:
* Place milk, olive oil, sugar, salt, bread flour, cake flour, milk powder in the pan of the bread machine (according to the sequence as stated in the instruction manual of your bread machine). Make an indentation on the flour and add in the instant yeast. Select the Dough function of the bread machine and press start. Let the machine knead the dough until the kneading cycle stops after 20mins. Remove dough from the bread pan.

to knead dough by hand:
* Place bread flour, cake flour, milk powder, sugar, salt and instant yeast in a mixing bowl. Whisk the mixture to combine. Make a well in the centre and add in the milk and olive oil. Mix to form a rough dough. Transfer dough to a lightly floured work surface. Knead the dough until it no longer sticks to your hand, becomes smooth and elastic. This should take about 20~30 mins. It helps to have a dough scraper on hand to scape up the dough as you knead since the dough will be quite sticky at first.


* Place dough in a lightly greased mixing bowl, cover with cling wrap or a damp cloth and let proof in room temperature (around 28 to 30 degC) for about one hour, or until double in bulk.

* Remove the dough from the bowl and give a few light kneading to press out the gas in the dough. Knead in the chopped olives and bacons. Dust the dough with some flour if it feels sticky. Divide the dough into 8 equal portions, about 65g each (or as per original recipe, divide into 6 portions, 80g each ). Roll each dough into smooth rounds. Place dough on a greased (or lined with parchment paper) baking tray. Space doughs two inches apart to allow them to expand. Cover with damp cloth or cling wrap and leave doughs to proof for the second time for about 40mins, or until double in size.

* Bake in pre-heated oven at 180 deg C for 15 mins or until golden brown. Remove from oven and transfer to wire track to let cool. Once cool, store immediately in an airtight container.

Recipe source: Happy Baking 星期天的烘焙时光
More aboutjust for the record

back to work

Diposting oleh good reading on Sabtu, 21 Juli 2012

It took me a while to get back to making bread. I thought I would be churning out loaf after loaf of bread when I bought my new bread machine, instead I have been making simple stir and bake cakes more regularly that ever. Even though making a batch of bread buns is not as difficult as it seems, it does take up a fair bit of time...at least 3 hrs from gathering the ingredients to retrieving a tray of freshly baked buns from the oven. It needs proper time management and planning ahead, so that I won't end up in a situation that I need to get out of the house to run errands or to go fetch my child from school while the dough is ready for shaping into rounds.


I finally got down to make some bread buns last week, and that was when 'suddenly' the reality hit me that I may have to spend less time on baking in the future...


I have been keeping my digital to-do list on my phone diligently, whenever I am at a lost or couldn''t make up my mind what to bake it will come in very handy. First on my list is none other than Coffee Buns or better known as Roti Boy or Mexican Bread Buns. While the usual roti boy bread buns come with a buttery filling, I decided to skip it since I have yet to find a recipe that uses much lesser fat. We could do without the filling extra fat as I was very confident that the tangzhong bread buns would taste great even when eaten plain.


I love how these coffee buns or coffee cookies buns (as they were covered with a layer of cookie dough) turned out. These buns were delicious even without the filling. They were not as greasy as the ones I bought from the bakery, but it would be better if the coffee flavour was stronger. They smell really good though especially when they were baking in the oven.


As usual, the tangzhong dough didn't disappoint me, the texture of the bread was very soft. After taking the first bite...for the first time...I felt proud of myself that I have come 'so far'. I can still remember the very first batch of bread buns I made several years ago, they looked so horribly out of shape that I could feel my stomach cringe every time I was reminded of them whenever someone left me a comment on that particular post. Everything is self taught, from baking to taking pictures. Even though I have not moved beyond baking simple cakes and buns, at least my shaping skills have improved and I am able to take slightly better pictures compared to six years ago. Yes, my learning curve is definitely much longer than most who started their baking journey even much later than me. Yet, I truly enjoyed this slow learning process, taking my own sweet time to explore the world of baking and doing what I like.


I hardly buy cut-flowers but when I saw these lovely flowers looking so fresh at the florist stall, I couldn't help but to part away a couple of dollars for a stalk. That single stalk has enough flowers to fill up my tiny vase :) I have bread to feed my body and I have flowers to feed my soul, what more could I ask...


Back to the title of this post...

I will be going back to work. It is not a full time job and I get to work from home. No, the job I have been offered has got nothing to do with baking. It is a 'regular' freelance, home-based job and I'll get to earn some pocket money which I could spend on baking ingredients :) I will probably not be able to update my blog as regularly but I will still continue to bake, at least once a week, I hope...


Coffee Cookie Buns
(makes 10)

tang zhong (water-roux):
25g bread flour
125ml water

bread dough:
210g bread flour
56g cake flour
20g milk powder
42g caster sugar
1/2 tsp salt
6g instant yeast

30g egg, lightly beaten
85g water
84g tang zhong (water-roux)*

22g unsalted butter

topping:
50g unsalted butter
50g caster sugar
50g egg, lightly beaten
50g cake flour
1 1/2 teaspoons instant coffee powder
1/2 teaspoon vanilla extract
1/2 teaspoon warm water


Method:

to make topping:
* Dissolve instant coffee powder with the warm water, mix in vanilla extract. Set aside.
* Beat the butter with caster sugar, until light and fluffy. Add the beaten egg one teaspoon at a time, beat well after each addition (add in egg gradually to prevent the mixture from curdling). Add in the coffee mixture gradually, beat well after each addition. Sieve over the cake flour. Mix with a spatula until just combined. Transfer topping into piping bag fixed with pipping nozzle (round tip). Let the topping chill in the fridge until needed. Remove from fridge about 5~10mins earlier before use to allow the topping to soften a little.

to make tang zhong:
* Place 25g bread flour in a saucepan. Add 125ml water, mix till smooth, making sure there are no lumps of flour. Cook over medium to low heat, stirring constantly with a hand whisk to prevent it from burning. Within 1 to 2 mins, the mixture will start to thicken, stop when you see traces in the mixture for every stir you make with the hand whisk. The 65degC tang zhong is ready. Immediately transfer the hot tang zhong into a bowl and cover it with a cling wrap, making sure the cling wrap sticks onto the surface of the mixture. This is to prevent a film from forming on the surface. Leave to cool completely before using it.

to knead dough by bread machine:
* Place water, egg, tang zhong (use 84g), sugar, salt, bread flour, cake flour, milk powder in the pan of the bread machine (according to the sequence as stated in the instruction manual of your bread machine). Make an indentation on the flour and add in the instant yeast. Select the Dough function of the bread machine and press start. Leave the lid of the machine open (this is to prevent over heating). After about 10mins of kneading, add in the 22g of butter. Let the machine continue to knead the dough. After the kneading cycle has stopped (20mins), Stop and Restart the machine. Continue to let the machine knead for another 20mins. Remove dough from the bread pan. (Note: refer this post for instructions on how to knead dough by hand.)

* Grease hands with some vegetable oil (this helps to prevent the dough from sticking to your hands). Remove dough from bread machine. Shape into a smooth round. Place dough in a lightly greased (use vegetable oil or butter) mixing bowl, cover with cling wrap or a damp cloth and let proof in room temperature (around 28 to 30 degC) for about one hour, or until double in bulk.

* Remove the dough from the bowl and give a few light kneading to press out the gas in the dough. Divide the dough into 10 equal portions (about 55g each). Roll each dough into smooth rounds and place on a greased (or lined with parchment paper) baking tray. Space doughs two inches apart to allow them to expand. Cover with damp cloth or cling wrap and leave doughs to proof for the second time for about 30~40mins, or until double in size.

* Pipe topping onto each dough. Make sure to cover the entire surface with the topping.

* Bake in pre-heated oven at 180 deg C for 15 mins or until golden brown. Remove from oven and transfer to wire track to let cool. Once cool, store immediately in an airtight container. Best served warm (re-heat in oven if necessary before serving).

Recipe source: 65度C汤种面包, 陈郁芬 and 我的幸福手作面包,李成实
More aboutback to work

one a penny, two a penny...

Diposting oleh good reading on Kamis, 05 April 2012

We heard and sung the hot cross buns nursery rhymes many many time when my kids were toddlers...but this is the first time I have ever made or eaten them!


Thanks to Laureen of Eat and Be Happy for sharing her chocolate chips hot cross buns last easter...I have bookmarked her recipe for over a year, and I finally got down to make them!


The dough was rather soft and sticky, and I had a hard time trying to knead it. After a couple of minutes, I gave up wrestling with the dough and proceed to leave it to proof. (on hindsight, I should have used my bread machine to do the kneading.) I was lucky, all went well and in no time, I was rewarded with a tray of hot cross buns...I don't think I deserve it for the little effort I had put in ;)


These hot cross buns are really awesome, soft and fragrant, they are worth every penny! Deliciously scented with cinnamon, just one bite will make you feel good, and when the chocolate chips melt away in your mouth, you will feel even better.


I guess from now on, I won't be spending easter without a batch of hot cross buns :)

Happy Easter!


Chocolate Chips Hot Cross Buns

Ingredients
(makes 15 ~ 16 buns)


300g plain flour
30g caster sugar
1/2 teaspoon ground cinnamon
1/2 teaspoon mixed spice (I omitted this)
1/2 teaspoon salt
40g unsalted butter, cut into cubes
5g Instant yeast
30g egg, lightly beaten
125 ml milk
40ml warm water
150g chocolate chips (I used dark chocolate chips)

Flour paste for crosses:
1 tablespoon plain flour
1 1/2 tablespoons cocoa powder
1 teaspoon of caster sugar
1 tablespoon cold water

Glaze:
2 tablespoons of caster sugar
2 tablespoons of water


Method

* Place flour, caster sugar, cinnamon, mixed spice (if using) and salt into a mixing bowl. Stir with a whisk to combine. Rub in the butter. Add instant yeast, stir to combine. Make a well in the centre, add in eggs, water, milk, mix to form a soft dough.

* Turn dough onto a lightly floured surface and knead for about 10 minutes (or knead with bread machine or stand mixer for about 5 minutes) until the dough is smooth and elastic. Knead in the chocolate chips. Smooth dough into a round ball, place in a greased mixing bowl, cover with a damp cloth or cling wrap and leave to rise for about one hour or until dough has doubled in size.

* Divide the dough into 15 portions and roll each portion into a ball. Place the balls, almost touching, on a greased rectangular pan (if using a square pan, divide into 16 portions). Cover with damp cloth or cling wrap and leave to rise for about 30~45 minutes or until dough has doubled in size. Preheat oven to 200 degC.

* To make flour paste crosses:
Sift flour, cocoa powder into a small bowl, stir in the sugar. Add in water and keep stirring with a spoon to make a smooth thick paste. Place the flour paste into a plastic bag and snip off the corner (Note: snip off a very tiny bit will do so that the hole will not be too big). When the doughs have doubled in size, pipe a continuous line down the centre of each row of buns, length wise and width wise, to form crosses.

* Bake:
Bake buns at 200degC for about 15~16 minutes or until golden brown.

* To make glaze:
While the buns are baking, place sugar and water in a small saucepan and stir over low heat until the sugar dissolves. Transfer the baked buns to a wire rack, brush the tops with glaze. Serve warm.

Note: The dough can be made the day before up to the shaping stage, cover with cling wrap and refrigerate over night. The next day bring to room temperature leave to rise till double in size, pipe on the crosses and bake.

Recipe source: adapted from Eat and be Happy
More aboutone a penny, two a penny...

单反篇

Diposting oleh good reading on Rabu, 21 Maret 2012

最近老大好像对摄影越来越有兴趣,每次参加学校的摄影活动他都会向摄影协会借个单反相机,通常他只把相机摆在一旁,这回却看他一有空就那出来把玩。这可是一件好事。我个人认为摄影是一项很好的爱好,通过摄影能培养孩子的想象力,提升审美感。对性格木纳,害羞,做事 粗枝大叶的老大来说,我希望借助摄影活动可以让他多接触事物,培养观察入微的能力,进而学会从不同的角度观察与判断事物。


不过我对摄影可是门外汉哦。。。我只会用我哪八岁高龄,半傻瓜相机拍照。。。而且我只会用自动功能, 其他一概一窍不通!

这次趁他把单反相机借回家,我试着用它拍了我的最新之作:奶酥面包。效果不是很理想,那是必然的,因为我把单反当傻瓜相机来用啦!还有就是单反超重,没有三脚架真的不行,没一会儿,手臂就感到很酸。有点杀鸡用牛刀的感觉。。。因为我又不是什么专业美食博客,觉得还是用普通相机就ok啦。

一直都想做这个65度C汤种奶酥面包,终于特地买了一包干椰丝,为的就是喜欢面包上那毛茸茸的效果。汤种做的面包绝对是好得没话说,口感绵软,放两天也不会老化。不过奶酥馅口感不是很好,吃起来有点沙沙的感觉,不太能适应这种口感。干椰丝倒是起了锦上添花的作用,而且还很香,之前我还以为干椰丝是没味道的呢!面包在烤箱烘烤的过程中,厨房一直飘忽着一丝丝面包的麦香味,夹杂着一阵阵令人难以抗拒的椰香味。满屋子的面包香,花钱是买不到的,这或许就是烘焙的乐趣所在吧!


I know, one shouldn't count their chickens before they are hatched, but I couldn't help but keep counting mine:) I took up a one-off home based assignment recently, and with the little extra income that I will be expecting, I have been thinking of saving it up for a digital slr...as a birthday present for my elder child who has shown increasing interest in photography. To get a feel of a dslr, I took the opportunity to play with the camera which he borrowed from school. After a 5 mins crash course, I gave up trying the learn how to use it! The first three photos in this post were taken with the dslr, but they don't look like they were taken with an expensive camera...of course what can I expect if I had used it just like a point-and-shoot? All I could manage was set the camera to the 'flower' aka 'macro' mode and clicked away ;)

I don't know much about food styling, composition, etc...everything is done by 'gut feel'...so please bear with me for my sub standard photography skill. I feel so ashamed of myself for using a good camera but producing something that is as good as taken with an idiot proof one(^^!)


Back to the bake of the week...yes, yet another tangzhong (water roux) bread buns! This time, the buns were wrapped with a cream-like filling made with butter, icing sugar, egg and milk powder. The bread buns didn't fail me, they were soft and yet had a very slight chew to it. It was the first time I baked something with desiccated coconut and I was totally taken aback by the wonderful aroma when the buns were baking in the oven. I really didn't know that desiccated coconut would smell that good!

We don't really like the cream filling though...the texture was a little 'sandy'...likely due to the milk powder. My younger son suggested that the next time I were to make them again, I should wrap the buns with grated coconuts mixed with that 'brown sugar' (gula melaka or palm sugar) we bought from Malacca...I know exactly what he was talking about :)


This shot above was taken with my faithful, eight year old camera. It looks quite similar to the first picture...but the one taken with the dslr has got a better or more shallow depth of field, creating a softer feel to the image. Anyway, as long as my compact camera is still alive and kicking, I will stick to it, unless one day, I make it a point to brush up my photography skill, otherwise I won't do a dslr camera justice...

最后这张是用我的老爷相机拍的。。。乍看没什么不同,仔细一看还是有区别的,用单反拍的, 画面比较柔和,比较能突出主题/焦点。我还是会继续用我的老爷相机啦,我这种懒人还是用傻瓜相机比较适合!


65度C汤种奶酥面包 (milk butter buns)
(makes 9)

tang zhong (water-roux):
25g bread flour
125ml water

bread dough:
210g bread flour
56g cake flour
20g milk powder
42g caster sugar
1/2 tsp salt
6g instant yeast

30g egg, lightly beaten
85g water
84g tang zhong (water-roux)*

22g unsalted butter

filling:
70g unsalted butter
30g icing sugar
1/8 teaspoon salt
30g egg, lightly beaten
1 tablespoon corn flour
80g milk powder

some desiccated coconut


Method:

to make filling:
* Beat the butter with icing sugar, salt, until light and pale. Dribble in the beaten egg, mix well after each addition. Sieve over the corn flour and milk powder. Mix with a spatula until just combined. Do not over mix. Divide the mixture into 9 portions (the mixture is quite wet and sticky), use either an ice cream scoop or scoop with a measuring tablespoon and place on a plate. Let the mixture chill in the fridge until needed.

to make tang zhong:
* Place 25g bread flour in a saucepan. Add 125ml water, mix till smooth, making sure there are no lumps of flour. Cook over medium to low heat, stirring constantly with a hand whisk to prevent it from burning. Within 1 to 2 mins, the mixture will start to thicken, stop when you see traces in the mixture for every stir you make with the hand whisk. The 65degC tang zhong is ready. Immediately transfer the hot tang zhong into a bowl and cover it with a cling wrap, making sure the cling wrap sticks onto the surface of the mixture. This is to prevent a film from forming on the surface. Leave to cool completely before using it.

to knead dough by bread machine:
* Place water, egg, tang zhong (use 84g), sugar, salt, bread flour, cake flour, milk powder in the pan of the bread machine (according to the sequence as stated in the instruction manual of your bread machine). Make an indentation on the flour and add in the instant yeast. Select the Dough function of the bread machine and press start. Leave the lid of the machine open (this is to prevent over heating). After about 10mins of kneading, add in the 22g of butter. Let the machine continue to knead the dough. After the kneading cycle has stopped (20mins), Stop and Restart the machine. Continue to let the machine knead for another 20mins. Remove dough from the bread pan. (Note: refer this post for instructions on how to knead dough by hand.)

* Place dough in a lightly greased (use vegetable oil or butter) mixing bowl, cover with cling wrap or a damp cloth and let proof in room temperature (around 28 to 30 degC) for about one hour, or until double in bulk.

* Remove the dough from the bowl and give a few light kneading to press out the gas in the dough. Divide the dough into 9 equal portions (60g each). Roll each dough into smooth rounds, cover with a damp cloth or cling wrap and let the doughs rest for 10mins.

* Remove the chilled filling from fridge.

* On a lightly floured work surface, roll each dough into a round disc (I used my hands). Press out any trapped air as you flatten the dough. Wrap each dough with one portion of the filling. Pinch and seal the seam tightly. Brush top with some water, then coat with desiccated coconut. Place dough seam side down on a greased (or lined with parchment paper) baking tray. Space doughs two inches apart to allow them to expand. Cover with damp cloth or cling wrap and leave doughs to proof for the second time for about 40mins, or until double in size.

* Bake in pre-heated oven at 180 deg C for 15 mins or until golden brown. Remove from oven and transfer to wire track to let cool. Once cool, store immediately in an airtight container.

Recipe source: 65度C汤种面包, 陈郁芬
More about单反篇

the missing link

Diposting oleh good reading on Selasa, 06 Maret 2012

Over the years, a few of my blogger pals have left the blogging scene, links to their blogs or recipes no longer work. One of them is MH...someone who shared with me her experience with making steamed buns. She had also taken the time and effort to type out a char siew pao recipe for me. Even though she has stopped blogging, I still keep the recipe as I know, someday, I will get to try it.


Since I am now in a bread making frenzy, instead of making steamed buns, I made the baked version of the char siew bao...


Just like my previous raisin loaf bread, I made these bread buns using the tangzhong or water roux method. I was in fact very inspired by MH's bread posts when she showed her bread made with tangzhong. So far, the tangzhong dough gives me the best result...bread buns with texture that is soft and springy, almost like commercial ones...minus the additives. When I pressed my finger onto one of these voluptuous-looking buns, it springed back immediately ;)


A close up of the nice, even texture of the bread crumbs. I used my bread machine to knead the dough for a total of 40mins. By right, for bread buns, 30mins of kneading should be sufficient, but the dough was still quite sticky so I left the machine to run for another 10mins. The dough was pretty easy to handle once I dust it very lightly with some flour. The bread dough used slightly less sugar compared to sweet buns dough, but used one whole egg and more butter. Since I did not have any left over eggs, I didn't bother to brush the top with egg wash. The buns were nicely browned anyway.


The char siew filling was rather delicious. I used 'rather' and not 'very' simply because the store bought char siew was a little saltish to me. However, the 'sauce' that coated the char siew bits was good, not too sweet, not too saltish. These homemade buns were so good that I finished two when they were still warm. They were great for breakfast too, as I am sure my boys won't feel hungry before the recess bells ring!

MH, if by any chance you are reading this, thank you for sharing this wonderful recipe!


Char Siew Bread Buns (叉烧小餐包)

Ingredients:
(makes 9)

* filling:
1/2 tablespoon oil
2 shallots, flatten
200g char siew,diced
1 1/2 tablespoons roasted sesame seeds

seasoning (mix together):
80ml water
1 tablespoon light soy sauce
1/2 tablespoon oyster sauce
1/2 teaspoon dark soy sauce
1 1/2 tablespoon sugar
1/2 tablespoon tapioca flour
1/2 tablespoon corn flour
1 teaspoon plain flour

* dough:
tang zhong (water-roux):
20g bread flour
100ml water

bread dough:
195g bread flour
90g cake flour
12g milk powder
30g caster sugar
6g salt
6g instant yeast

60g egg, lightly beaten
65g water
75g tang zhong (water-roux)

45g unsalted butter


Method:

to make char siew filling:
* Heat up oil on medium heat, saute shallots till fragrant. Discard the fried shallots. Pour in mixed seasoning, immediately stir the mixture as it boils. Keep stirring until it thickens. Takes about a few seconds. Add char siew, sesame seeds and mix well. The finished mixture should dry up and becoms sticky (for easy wrapping). Dish up and leave to cool.

to make tang zhong:
Place 20g bread flour in a saucepan. Add 100ml water, mix till smooth, making sure there are no lumps of flour. Cook over medium to low heat, stirring constantly with a hand whisk to prevent it from burning. Within 1 to 2 mins, the mixture will start to thicken, stop when you see traces in the mixture for every stir you make with the hand whisk. (Take a look at the video clip here.) The 65degC tang zhong is ready. Immediately transfer the hot tang zhong into a bowl and cover it with a cling wrap, making sure the cling wrap sticks onto the surface of the mixture. This is to prevent a film from forming on the surface. Leave to cool completely before using it.

to knead dough by bread machine:
* Place water, egg, tang zhong (use 75g), sugar, salt, bread flour, cake flour, milk powder in the pan of the bread machine (according to the sequence as stated in the instruction manual of your bread machine). Make an indentation on the flour and add in the instant yeast. Select the Dough function of the bread machine and press start. Leave the lid of the machine open (this is to prevent over heating). After about 10mins of kneading, add in the 45g of butter. Let the machine continue to knead the dough. After the kneading cycle has stopped (20mins), Stop and Restart the machine. Continue to let the machine knead for another 20mins. Remove dough from the bread pan.

* Place dough in a lightly greased (use vegetable oil or butter) mixing bowl, cover with cling wrap or a damp cloth and let proof in room temperature (around 28 to 30 degC) for about one hour, or until double in bulk.

* Remove the dough from the bowl and give a few light kneading to press out the gas in the dough. Divide the dough into 9 equal portions (60g each). Roll each dough into smooth rounds, cover with a damp cloth or cling wrap and let the doughs rest for 10mins.

* On a lightly floured work surface, roll each dough into a round disc (I used my hands). Press out any trapped air as you flatten the dough. Wrap each dough with one heaped tablespoon of the char siew filling. Pinch and seal the seam tightly. Place seam side down on a greased (or lined with parchment paper) baking tray. Space doughs two inches apart to allow them to expand. Cover with damp cloth or cling wrap and leave doughs to proof for the second time for about 40mins, or until double in size.

* Dab finger tip with some water, then dab with black or white sesame seeds, then 'stamp' it on the surface of the bun. This step can be omitted. (Note: I do not apply egg wash on the buns.)

* Bake in pre-heated oven at 180 deg C for 15 mins or until golden brown (if necessary, tent the surface with foil if the top browns too quickly closer to the baking time). Remove from oven and transfer to wire track to let cool. once cool, store immediately in an airtight container.

Recipe source: 
fillings: Delightful Snacks and Dim Sum, Agnes Chang
bread dough: 65度C汤种面包, 陈郁芬
More aboutthe missing link

magical rolls

Diposting oleh good reading on Selasa, 27 September 2011

My cake friend calls these Magical Rolls.


That was the subject heading of her email which was sent to me right after she had them for breakfast. She had made a batch of magical rolls...aka Cinnamon Rolls following the recipe posted by The Little Teochew. So, what's so magical about these rolls?


First of all, the dough doesn't require any kneading, yet, the finished texture is as soft as any Asian kind of soft buns. My cake friend is also very surprised that the rolls are made with plain flour instead of bread flour. Aren't bread buns made with bread flour, won't plain flour produces a 'cake-like' texture? The answer is No. Magical, isn't it?

Next, the delicious sweet scent of cinnamon rolls baking in the oven magically transformed her kitchen into some cinnamon rolls speciality shop. For the benefit of those from a different era, cinnamon rolls were so popular many years back. Sad to say, they were like one of those fad foods, came and went so quickly, not very different from the rotiboy or the donut craze.

My friend's family polished off all 15 rolls during breakfast. I am sure, any self-taught home bakers would feel so proud and satisfied to be able to replicate something so close to what the professionals are churning out from the bakery stores.


Naturally, I got hooked to these magical rolls after hearing my friend raved about them.

I was all eager to give it a try until I studied the step by step tutorial posted by the original author of the Pioneer Woman's Cinnamon Rolls. After going through the list of ingredients, I had some reservations about making them. I was really taken aback by the amount of sugar and butter that goes into making the cinnamon fillings and frosting. I am seriously not willing to pile on the pounds again. The big portion is also another issue.


Fortunately, I stumbled upon a small batch version posted by kitchenMage. This smaller portion yields 12 rolls which I thought is just right for the three of us. I have also taken the liberty to cut down on the butter and sugar for filling, and I omitted the frosting completely.

Making the dough was a breeze, just a simple mixing of the ingredients, and really, there is no kneading required. I left the dough to chill over night so that it will be more firm to work on. Even then, the dough was still very soft and sticky. The only way to get around it was to dust the work surface and the dough, generously, with flour to prevent it from sticking.


I can't agree more that these are really magical rolls! The texture is so soft and light! Even without the icing, I find them very delicious. They are not overly sweet, nor sticky or gooey. I couldn't stop at just one, and with the reduced butter and sugar, I didn't feel guilty even when I reached out for the third one ;)


Ok, now, stop gawking. The only way for you to enjoy these freshly baked cinnamon rolls is to go make them yourself :)

Happy Baking!


Pioneer Woman's Cinnamon Rolls
Ingredients:
(makes 12 ~ 15 rolls)

for dough:
250ml (1 cup) milk (I used low fat fresh milk)
50g (1/4 cup) sugar (I used brown sugar)
62.5ml (1/4 cup) vegetable oil (I used canola oil)
1 teaspoon Instant yeast (or 1.5 teaspoons Active Dry Yeast)
250g (2 cups) + 30g (1/4 cup) plain flour
1/4 teaspoon baking powder
1/4 teaspoon (scant) baking soda
3/4 teaspoon salt

for filling:
1 tablespoon ground cinnamon (cinnamon powder)
50g (1/4 cup) sugar (I used brown sugar)
50g (1/4 cup) unsalted butter (melted)


Method:
  • Mix milk, sugar and vegetable oil in a pan. Scald (heat until just before boiling) the mixture. Leave to cool for 45mins ~ 1 hour.
  • Place 250g (2 cups) plain flour and Instant yeast in a mixing bowl. Make a well in the centre and add the above mixture. Stir with a spatula until the mixture comes together to form a thick batter. (If using Active Dry Yeast, sprinkle the yeast into the mixture and let it sit for a minute before adding it to the plain flour.) Cover and let the batter sit for at least 1 hour.
  • Add in the remaining 30g (1/4 cup) flour, baking powder, baking soda and salt. Stir until the mixture comes together. Either go ahead to make the rolls or cover and leave to chill in fridge over night or until needed. If left to chill, check the dough and punch it down by folding with a spatula if the dough rises almost to the rim of the mixing bowl. (Note: dough will be more firm and easier to work with if left to chill in fridge).
  • When ready to make the rolls, mix ground cinnamon and sugar in a small bowl.
  • Dust the work surface freely with flour. Dust the top and bottom of dough with flour. Roll out the dough into a rectangular shape. Then roll out as thin as possible. Dust the dough and work surface with flour when necessary.
  • Brush the rolled out dough with melted butter. Sprinkle the cinnamon and sugar mixture evenly over the surface.
  • Start from the opposite end of the dough, roll the dough neatly in a line towards you. Roll as tightly as possible. Dust fingers with flour if the dough feels sticky. Pinch the seams to seal.
  • Cut into 1 inch thick slices and arrange on baking pan lined with parchment paper (or greased with butter). Place the rolls close together so that they are almost touching.
  • Cover and leave to rise for 30mins (1 hour if dough was left to chill over night) or until the rolls double in size. (Note: the rolls can be left to chill in the fridge over night and bake them the next morning. If rolls have doubled in size, bake them right away. Otherwise leave to sit on counter until double in size before baking.)
  • Bake in preheated oven at 180degC for 20mins until golden brown. 
Recipe source: adapted from Pioneer Woman's Cinnamon Rolls
More aboutmagical rolls

Korean mochi buns

Diposting oleh good reading on Minggu, 27 Februari 2011

These lovely Korean mochi bread buns came right out of my oven on a late Sunday afternoon.  I wanted to bake something badly, but I didn't have too much time or even the energy to lift up a manual whisk.


To quench my thirst for baking, I turn to this box of premix I received months ago. I emptied one of the two packets of the flour mixture into my mixing bowl, cracked an egg and added it into the bowl with some water. I mixed the mixture with my hand and I noticed that the dough was quite dry. I was tempted to add some more water but kept working away, and eventually I was able to gather up the mixture to form a nice smooth dough. The dough wasn't sticky or oily, it was so easy to work with. I divided the dough into nine equal portions and shaped them into little round balls. I let them rest, covered with cling wrap, while the oven is preheating. Just before I popped them into the oven, I sprinkled some water all over the dough. I suppose this is to make the crust crispy, just like making French breads.


35 minutes later, I was rewarded with a tray of crackly plump balls. Also known as black sesame tapioca rolls (tapioca flour is listed as one of the ingredients), these buns have got a hard but thin crispy crust and the inside was soft and very chewy.


It was the first time I have tasted a Korean mochi bread. The bread is not sweet at all and it doesn't have much flavour except for the black sesame. It is almost like eating a plain but chewy bread roll. They tasted really good when fresh out of the oven, and I would pair it with a cup of latte or something sweet such as hot chocolate or milo.

In case you ask, I have seen similar mochi bread premix ($9+ a box, comes with 2 packs) at the following Korean grocery shops here. To my delight,  I also happened to come across the Korean omija tea (read about it my earlier post here) at these two shops :)

S-Mart (Chinatown Point)
133 New Bridge Road
#01-01 A/B Chinatown Point

Lotte Mart (Bukit Timah)
17 Lorong Kilat
#01-02 Kilat Court

I have also included the recipe here as the instruction printed on the package is in Korean.


Korean mochi bread

Ingredients:
(makes 9 bread buns)

250g (1 packet) mochi bread flour mix
1 egg
70ml water

Method:
- Mix flour, egg and water in a mixing bowl. Gather to form a soft dough.
- Divide dough into 8 ~ 10 equal portions. Shape into round balls.
- Place doughs on baking tray lined with parchment paper. Cover with cling wrap or a damp cloth, leave to rest for about 15mins.
- Spray the doughs with some water.
- Bake in preheated oven at 180degC for 30~35mins or until golden brown.
Note: These rolls taste best on the day they are made.
More aboutKorean mochi buns

My Bread Baking Frenzy

Diposting oleh good reading on Kamis, 02 September 2010

I caught the bug again! Not ordinary flu bug, but bugs that sent me conducting one failed experiment after another, again and again in my kitchen.

I have been in a bread baking frenzy over the past couple of weeks. I got hooked into making different loaf breads, but so far none has met my expectations. First, I made a matcha red bean swirl loaf, using another (烫种) scalded dough recipe. I even put in that extra effort to cook the red beans. The loaf ended up looking very pretty, but failed my taste-test. The texture was too dense! I sensed trouble coming when the dough appeared to be quite stiff while I was kneading it. I blamed it on the recipe, and decided to try it again using the tangzhong, water roux method (汤种). Instead of making swirl loaf, I mixed the red beans into the dough. Everything went well except for the final proofing. I left the dough to proof for 2 hours and it still didn't fill up my pullman pan. I popped it in the oven, hoping the oven spring will expand the loaf a little. Well, the miracle that I was hopping for did not occur. The loaf did not even expand a single bit upon baking. I was left with a short and dense loaf.

You would think I should have given up by now. No, I didn't. I am quite surprised by my own stubborn persistence. Unless you have done it before, kneading dough occasionally by hand is therapeutic to most people, but doing it every time, means a lot of hard work, especially when you have to wrestle with a wet and sticky mess . Despite my aching arms and shoulders, I continued my quest for a perfect homemade loaf. I tried another tangzhong loaf recipe. This time I made a black sesame seeds loaf, thinking that maybe the red beans had 'broken' the bread gluten while I was trying to shape the dough, causing it not to rise well. So since sesame seeds are smaller grains, it would not do any damage to the bread. Alas, the tragic history repeats itself! The loaf came out of the oven dense and short.

After tasting a small piece of it, my elder child remarked, "It tastes like beer." To cover up my embarrassment, I told him 'that's because beer is also made with yeast, your know'. I learned the lesson not to over proof the dough, especially during the second rise, unless I intend to make a tiger beer bread ;) I also finally realised that I am not using the right amount of dough to fill up my bread tin. In order to fill up the tin, the dough should weigh at least 600g, or as a rough gauge, I should follow recipes that calls for flour amount that is at least 300-350g. Since I can't feed the ducks with my bread, I had no choice but to feed the bin, which I deem as one of the most annoying thing that could happen in my baking repertoire!


I was itching to make another loaf this week, but dismissed the idea as I strongly believe the Chinese sayings "祸不单行" or the English equivalent, 'bad luck comes in 3s'. I am glad that I stayed away from loaf bread as I managed to make a decent bread roll yesterday :D

This soft and yummy log is made using none other than the tangzhong method. It is amazing how a single ingredient can make a whole lot of difference. What I am referring to, is those spring onions dotted all over the bread roll. Spring onions smells and taste really pungent when raw, however, just like garlic, when it comes in contact with heat, the aroma that it releases makes it such a delightful experience even though I was standing vigilantly in front of the hot oven, keeping a close watch.


It did take a few extra steps to make these pork floss rolls, but the effort was worthwhile. At least I was rewarded with a tray of edible buns. When my kids got home from school, my elder child wanted to have one right after lunch, but I told him to wait till tea time. These rolls tasted soft and delicious and I noted there was a slight chew to it, probably because of the way the dough is made. We had them for tea and breakfast the next day. The rolls stayed soft over night and they definitely did not taste like beer ;)


Seaweed Pork Floss Rolls (65degC TangZhong)

Ingredients
(makes 6 rolls)

water roux:
20g bread flour
100ml water

dough:
195g bread flour
90g cake flour
30g caster sugar
12g milk powder
6g salt
6g instant yeast
60g egg, lightly beaten
65ml water
75g water roux (tangzhong)
45g unsalted butter

fillings:
chopped spring onions
sesame seeds
seaweed pork floss
mayonnaise


to make tang zhong:
  • Place 20g bread flour in a saucepan. Add 100ml water, mix till smooth, making sure there are no lumps of flour. Cook over medium to low heat, stirring constantly with a hand whisk to prevent it from burning. Within 1 to 2 mins, the mixture will start to thicken, stop when you see traces in the mixture for every stir you make with the hand whisk. (Take a look at the video clip here. ) The 65degC tang zhong is ready. Immediately transfer the hot tang zhong into a bowl and cover it with a cling wrap, making sure the cling wrap sticks onto the surface of the mixture. This is to prevent a film from forming on the surface. Leave to cool completely before using it. Measure 75g for the recipe, there will be a little bit of leftover.
to make dough (by hand):
see video here on kneading by hand
  • Mix all the dry ingredients in a mixing bowl. Make a well in the centre and add in the egg and tang zhong. Reserve about 20ml of water and add the rest into the mixing bowl. Mix the ingredients with hand and slowly form into a rough dough. Add in a little of the reserved water if the mixture is too dry.
  • Transfer dough to a lightly floured work surface. Knead the dough till smooth. Add in the remaining water a little at a time, knead well after each addition. (This way, the dough will not be too wet and sticky). Use up all the water. The whole process should take about 10mins.
  • Knead in the butter. Continue to knead the dough until it no longer sticks to your hand, becomes smooth and elastic. This should take about another 20 to 30 mins. Do the window pane test: pinch a piece of the dough, pull and stretch it. It should be elastic, and can be pulled away into a thin membrane without tearing/breaking apart easily.
  • Place dough in a lightly greased (use vegetable oil or butter) mixing bowl, cover with cling wrap and let proof in room temperature (around 28 to 30 degC) for about 40mins or an hour, or until double in bulk.
  • Turn dough out onto a lightly floured surface and give a few light kneading to press out the gas. Roll into a round dough. Cover with a damp cloth or cling wrap and let the dough rest for 15mins.
  • Roll out the dough into a rectangular shape to fit a 30cmx40cm baking tray (I used a 10" by 14" tray). Place dough in baking tray(lined with parchment paper). Cover and let it proof for around 30~40 minutes.
  • Use a fork to poke holes all over the surface of the dough (this is to ensure the bread will not puff up too much during baking). Brush with egg wash then sprinkle with chopped onions and sesame seeds. Bake at 170~180degC for about 15 minutes (do not over bake).
to assemble:
  • Remove bread from tray and leave to cool. Invert the bread on a parchment paper. Cut a few slits along the longer edge of the bread, make the slits only half-way through the bread do not cut through. The slits will make rolling up the bread easier.
  • Spread a thin layer of mayonnaise on the surface and sprinkle with pork floss. From the longer edge, roll up like a swiss roll. Wrap the bread roll with the parchment paper. Secure and leave it for about 30mins so that the roll can stay in its shape without unrolling. (I tried to tape it down, but the tape couldn't stick onto the parchment paper, so I had to use stripes of paper to secure the roll.) Trim away the edges and cut the bread into 6 portions. Spread the cut sides with some mayonnaise and coat with pork floss.
  • Recipe source: 65度C汤种面包, 陈郁芬

More aboutMy Bread Baking Frenzy

Rolls and Buns

Diposting oleh good reading on Sabtu, 07 Agustus 2010


I made these bread rolls based on the sweet bread recipe shared by Edith. Her blueberry and cheese bread buns look so soft and fluffy that I bookmarked the recipe right away.

I was planning to make some char siew buns, but decided against it since I still have a pack of ready-made red bean paste.


To make these buns, you need to plan a day ahead. The 烫种 or 'scalded-dough' has to be made and leave to chill for at least 12 hours in the fridge. The 烫种 is made by scalding flour with hot boiling water so as to increase the water-binding capacity of the dough. A dough with higher water-binding capacity will suffer less moisture loss during baking, and it will not dry out or age too quickly after baking.


As expected, this dough is less  wet and sticky than the one made using 汤种 or water roux method (see post on Cinnamon Rolls), since the water content is lesser. The dough is also much easier to work with, as it doesn't stick to the work surface at all. In fact the dough was very stiff before the butter was added. I was quite worried that I would end up with a tray of rock buns. It took me about 30mins to get to the window pane stage. Pardon the lousy image as I was trying to do the window pane test with one hand, and the other holding a camera! The dough is easily stretched to a thin membrane, and the holes come with smooth edges.


I made some into red bean rolls and some into buns.


The buns were indeed very soft and fluffy, freshly baked! The texture was comparable to those you get from bakery shops. Take a look at the image on the left, base on the exterior of the buns,  I am not sure whether you could tell how soft and tender they were?  The buns felt 'puffy' as the crust was very thin.

However, even though I stored them right away in an air-tight container, the buns were less soft the next morning :( In fact, they don't taste very different from those I made using the straight dough method. Personally, I think the 汤种 or water roux method is actually better as the buns remained as soft when left over night. But, if you do not have a standing mixer or a bread machine like me, this 烫种 or 'scalded-dough' method is easier on your arms if you were to knead by hand. I have bookmarked another 烫种 recipe, will give it a go and hope it will give a better result...ie easy to knead by hand and  yet will not age that fast.


Red Bean Rolls

Ingredients:
(makes 8 rolls)

(A)
50g bread flour
35g boiling water

(B)
150g bread flour
50g plain flour
40g caster sugar
3g salt
10g milk powder
4g instant yeast

(C)
88g water
30g egg (about half an egg, reserve the leftover as egg wash)

(D)
30g butter (cut into cubes)

(E)
240g red bean paste, roll into 8 equal balls
some white sesame seeds (optional)

Method:
  1. Add the boiling water in (A) into the flour, stir and mix to form a rough dough. Cover dough and set aside to cool. Leave to chill in fridge for at least 12 hrs.
  2. Place ingredients in (B) in a mixing bowl. Mix well. Make a well in the centre, and add in ingredients in (C). Knead to form a rough dough. Knead in scalded-dough in Step 1.
  3. Transfer dough to a lightly floured work surface. Knead the dough till smooth. This should take about 10mins. This dough is quite easy to knead as it does not stick to the surface.
  4. Knead in the butter in (D). Continue to knead the dough until it no longer sticks to your hand, becomes smooth and elastic. This should take about another  15~20 mins. Do the window pane test: pinch a piece of the dough, pull and stretch it. It should be elastic, and can be pulled away into a thin membrane without tearing/breaking apart easily.
  5. Place dough in a lightly greased (use vegetable oil or butter) mixing bowl, cover with cling wrap and let proof in room temperature (around 28 to 30 degC) for about one hour, or until double in bulk.
  6. Remove the dough from the bowl and give a few light kneading to press out the gas in the dough. Divide the dough into 8 portions (about 60g each). Roll each dough into smooth rounds, leave to rest for 10-15mins.
  7. Flatten dough into a round disc. Wrap each dough with one portion of the red bean paste in (E). Pinch and seal the seam tightly. Flatten the dough into a round disc and roll out into a longish oval shape (about 15cm in length). Use a knife or dough scraper to make a few slits(see photo below, do not cut through the edges). Roll up swiss-roll style, seal and pinch the edges.
  8. Place the rolls, seam side down on a greased (or lined with parchment paper) baking tray. Leave some space in between the rolls to allow them to expand. Cover with damp cloth or cling wrap and leave doughs to proof for the second time for about 45mins, or until double in size.
  9. Brush top with egg wash (mix leftover egg with 1 tbs water) and sprinkle with some white sesame seeds. Bake in pre-heated oven at 190 deg C for 15 mins or until golden brown. Remove from oven and once cool store immediately in an airtight container.
Recipe Source: adapted from Magic Bread by Alex Goh

More aboutRolls and Buns