HOT & STEAMY CHOCOLATE CAKE

Diposting oleh good reading on Kamis, 26 Februari 2009

Don't have an oven, you say?
Craving some chocolate cake made from scratch?
and only 2 eggs in your refrigerator?
Steamed Chocolate Cake

Don't despair...Asian "bakers" long ago discovered the joys of steaming their desserts.

I always enjoy a well-made Mah-Lai Goh (Malaysian Cake) at DimSum. It sometimes comes around on the steam carts and it isn't a very easily made cake. Not all restaurants can create the proper texture in the crumb. I like my Mah-Lai Goh tender, moist and full of caramelly flavour. Unfortunately, these cakes need to be eaten fresh from the steamer and don't last too well past a few hours.

I was clicking away around the internet the other day and came across a Steamed Chocolate Cake recipe. It called for evaporated milk and this tweaked in me nostalgia for those DimSum steamed cakes. Unfortunately, I've never seen chocolate anywhere in a Chinese Restaurant (too bad), but the technique is certainly Asian in technique.

A steamed cake may not sound too appealing to many, but in fact it can yield a very tender crumb. You don't get any of those golden brown edges on steamed cakes. Every inch of the cake, including the crust is very much like the center of the cake. The ease of this recipe is a bonus. You don't even need an electric mixer. In fact, most of these items can be found in your pantry. This cake only requires 2 eggs. It can be made into cupcakes or the batter can be divided.

The only problem is finding a vessel large enough to steam your 9" cake pan. I use a wide wok and set the cake pan on a rack in the water. The water doesn't touch the cake pan and I have about 1.5" clearance from the cake pan to my lid at least. My wok lid is too shallow and I need a higher-domed one, but I like it because it's glass and I can always check the water level without lifting the lid to take a peek.

Fortunately, this Steamed Chocolate Cake proved to keep better than the DimSum ones. I covered mine in plastic wrap and by the end of the evening, half the cake was gone. It was still moist.

My mom and the kids loved the cake and inhaled it during snack times. Don't worry...I didn't succumb to the sugar-cravings! I've kept on track and I'm still low-carbing. In fact, I've added running into my health regime and I've been running every day this week so far. Actually, correction: I run every night. By the time I've done my marking, put the kids to bed and everything else you need to do in a household, it's like 10pm! After my run and shower, I'm kind of still buzzed and can't always fall asleep until 11:30. There's no way I can fit the run in, in the morning because you-know-who still has night-wakings/nose-bleeds/night-terrors. These occur around 3a.m. consistently. So running in the a.m. is not happening! :p

In any case, the cake kept well into the next day for snacking in an air-tight plastic container. I didn't refrigerate it. I don't know if it can last longer than that because there wasn't anything left! Here's a Cakebrained tip: if you find the cake has survived into the second day and it's not as soft as you'd like, then simply re-steam that slice for a few minutes. Of course, this is only if you haven't frosted it!

This steamed cake is perfect even without frosting, but if you do intend to frost it, I'm sure it would prove to be excellent too. It slices very cleanly and isn't crumbly or dry. It would make a wicked cupcake. If you were making a tall frosted chocolate cake, I could envision a few problems after doubling the recipe: such as whether to steam both 9" cakes at once, to do them consecutively (would the batter hold well?) or finding two woks so you could steam both pans simultaneously.

Here's the recipe I found at Cuisine Asia.

STEAMED MOIST CHOCOLATE CAKE
(adapted from Cuisine Asia)
makes one 9" round

185g unsalted butter
180g granulated sugar
200 ml evaporated milk
2 eggs, lightly beaten
125g all-purpose flour
70g cocoa powder
1/2 t baking powder
1/2 t baking soda
1/2 t vanilla
  • Line and grease a 9"baking pan
  • Combine sugar, evaporated milk vanilla and butter in a saucepan. Stir over low heat until sugar is dissolved and butter has melted. Remove from heat and allow to cool.
  • Add the beaten eggs into the slightly cooled mixture and stir until well mixed.
  • Sift the flour, cocoa powder, baking powder and baking soda into a large mixing bowl. Add the egg mixture over the flour and stir until well mixed. Batter should be runny.
  • Heat up the steamer. Place a rack over the water.
  • Pour the batter into the prepared pan and place into the steamer on the rack. Cover the top of the pan loosely with a piece of aluminum foil. [I tented it slightly] Cover with wok lid.
  • Steam over medium heat for 45 minutes. [check water level occasionally to ensure the wok doesn't dry up]. Check for doneness by inserting a skewer into the cake. If it comes out clean, it's done. If not, steam for a further 5 minutes.

    Cool the cake in pan before turning out for further decoration.
  • More aboutHOT & STEAMY CHOCOLATE CAKE

    Dietary Fiber and Mineral Availability

    Diposting oleh good reading

    Health authorities tell us to eat more fiber for health, particularly whole grains, fruit and vegetables. Yet the Diet and Reinfarction Trial, which determined the effect of eating a high-fiber diet on overall risk of death, came up with this graph:


    Oops!  At two years, the group that doubled its fiber intake had a 27% greater chance of dying and a 23% greater chance of having a heart attack. The extra fiber was coming from whole grains. The difference wasn't statistically significant, so we can't make too much out of this. But at the very least, it doesn't support the idea that increasing grain fiber will extend your life. 

    Why might fiber be problematic? I read a paper recently that gave a pretty convincing answer to that question: "Dietary Fibre and Mineral Bioavailability", by Dr. Barbara F. Hartland. By definition, fiber is indigestible. We can divide it into two categories: soluble and insoluble. Insoluble fiber is mostly cellulose and it's relatively inert, besides getting fermented a bit by the gut flora. Soluble fiber is anything that can be dissolved in water but not digested by the human digestive tract. It includes a variety of molecules, some of which are quite effective at keeping you from absorbing minerals. Chief among these is phytic acid, with smaller contributions from tannins (polyphenols) and oxalates. The paper makes a strong case that phytic acid is the main reason fiber prevents mineral absorption, rather than the insoluble fiber fraction. This notion was confirmed here.

    Whole grains would be a good source of minerals, if it weren't for their very high phytic acid content. Even though whole grains are full of minerals, replacing refined grains with whole grains in the diet (and especially adding extra bran) actually reduces the overall absorption of a number of minerals (free text, check out table 4). This has been confirmed repeatedly for iron, zinc, calcium, magnesium and phosphorus. 

    Refining grains gets rid of the vitamins and minerals, but at least refined grains don't prevent you from absorbing the minerals in the rest of your food. Here's a comparison of a few of the nutrients in one cup of cooked brown vs. unenriched white rice (218 vs. 242 calories):

    Brown rice would be quite nutritious if we could absorb all those minerals. There are a few ways to increase mineral absorption from whole grains. One way is to soak them in slightly acidic, warm water, which allows their own phytase enzyme to break down phytic acid. This doesn't seem to do much for brown rice, which doesn't contain much phytase.

    A more effective method is to grind grains and soak them before cooking, which helps the phytase function more effectively, especially in gluten grains and buckwheat. The most effective method by far, and the method of choice among healthy traditional cultures around the world, is to soak, grind and ferment whole grains. This breaks down nearly all the phytic acid, making whole grains a good source of both minerals and vitamins.

    The paper "Dietary Fibre and Mineral Bioavailability" listed another method of increasing mineral absorption from whole grains. Certain foods can increase the absorption of minerals from whole grains high in phytic acid. These include: foods rich in vitamin C such as fruit or potatoes; meat including fish; and dairy.

    Another point the paper made was that the phytic acid content of vegetarian diets is often very high, potentially leading to mineral deficiencies. The typical modern vegetarian diet containing brown rice and unfermented soy products is very high in phytic acid, and therefore it may make sense to ensure plentiful sources of easily absorbed minerals in the diet, such as dairy. The more your diet depends on plant sources for minerals, the more careful you have to be about how you prepare your food.
    More aboutDietary Fiber and Mineral Availability

    Weekday Lunch Express - Salmon Onigiri

    Diposting oleh good reading on Rabu, 25 Februari 2009

    Whenever I run out of idea what to prepare for lunch, I will just make some Onigiri or Japanese rice balls. These are just so simple to make...you will only need to cook some Japanese rice or use any short-grain rice like CalRose. I made these Salmon Onigiri with a brand of Australian CalRose rice...which I spotted on a supermarket shelf. I bought it to try as it's available in a 1 kg small pack.

    One good thing about onigiri is that you don't have to add any sushi vinegar to the rice, it takes away the hassle of mixing the rice and fanning it at the same time...you will know what I mean if you have tried making sushi rice. In order to make good onigiri, there is this extra step which I'll follow, that is, after washing the rice, I will drain away the water, and set the rice aside for 30mins to an hour. When ready, I cook it with a rice cooker...using the ratio of 1 cup of rice to 1 cup of water. Just like cooking our usual long grain rice, I will not open the lid until 10-15mins after the rice has been cooked. I'm not really sure what's the reason behind, but it has long became my habit to do so.


    The salmon fillings is very easy to prepare too. You will only need to season the salmon with some salt and/or ground pepper...pan fried it till cooked and flaked it with a fork. I used the salmon fillings in two ways. I used some to wrap inside the rice balls, and the rest I mixed them with rice, some black sesames, and some furikake (Japanese rice seasoning), before shaping them with a set of onigiri rice mould.


    I dressed up an otherwise plain looking rice ball with seaweed, and with a kitchen scissors I cut out some eyes and mouths. I thought they look like little men in tuxedos?! My kids love rice balls...especially those I made using fillings such as pork floss or otah ;) We find these salmon version a little bland on it's own...so we dipped them in some Japanese soya sauce.


    I can't remember how I stumbled onto this site, which provides many fun image effects for free. Thanks to FunPhotoBox I am able to create such a lovely photo effect. Hope you will also have fun playing around with your photos too :)
    More aboutWeekday Lunch Express - Salmon Onigiri

    A few thoughts on Minerals, Milling, Grains and Tubers

    Diposting oleh good reading on Selasa, 24 Februari 2009

    One of the things I've been noticing in my readings on grain processing and mineral bioavailability is that it's difficult to make whole grains into a good source of minerals. Whole grains naturally contain more minerals that milled grains where the bran and germ are removed, but most of the minerals are bound up in ways that prevent their absorption.

    The phytic acid content of whole grains is the main reason for their low mineral bioavailability. Brown rice, simply cooked, provides very little iron and essentially no zinc due to its high concentration of phytic acid. Milling brown rice, which turns it into white rice, removes most of the minerals but also most of the phytic acid, leaving mineral bioavailability similar to or perhaps even better than brown rice (the ratio of phytic acid to iron and zinc actually decreases after milling rice). If you're going to throw rice into the rice cooker without preparing it first, white rice may actually deliver an overall higher level of certain minerals than brown rice, though brown rice may have other advantages such as a higher feeling of fullness per calorie. Either way, the mineral availability of rice is low. Here's how Dr. Robert Hamer's group put it when they evaluated the mineral content of 56 varieties of Chinese rice:
    This study shows that the mineral bio-availability of Chinese rice varieties will be [less than] 4%. Despite the variation in mineral contents, in all cases the [phytic acid] present is expected to render most mineral present unavailable. We conclude that there is scope for optimisation of mineral contents of rice by matching suitable varieties and growing regions, and that rice products require processing that retains minerals but results in thorough dephytinisation.
    It's important to note that milling removes most of the vitamin content of the brown rice, and most of the fiber, both of which could be disadvantageous depending on what your overall diet looks like.

    Potatoes and other tubers contain much less phytic acid than whole grains, which may be one reason why they're a common feature of extremely healthy cultures such as the Kitavans. I went on NutritionData to see if potatoes have a better mineral-to-phytic acid ratio than grains. They do have a better ratio than whole grains, although whole grains contain more total minerals.

    Soaking grains reduces their phytic acid content, but the extent depends on the grain. Gluten grain flours digest their own phytic acid very quickly when soaked, due to the presence of the enzyme phytase. Because of this, bread is fairly low in phytic acid, although whole grain yeast breads contain more than sourdough breads. Buckwheat flour also has a high phytase activity. The more intact the grain, the slower it breaks down its own phytic acid upon soaking. Some grains, like rice, don't have much phytase activity so they degrade phytic acid slowly. Other grains, like oats and kasha, are toasted before you buy them, which kills the phytase.

    Whole grains generally contain so much phytic acid that modest reductions don't free up much of the mineral content for absorption. Many of the studies I've read, including this one, show that soaking brown rice doesn't really free up its zinc or iron content. But I like brown rice, so I want to find a way to prepare it well. It's actually quite rich in vitamins and minerals if you can absorb them.

    One of the things many of these studies overlook is the effect of pH on phytic acid degradation. Grain phytase is maximally active around pH 4.5-5.5. That's slightly acidic. Most of the studies I've read soaked rice in water with a neutral pH, including the one above. Adding a tablespoon of whey, yogurt, vinegar or lemon juice per cup of grains to your soaking medium will lower the pH and increase phytase activity. Temperature is also an important factor, with approximately 50 C (122 F) being the optimum. I like to put my soaking grains and beans on the heating vent in my kitchen.

    I don't know exactly how much adding acid and soaking at a warm temperature will increase the mineral availability of brown rice (if at all), because I haven't found it in the literature. The bacteria present if you soak it in whey, unfiltered vinegar or yogurt could potentially aid the digestion of phytic acid. Another strategy is to add the flour of a high-phytase grain like buckwheat to the soaking medium. This works for soaking flours, perhaps it would help with whole grains as well?

    So now we come to the next problem. Phytic acid is a medium-sized molecule. If you break it down and it lets go of the minerals it's chelating, the minerals are more likely to diffuse out of the grain into your soaking medium, which you then discard because it also contains the tannins, saponins and other anti-nutrients that you want to get rid of. That seems to be exactly what happens, at least in the case of brown rice.

    So what's the best solution for maximal mineral and vitamin content? Do what traditional cultures have been doing for millenia: soak, grind and ferment whole grains. This eliminates nearly all the phytic acid, dramatically increasing mineral bioavailiability. Fermenting batter doesn't lose minerals because there's nowhere for them to go. In the West, we use this process to make bread. In Africa, they do it to make ogi, injera, and a number of other fermented grain dishes. In India, they grind rice and beans to make idli and dosas. In the Phillipines, they ferment ground rice to make puto. Fermenting ground whole grains is the most reliable way to improve their mineral bioavailability and nutritional value in general.

    But isn't having a rice cooker full of steaming brown rice so nice? I'm still working on finding a reliable way to increase its nutritional value.
    More aboutA few thoughts on Minerals, Milling, Grains and Tubers

    Hollywood Hair...Jennifer Aniston at the Oscars

    Diposting oleh good reading on Senin, 23 Februari 2009

    I have a secret. I watch the Oscars and Emmy's. Not to see who wins, but to see their hair. Last night's favorite was Jennifer Aniston. She was beautiful! LOVED her hair, it wasn't over done or swept back into an updo that wasn't her at all. It was simple and fresh.


    This morning we did her style on my oldest. She is getting past the point of piggies and wants her hair down and older (WAH!) so this style fit the bill.


    All we did was part the hair at an angle from above her eye to her crown. About an inch and a half up the part, I parted her hair again to the other side. I pulled the extra hair into a ponytail so I didn't inadvertently pull excess into the French braid. I sprayed the hair with water and hairspray and braided down like so. I secured the braid with an elastic and then to make sure it didn't move, I threaded a bobby pin through the elastic and up through the underside of the braid.


    Then I pulled the ponytail out and ran my flat-iron through pieces of her hair to give it some "UMPH"

    How'd we do?

    Coming up next:

    Nancy O'Dells Golden Globes Hair

    Vanessa Hudgens
    More aboutHollywood Hair...Jennifer Aniston at the Oscars

    How to Eat Grains

    Diposting oleh good reading on Sabtu, 21 Februari 2009

    Our story begins in East Africa in 1935, with two Bantu tribes called the Kikuyu and the Wakamba. Their traditional diets were mostly vegetarian and consisted of sweet potatoes, corn, beans, plantains, millet, sorghum, wild mushrooms and small amounts of dairy, small animals and insects. Their food was agricultural, high in carbohydrate and low in fat.

    Dr. Weston Price found them in good health, with well-formed faces and dental arches, and a dental cavity rate of roughly 6% of teeth. Although not as robust or as resistant to tooth decay as their more carnivorous neighbors, the "diseases of civilization" such as cardiovascular disease and obesity were nevertheless rare among them. South African Bantu eating a similar diet have a low prevalence of atherosclerosis, and a measurable but low incidence of death from coronary heart disease, even in old age.

    How do we reconcile this with the archaeological data showing a general decline in human health upon the adoption of agriculture? Humans did not evolve to tolerate the toxins, anti-nutrients and large amounts of fiber in grains and legumes. Our digestive system is designed to handle a high-quality omnivorous diet. By high-quality, I mean one that has a high ratio of calories to indigestible material (fiber). Our species is very good at skimming off the highest quality food in nearly any ecological niche. Animals that are accustomed to high-fiber diets, such as cows and gorillas, have much larger, more robust and more fermentative digestive systems.

    One factor that reconciles the Bantu data with the archaeological data is that much of the Kikuyu and Wakamba diet came from non-grain sources. Sweet potatoes and plantains are similar to the starchy wild plants our ancestors have been eating for nearly two million years, since the invention of fire (the time frame is debated but I think everyone agrees it's been a long time). Root vegetables and starchy fruit ted to have a higher nutrient bioavailibility than grains and legumes due to their lower content of anti-nutrients.

    The second factor that's often overlooked is food preparation techniques. These tribes did not eat their grains and legumes haphazardly! This is a factor that was overlooked by Dr. Price himself, but has been emphasized by Sally Fallon. Healthy grain-based African cultures often soaked, ground and fermented their grains before cooking, creating a porridge that's nutritionally superior to unfermented grains. The bran was removed from corn and millet during processing, if possible. Legumes were always soaked prior to cooking.

    These traditional food processing techniques have a very important effect on grains and legumes that brings them closer in line with the "paleolithic" foods our bodies are designed to digest. They reduce or eliminate toxins such as lectins and tannins, greatly reduce anti-nutrients such as phytic acid and protease inhibitors, and improve vitamin content and amino acid profile. Fermentation is particularly effective in this regard. One has to wonder how long it took the first agriculturalists to discover fermentation, and whether poor food preparation techniques or the exclusion of animal foods could account for their poor health.

    I recently discovered a paper that illustrates these principles: "Influence of Germination and Fermentation on Bioaccessibility of Zinc and Iron from Food Grains". It's published by Indian researchers who wanted to study the nutritional qualities of traditional fermented foods. One of the foods they studied was idli, a South Indian steamed "muffin" made from rice and beans. 

    The amount of minerals your digestive system can extract from a food depends in part on the food's phytic acid content. Phytic acid is a molecule that traps certain minerals (iron, zinc, magnesium, calcium), preventing their absorption. Raw grains and legumes contain a lot of it, meaning you can only absorb a fraction of the minerals present in them.

    In this study, soaking had a modest effect on the phytic acid content of the grains and legumes examined. Fermentation, on the other hand, completely broke down the phytic acid in the idli batter, resulting in 71% more bioavailable zinc and 277% more bioavailable iron. It's safe to assume that fermentation also increased the bioavailability of magnesium, calcium and other phytic acid-bound minerals.

    Fermenting the idli batter also completely eliminated its tannin content. Tannins are a class of molecules found in many plants that are sometimes toxins and anti-nutrients. In sufficient quantity, they reduce feed efficiency and growth rate in a variety of species.

    Lectins are another toxin that's frequently mentioned in the paleolithic diet community. They are blamed for everything from digestive problems to autoimmune disease. One of the things people like to overlook in this community is that traditional processing techniques such as soaking, sprouting, fermentation and cooking, greatly reduce or eliminate lectins from grains and legumes. One notable exception is gluten, which survives all but the longest fermentation and is not broken down by cooking.

    Soaking, sprouting, fermenting, grinding and cooking are the techniques by which traditional cultures have been making the most of grain and legume-based diets for thousands of years. We ignore these time-honored traditions at our own peril.
    More aboutHow to Eat Grains

    Brownies Rediscovery

    Diposting oleh good reading

    My boys don't see eye to eye on most things. Brownies are just about the few things that they share a common view. It is also the only thing that both would crave for, constantly. They will be very happy if I were to make brownies for them every other day. Both like their brownies dense, fudgy and most importantly, without any nuts!

    I like brownies too...both making and eating them :) My first ever bake that I did on my own was a tray of brownies, out of a box of premix (without nuts). He was only 2 and half years old when my elder son tried my first homemade brownies, and it has since been his favourite treat of all time.


    Although brownies come in a variety of forms and flavours, they usually come in two textures: fudgy or cake-like. The fudgy type of brownie has got moist and dense interior, and depending on the recipes, can be chewy or gooey. Cake-like brownies are lighter, airy and slightly fluffy.

    So how do you know whether a recipe will give a fudgy or cakey brownie? What I have learned so far is that when a recipe calls for a relatively small amount of flour, chances are it will yield fudgy brownies. The other thing that I have noticed is that fudgy brownies are usually made with liquid fat...either oil or melted butter. Most of the time the chocolates are melted with the butter before the rest of the ingredients are added in. The larger amount of sugar vs flour also contributes to the fudgy-ness of the brownies. Due to the high sugar content, a thin crust would form on the surface. I find fudge brownies so easy to make as I would only require a wooden spoon or a spatula and everything can be done with a saucepan.

    To get chewy brownies, it will require slightly more flour and usually cocoa powder is used in place of melted chocolates. The proteins in the flour and cocoa powder will give the chewy texture and make the brownies less gooey.

    If a brownie recipe calls for creaming the butter with sugar, you will likely get a batch of cake-like brownies. Always use room temperature butter for creaming, that is it has to be soft, but still firm. I read from a cookbook that you can test by pressing your fingertip onto the butter. It should be able to leave an indentation and yet feels firm. You can also gauge by leaving the butter on your counter for 15 - 30mins (depending on the weather) before using it. If the butter is too soft (it will appear very greasy), it will melt even further when beaten, resulting a chewier textured brownie. Chemical leaveners such as baking powder is always used in cake-like brownies to give it a fluffier texture. It is especially important not to over-bake this type of brownies(in fact it applies to all brownies!) otherwise it will dry out and you will end up with a chocolate cake instead. Even after removing from the oven, the brownies will continue to cook for a few minutes from the residual heat. I always under-bake my brownies...ie the toothpick should still have a few moist crumbs cling onto it when you do the doneness test.


    I have always been making fudgy brownies. It was only recently that I first attempted a cake-like brownie. I put it right on top of my to-do list the moment I first saw this Chocolate Walnut Brownies recipe from Grace's Kitchen Corner. The recipe uses much less fat and sugar as compared to my usual brownie recipe, and I wasted no time to make a batch for my kids who have been deprived from brownies for months.

    I followed the recipe quite closely except that I used brown sugar, and after constant reminders, I omitted the nuts. My kind offer to use pistachios was also turned down flatly. I don't have 100% cocoa powder, all I have is a can of Ghirardelli unsweetened cocoa. I guess that's the reason why my brownies were not as dark as Grace's?

    I was a little alarmed after I added in the coffee mixture...the batter started to look almost curdled. But there was really no cause for concern, once the flour and cocoa powder is added in, the batter became smooth and thick.

    It's always a joy to detect the intense flavor and aroma being released into the air when you are baking a tray of brownies. Although lighter in texture, these cake-like brownies are really delicious. I like the tiny bits of chopped chocolates which did not melt away after baking. My kids were happy to have their cravings satisfied, although the younger fellow requested that the next time I should make him 'those brownies with hard crust' which he is more familiar with.


    I prefer fudgy brownies but I would not be able to resist a square of cake-like brownie. So which kind of brownie is your favorite?
    More aboutBrownies Rediscovery

    MINI SUSHI

    Diposting oleh good reading on Rabu, 18 Februari 2009

    miniature sushi cones: so realistic you want to pop them in your mouth!

    no, no, no...you can't eat them with a toothpick! It's fake food!

    Here's some teeny tiny sushi cones for Bebe's dollhouse. The dolls are "Asian"--well, at least the PLAN toy company thinks they look Asian ( I personally think their hair-styles suck!)--and they have been hankering for some sushi...so along with their Pierre Herme Desserts, they're having some appetizing sushi.

    I don't read Japanese so I have no idea what some of the fillings are inside the cones, but from the looks of some, there are fish eggs, fish, veggies, tamago and other such usual goodies. All I can tell is that one has a bamboo theme; another a flower blossom theme (spring?) and from my crappy understanding of asian characters, the other one has something to do with trees (a summer theme?)

    This sushi set was one of those "surprise" sets. The salesgirl told me she couldn't guarantee which set I would get inside the box. There was one set with nigiri sushi, another had crab and another had rolls. I actually wanted the set pictured on the box (the nigiri sushi on the wooden tray) but I guess I'm not wholly disappointed with this set. They're quite cute. The sushi set was much cheaper than the Pierre Herme box I bought. This one clocked in at $8.49 CDN


    For that price, I could have gotten 3 real-sized, edible sushi cones at my local Japanese restaurant. Ah well, like I said: the dolls have to eat! And BTW, I didn't buy anymore fake food nor do I intend to buy more fake food because now the dollhouse larder is full. They've got hand-made (by me!) FIMO fruits, veggies, hot dogs and burgers along with a fridge full of beverages. I just needed to make sure they had sushi and dessert. I mean, that's all one really needs to eat well in my books.
    More aboutMINI SUSHI

    Paleolithic Diet Clinical Trials Part III

    Diposting oleh good reading on Minggu, 15 Februari 2009

    I'm happy to say, it's time for a new installment of the "Paleolithic Diet Clinical Trials" series. The latest study was recently published in the European Journal of Clinical Nutrition by Dr. Anthony Sebastian's group. Dr. Sebastian has collaborated with Drs. Loren Cordain and Boyd Eaton in the past.

    This new trial has some major problems, but I believe it nevertheless adds to the weight of the evidence on "paleolithic"-type diets. The first problem is the lack of a control group. Participants were compared to themselves, before eating a paleolithic diet and after having eaten it for 10 days. Ideally, the paleolithic group would be compared to another group eating their typical diet during the same time period. This would control for effects due to getting poked and prodded in the hospital, weather, etc. The second major problem is the small sample size, only 9 participants. I suspect the investigators had a hard time finding enough funding to conduct a larger study, since the paleolithic approach is still on the fringe of nutrition science.

    I think this study is best viewed as something intermediate between a clinical trial and 9 individual anecdotes.

    Here's the study design: they recruited 9 sedentary, non-obese people with no known health problems. They were 6 males and 3 females, and they represented people of African, European and Asian descent. Participants ate their typical diets for three days while investigators collected baseline data. Then, they were put on a seven-day "ramp-up" diet higher in potassium and fiber, to prepare their digestive systems for the final phase. In the "paleolithic" phase, participants ate a diet of:
    Meat, fish, poultry, eggs, fruits, vegetables, tree nuts, canola oil, mayonnaise, and honey... We excluded dairy products, legumes, cereals, grains, potatoes and products containing potassium chloride...
    Mmm yes, canola oil and mayo were universally relished by hunter-gatherers. They liked to feed their animal fat and organs to the vultures, and slather mayo onto their lean muscle meats. Anyway, the paleo diet was higher in calories, protein and polyunsaturated fat (I assume with a better n-6 : n-3 ratio) than the participants' normal diet. It contained about the same amount of carbohydrate and less saturated fat.

    There are a couple of twists to this study that make it more interesting. One is that the diets were completely controlled. The only food participants ate came from the experimental kitchen, so investigators knew the exact calorie intake and nutrient composition of what everyone was eating.

    The other twist is that the investigators wanted to take weight loss out of the picture. They wanted to know if a paleolithic-style diet is capable of improving health independent of weight loss. So they adjusted participants' calorie intake to make sure they didn't lose weight. This is an interesting point. Investigators had to increase the participants' calorie intake by an average of 329 calories a day just to get them to maintain their weight on the paleo diet. Their bodies naturally wanted to shed fat on the new diet, so they had to be overfed to maintain weight.

    On to the results. Participants, on average, saw large improvements in nearly every meaningful measure of health in just 10 days on the "paleolithic" diet. Remember, these people were supposedly healthy to begin with. Total cholesterol and LDL dropped. Triglycerides decreased by 35%. Fasting insulin plummeted by 68%. HOMA-IR, a measure of insulin resistance, decreased by 72%. Blood pressure decreased and blood vessel distensibility (a measure of vessel elasticity) increased. It's interesting to note that measures of glucose metabolism improved dramatically despite no change in carbohydrate intake. Some of these results were statistically significant, but not all of them. However, the authors note that:
    In all these measured variables, either eight or all nine participants had identical directional responses when switched to paleolithic type diet, that is, near consistently improved status of circulatory, carbohydrate and lipid metabolism/physiology.
    Translation: everyone improved. That's a very meaningful point, because even if the average improves, in many studies a certain percentage of people get worse. This study adds to the evidence that no matter what your gender or genetic background, a diet roughly consistent with our evolutionary past can bring major health benefits. Here's another way to say it: ditching certain modern foods can be immensely beneficial to health, even in people who already appear healthy. This is true regardless of whether or not one loses weight.

    There's one last critical point I'll make about this study. In figure 2, the investigators graphed baseline insulin resistance vs. the change in insulin resistance during the course of the study for each participant. Participants who started with the most insulin resistance saw the largest improvements, while those with little insulin resistance to begin with changed less. There was a linear relationship between baseline IR and the change in IR, with a correlation of R=0.98, p less than 0.0001. In other words, to a highly significant degree, participants who needed the most improvement, saw the most improvement. Every participant with insulin resistance at the beginning of the study ended up with basically normal insulin sensitivity after 10 days. At the end of the study, all participants had a similar degree of insulin sensitivity. This is best illustrated by the standard deviation of the fasting insulin measurement, which decreased 9-fold over the course of the experiment.

    Here's what this suggests: different people have different degrees of susceptibility to the damaging effects of the modern Western diet. This depends on genetic background, age, activity level and many other factors. When you remove damaging foods, peoples' metabolisms normalize, and most of the differences in health that were apparent under adverse conditions disappear. I believe our genetic differences apply more to how we react to adverse conditions than how we function optimally. The fundamental workings of our metabolisms are very similar, having been forged mostly in hunter-gatherer times. We're all the same species after all.

    This study adds to the evidence that modern industrial food is behind our poor health, and that a return to time-honored foodways can have immense benefits for nearly anyone. A paleolithic-style diet may be an effective way to claim your genetic birthright to good health. 

    Paleolithic Diet Clinical Trials
    Paleolithic Diet Clinical Trials Part II
    One Last Thought
    More aboutPaleolithic Diet Clinical Trials Part III

    Banana Blueberry Chiffon Cake

    Diposting oleh good reading on Sabtu, 14 Februari 2009

    I wasn't in the mood to make any bread recently...in fact anything that appears too complicated would be strike out from my to-do list. I sat down one morning and spent some time running through my pile of recipes before I finally decided to make a chiffon cake. Although the steps are pretty straight forward, I always find it very challenging when it comes to making a chiffon cake. I have to keep my fingers crossed all the time...from the beating and folding of the egg whites, the baking temperature and even the unmoulding. I would only heave a sigh of relieve after I cut a slice of the cake. I would never know whether I got a chiffon cake right until I have tasted it.

    I adapted the recipe that was meant for a strawberry chiffon cake and turned it into a banana blueberry flavour by using my homemade banana & blueberry jam. The preparation of the cake was uneventful...as the ingredients are really very simple and the steps easy to follow. The only thing that I am still not sure was when to stop beating the egg whites!


    I was lucky that my oven was under a rather stable condition...the cake rose high and mighty during baking...and even when it was close to the finishing time, it didn't deflate too much. This is indeed a rare occasion, most of the time, my chiffon would start sinking even before I removed it from the oven. I would also attribute it to the recipe, as I find that recipes from this Taiwanese author, 曾美子 are very reliable.


    I allowed the cake to continue to bake for a further 5 mins beyond the recommended time as I have little faith in my oven ;) I was glad I did the right thing as the cake has got this lovely golden brown crust after I unmoulded it.


    The texture of the cake was wonderful...light, cottony and very fluffy. It was an instant hit with the kids. However, I find the cake a tad too sweet, likely due to the sweet jam. I like the chunks of blueberries embedded in the cake though. I'd made a mental note that I'll have to cut down the sugar a little the next time I were to make this again.


    Banana Blueberry Chiffon

    Ingredient A:

    3 egg yolks
    20g caster sugar
    3 tablespoons blueberry jam (or any jam of your choice)
    40ml vegetable oil
    40ml fruit juice (I used cranberry juice)
    70g plain flour
    1/2 teaspoon baking powder


    Ingredient B:
    3 egg whites
    50g caster sugar

    Method:
    1. Sieve flour, baking powder together, set aside.
    2. Separate egg yolks/whites and bring to room temperature. (It is easier to separate eggs when they are cold.)
    3. Place egg yolks in a mixing bowl, add in sugar, and with a manual whisk, whisk till the mixture becomes very sticky and turn pale. (Test by lifting the whisk, once the batter is able to leave a ribbon-like trail behind, you are done. Another way to gauge: your arm should be very tired by now.)
    4. Drizzle in the oil, whisking at the same time till the mixture is well combined. Repeat the same for the fruit juice. Add in the jam, mix well. Sieve over the flour mixture and whisk until flour mixture is fully incorporated into the batter.
    5. In a clean, dry mixing bowl, beat egg whites with an electric mixer until mixture becomes frothy and foamy. Beat in the sugar in 3 separate additions on high speed until  just before stiff peaks form* (after note: after several attempts at baking chiffon cakes, I learned that the whites should be beaten until just before stiff peaks form).
    6. Add the beaten egg white into the egg yolk batter in 3 separate additions, each time folding gently with a spatula until just blended.
    7. Pour batter into a 18cm (7 inch) tube pan (do not grease the pan). Tap the pan lightly on a table top to get rid of any trapped air bubbles in the batter.
    8. Bake in pre-heated oven at 170 degC for 30 ~ 35mins or until the cake surface turns golden brown, and a skewer inserted into the centre comes out clean.
    9. Remove from the oven and invert the pan immediately. Let cool completely before unmould. To remove the cake from the pan, run a thin-bladed knife around the inside of the pan and the center core. Release the cake and run the knife along the base of the pan to remove the cake.
    Recipe adapted from: 曾美子戚风cake零失败
    More aboutBanana Blueberry Chiffon Cake

    RED VELVET VALENTINE'S DAY CUPCAKES

    Diposting oleh good reading on Jumat, 13 Februari 2009

    What better for a kiddies' Valentine's day party than Red Velvet cupcakes? I will forego the traditional cream cheese frosting for a classic buttercream because this will hold up better and pipes beautifully. I wanted huge swirls of buttercream and little candy heart sprinkles.

    I think this will go over well with the kindergarteners because it has all the elements of fun food: it's tiny, sweet, buttery, full of sprinkles and hand-held! Bib took a mini cupcake and scraped off all the frosting (as usual); leaving behind the cake. She didn't even taste the cake; nor was she interested in tasting it. Bebe ate the whole thing and nodded approvingly.

    The recipe for Red Velvet cupcakes makes 24 regular cupcakes, but I wanted mini ones for the kids so I made a batch of 24 mini cupcakes and the rest of the batter filled up the remaining 14 regular-sized cupcake molds for the adults.

    The batter mixes up easily and yes indeed, it uses a full 2 ounces (a huge bottle) of red food colouring. The resulting batter looks quite ghastly, but after it bakes, it deepens into a deep red.

    Red Velvet Cupcakes
    from The Artful Cupcake, by Marcianne Miller
    4 oz (1 stick) unsalted butter or shortening, room temperature (I used butter, of course!)
    1 1/2 cups sugar
    2 eggs
    2 oz red food colouring
    2 T unsweetened cocoa powder
    1/2 t salt
    1 cup buttermilk
    2 1/4 cups all-purpose flour
    1 t vanilla extract
    1 T distilled white vinegar
    1 T baking soda

    1. Preheat oven to 350F and prepare the muffin pans with shortening or nonstick spray. Bake without paper cups to get smoother sides. [I used paper liners]
    2. Cream together the butter/shortening and sugar until well blended and light and fluffy
    3. Add the eggs, one at a time, and blend well after each addition
    4. Make a paste with the food colouring and cocoa. Add the paste to the butter/shortening mixture and blend thoroughly.
    5. Add the salt and buttermilk to the mixture
    6. Add the flour, vanilla, vinegar and baking soda in that order, mixing after each addition
    7. Pour the batter into the pans, filling at least halfway. Bake for 15 to 20 minutes, or until a toothpick inserted comes out clean.
    8. Remove and turn out onto a wire rack to cool.

    I frosted with a 1m Wilton tip using a double batch of this classic buttercream recipe.

    More aboutRED VELVET VALENTINE'S DAY CUPCAKES

    Hearts take three

    Diposting oleh good reading on Kamis, 12 Februari 2009

    I can't go off and enjoy all of the lovey dovey romance I have planned for my family without leaving you with one final style.


    Super simple, remember those twists I did a couple of posts down? Simply do the same thing, only make sure that your final twist goes away from the crown. The secret here is in the parting. Start in the middle of the head and swoop forward in a curve towards the ears. Twist and secure and tie a romantic ribbon to the bottom. I should have grabbed a picture, but she is wearing some of her sisters babylegs that are black and pink stripes with hearts. LOVING the hearts!!!


    Happy Valentine's Day!
    XOXOXO

    Stephanie

    More aboutHearts take three

    WHITE CHOCOLATE VALENTINE'S SUGAR COOKIES

    Diposting oleh good reading on Rabu, 11 Februari 2009

    White Chocolate Valentine's Day Cookies

    Last year I made Valentine's Day cookies and iced them with royal icing. Though royal icing is easy to work with, it's not my favourite for flavour or texture.
    unlike me, you should remember not to stack these cookies as the white chocolate marks up easily...see all the smudges?

    I love chocolate and decided to try my hand at decorating some sugar cookies with tinted white chocolate. I know that chocolate is temperamental and adding water to it is asking for disaster, so I used powdered food colouring. I added red powdered colour and of course it never really turned a deep red. I didn't really care though.

    when in doubt, just drizzle with way more white chocolate! you can't go wrong

    I used parchment cones to pipe and flood the cookies. Initially, everything was going fine...I melted the white chocolate and stirred it until it was completely smooth. I poured the tinted white chocolate into the cones...and then I realized how runny it really was. The chocolate dripped out the tiny point of the cones almost immediately. I worked quickly and realized that piping wasn't going to be so easy after all.
    see all the bumps from the flooding? these are easily remedied by hiding them with more drizzled white chocolate ;P

    I did my best at outlining and then flooding the hearts. The chocolate didn't really flatten out completely and looked a tad bumpy but I didn't want to tempt fate and start messing with it so I left it. I let it dry and then decided I wanted to outline with just plain white chocolate (no tint) and realized I had to come up with a simple design because the chocolate was way runnier than royal icing. I piped some lacy dots; just touching around the edges of the hearts and it seemed okay.
    The flavour of these white chocolate cookies totally rocks compared to royal icing cookies.

    Check out here the MS sugar cookie recipe I used or if you prefer, a totally decadent Vanilla Bean Butter cookie. I used Callebaut White Chocolate for decorating. Only the best for my sweetie pies: Bebe and Bib thought they were delicious!

    More aboutWHITE CHOCOLATE VALENTINE'S SUGAR COOKIES

    Sharing your hearts

    Diposting oleh good reading

    Thank you all so much for the wonderful comments about the hearts. I appreciate each and every one of them.

    I have received some e-mails with pictures of some of the hearts you have come up with. Keep them coming! I want to see how many heart hairstyles I can get on this post!

    This first one is from my friend that I have had since we were sophomores in high school. Our timing on everything is pretty consistent. Weddings were 20 days apart (she was my maid of honor, I her matron), first and last babies were within weeks of each other, we even live four miles apart. I love her. This is her sweet chocolate covered K girl. Look at how cute her hair is! She did the knot the opposite way of normal and proceeded to do a heart with little clips! Brilliant! It gives you so much control over the shape of the heart!


    Thanks Itybtyfrog!

    Next is one I received from Kelly. She tried the heart on her little Jillian. SO cute! Next time I will try the hot pink ribbon! I love the way it makes her hair POP!


    Ammy had a great idea if you don't have a long enough ribbon, just twist the halves into ropes and secure into a ponytail! SO CUTE!


    Perfect timing! My sweet little neighbor Naomi came over to give Tess a Valentine and I snagged a picture of her on my front porch. She looks so cute with the snow melting on her hair. Her mom pulled all of her hair into a ponytail and did an upside down knot and then rope twisted the hair and held it into place with cute little clippies! Thanks Naomi and Kera! (Kera does all sorts of fun things with her daughters hair...you will probably be seeing some more of her ideas regularly on here).


    Check out how cute this one is! Becky did a puffy braid heart with just the top portion of the hair. Darling!


    Cindy has been super busy with her daughter Paige. These are TWO heart hairstyles they have done recently. SO CUTE! Thanks ladies!


    Debbee did a beautiful heart framing her daughters pretty blonde hair. Thanks Debbee!


    Keep those pictures coming ladies! It does my heart good! Blackeyedsue2@gmail.com
    More aboutSharing your hearts

    Miss Tess as Fancy Nancy

    Diposting oleh good reading on Selasa, 10 Februari 2009


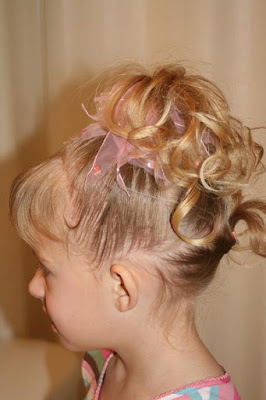
    A while back, Tess was invited to a Fancy Nancy Gala with some of her best girls. She needed to get all dolled up and wanted her hair the way Nancy wears it way up high on her head. We had a problem, the underside of Tess's hair is short...way too short to be pulled up so high without most of it falling down within an hour.

    A concocting we went.

    First I combed most of her hair as high as it would go and I parted it across her hair from earlobe to earlobe. I pulled that section into a ponytail and flipped it into a knot where the hair came out the top instead of the bottom.


    Then I parted another section from the top of the ear to the top of the other ear and pulled it into a ponytail as well. I also picked up the first ponytail and put it in with this new ponytail. Before I secured it with an elastic, I pulled some pieces out. Then I flipped that ponytail into a knot as well.


    I pulled the rest of the hair and this ponytail together. As before, I pulled pieces out of the ponytail and secured the ponytail WAY up high.


    Now, curl all of those pieces that you left hanging down. Just so you know, the bottom pieces when we did it THIS time were a little wonky. The first time I did this, I left longer pieces down, which is what I would advise doing.


    Now, add your elastic tied with a bunch of organza ribbon (or bow or whatever is FANCY in your house) and fluff all of those curls.


    More aboutMiss Tess as Fancy Nancy